Showing posts with label eggs. Show all posts

Friday, May 29, 2015

You say Soy Eggs, I say Tea Eggs

I don't remember when I first tried tea eggs, but I must have been about eight or nine years old.  I remember loving the dark flavor and sipping the savory, vaguely sweet sauce as I ate my egg.  Delicious.

Years later, I still enjoy this treat, and I often look for it when I am in Asian markets.  Although these are sometimes sold as "Soy Eggs", I find that the tea part is really key to flavoring the eggs.  After several not-quite-so-satisfying samples, I decided that it was time for me to make my own.

The recipe is actually very easy, and I'm kicking myself for not making these earlier.  I could have been enjoying this treat on my own years ago!  Honestly the only extra ingredient that I needed to buy was star anise.  Being Asian, I always have soy sauce and black tea on hand, and as someone who cooks, I also always have eggs.  And who doesn't keep sugar in their house?  Aliens, that's who.  So now that we've sorted out our ingredients, let's talk technique.

I started this recipe the same way I make my soft boiled eggs.  Most recipes for tea eggs call for hard boiling the eggs first, but I think that when you hard boil the eggs before you add the flavoring, it's like searing a steak before you salt it.  However, you do need to cook the eggs so that you can crack the shell without raw egg going everywhere, so I compromised and soft boiled my eggs before cracking them.  Feel free to hard boil yours though if it makes your life easier!
After I soft boiled my eggs, I crack them gently all around, and then cooked them again in the soy sauce and tea mixture.  Then I strained out the tea and let the eggs sit for several hours (the longer, the better).  You can see that the eggs in the picture at the top soaked for about 8 hours.  The eggs in the picture below soaked for closer to 24 hours.


Now I'm sure that at this point, you're probably asking me one of two questions:
  1. Why don't I just do the entire cooking process in the tea mixture?  Because grocery store eggs are covered in a thin layer of wax and who-knows-what-else (e.g. bacteria), so I wanted to get rid of that before cooking up a tea mixture that I would later be eating / drinking.
  2. Why don't I just completely peel the eggs and soak them in the tea mixture that way?  Actually, you can absolutely do this.  The only thing is, you won't get a pretty cracked / marbled appearance to your egg, and as we all know, appearance matter.  However, after I snapped these pictures, I actually did peel the eggs completely and let them soak overnight.  They absorbed the flavors beautifully, so if you don't care about aesthetics, this is definitely the way to make delicious tea eggs.
One last comment: you use this recipe to make as many or as few tea eggs as you'd like.  Really, it's all about how many eggs can fit into your pot in one layer (that is the upper limit of how many eggs you should make).  You can store these eggs in the fridge for up to 5 days after making them.  I find that the longer they sit in the tea mixture, the better they get.  After you have eaten all your eggs, you can also reuse the tea mixture.  Just add enough water to mostly cover your eggs.  For every 1 cup of water, add an additional 1-2 teaspoons of soy sauce.


Delicious Tea Eggs Recipe
10 eggs (that's just what fit in my pot)
3 bags of black tea (or 3 tablespoons of loose black tea)
1/4 cup soy sauce (I used Kikkoman)
4-5 pieces of star anise (or 2 whole pieces)
Water
1 teaspoon of sugar (I use raw / turbinado sugar)

To soft boil your eggs: Place them in a pot with just enough tap water to cover them.  Cover the pot with a lid.  Turn on high heat and allow the water to come to a boil.  For me, with a gas stove, this took 7-8 minutes.  As soon as the mixture is at a rolling boil (meaning the most bubbly it's going to get... aka the point when you would normally throw in your pasta), turn off the heat.  Leave the pot alone for 2 minutes.  Do not take it off the stove. Do not touch the lid.  Set a timer and don't touch the pot.
After two minutes, drain the eggs and cover with cold tap water.
Crack the eggs gently using a spoon or your kitchen counter (whatever is convenient).  Remember to be gentle!  These are soft boiled eggs.

To make the tea eggs: Place the soft boiled eggs back into the pot in a single layer.  Add just enough fresh tap water to barely cover the eggs.  Add the tea, soy sauce, star anise, and sugar.  Bring the pot to a boil over medium-high heat (should take about 10-12 minutes).
Once it has started boiling, turn down to low heat.  Remove the tea bags (or strain out the loose tea) and allow the eggs to simmer for roughly 30 minutes.
Turn off the heat.
Tap all the eggs again all over to make sure that they are really cracked.  Allow to soaked for at least 3 hours in the tea/soy mixture.

Note: You should store these cooked eggs in the refrigerator, in the tea mixture.  They will keep for at least 5 days.  I eat these eggs cold, straight from the fridge.  You can remove the eggs about 30 minutes before serving if you prefer them room temperature.

An extra tea liquid will keep in the fridge for about 2 weeks.  It can be reused to make more batches of tea eggs.

Thursday, May 3, 2012

Springtime Comfort Food - Coddled Eggs

Spring has sprung.  You know how I know?  Because asparagus has popped up at the local farmer's market.  I'm starting to see rhubarb in the stands again.  The parsley and chives I'm growing on my windowsill have started sprouting enthusiastically.

I judge the weather not on the skies outside, but on the produce that I can get my hands on.  And I am eagerly counting down until June when the farmer's market right across the street from me returns and I can get my fill of summer peaches and plums, local seasonal honey, and plump, ripe berries.  In the late spring and summer months I can completely understand how some people go on raw food diets.

But for now, it is still a bit chilly some days and rainy on others, and so it's not quite time yet to throw open the windows and let the sun in.


It is during these times of the year when I feel like light comfort food is the best.  It's no longer the weather for soups and stews, but it's not quite time yet for spring salads.  Instead, I say springtime is the time for coddled eggs.

Coddled eggs are lightly cooked eggs with relatively firm whites and runny yolks; they're much like a soft boiled eggs without the issue of the shell.  When you have fresh farm eggs this dish is exceptionally lovely because it allows the flavor of the eggs to really melt in your mouth, but even with standard grocery store eggs I love making this.

Now you can coddle your eggs in one of those teacup/ramekins made specifically for this purpose or you can poach your eggs in simmering water, but I like simplicity and I make meals for one, which means I don't find it worth it to pull out a pot and wait for water to heat up when I just want to cook one egg.  So yes, I use a microwave.

I always feel a little bit guilty when I admit it, but I enjoy eating microwaved eggs.  I know, this sounds awful.  The idea of "microwaved eggs" isn't often associated with good food in people's mind.  But if you do it right, microwaved eggs can be quick, easy, and delicious.  Because I'm not talking about the scrambled, puffed up, styrofoam-looking eggs that you can get when you just haphazardly toss an egg in a bowl and cook the bejesus out of it with radiation.  I'm talking about coddled eggs, gently cooked in milk, flavored with a little bit of garlic, chives, and black pepper, and sprinkled with a bit of black truffle salt.

The methodology is simple: pour about one-third of a cup of milk into a small bowl or ramekin.  Add a dash of garlic powder.  Microwave it for about 45 seconds, until you see it start to bubbling.  Be careful because milk will froth over if you heat it for too long.  Carefully crack an egg into the hot milk (do this at a low level so the egg doesn't splash in).  Microwave for 10 seconds.  Stir the milk around the egg gently.  Microwave for another 10 seconds.  Stir gently.  Microwave for another 10 seconds.  Stir gently.  After about 30-40 seconds of total cook time, your egg whites should start to solidify.  Your cook time will vary based on how powerful your microwave is and how runny you like your yolks.  I generally go with a cook time of about 35 seconds.  Add some freshly ground black pepper, minced chives, and black truffle salt.  Let this sit for one minute.  Trust me; it makes a difference.  Then, enjoy.

This is great with some lightly buttered toast, or on it's own.
It is so simple and easy, and it is the perfect comfort food for spring.


Note: because of the possibility of undercooking, I wouldn't recommend this dish to children, pregnant women, or individuals who are otherwise immunocompromised.  Or you could just make sure to use really fresh eggs.  Talk to a farmer at your local farmer's market!

Monday, November 28, 2011

Baked Egg Breakfast Souffle


With the holidays coming up, an important recipe to have on hand is always a good, fast breakfast item.  As popular as pancakes are for family breakfasts and brunches, I rarely go with them because they should be eaten hot and often the cook ends up staying by the skillet turning out food for everyone and waiting to eat last.  A better recipe is one that allows everyone to eat together and doesn't require the cook to wake up an extra 30 minutes earlier than the rest of the family.  I've used this recipe for several years now, loving it for the fact that it is fast and easy to make and yet seems fancy enough to impress everyone at the table.

These baked egg breakfast souffles are light, airy, and almost ethereal in quality while the yolk provides just the right amount of substance.  Filling without being heavy, this recipe is my absolute favorite for family breakfasts.  We ate it this Thanksgiving morning -- the first meal the whole family had had together since the beginning of August -- and we've had it Christmas morning too, but this works as a great recipe for impressing any visiting guests who have stayed over.

This baked egg souffle takes no more than 5 minutes to throw together and then the oven does all the cooking for you.  Ten minutes later -- just enough time to wash up and change from your pjs into real clothes -- and breakfast is served!


Tuesday, October 18, 2011

Plum Clafoutis

There are two things I almost never say no to: making dessert and eating dessert.  And there was a point last week when I desperately needed to do both.  I was stressed, tired, and having a craving for something sweet.  I also had some beautiful plums from the farmer's market that were perhaps a little too ripe on the counter that I needed to do something with.

Of course, I had to bake something.

But I was busy.  I had no time to make a cake or complicated dessert that involved multiple steps and a lot of time creaming butter or adding ingredients one at a time.  I needed to make something simple.  Something that would satisfy me.  Something that would allow the flavor of my beautiful plums to shine.  And something that would be just as delicious straight from the oven as it would be after some time on the counter or in the fridge.

It was clear what I needed to make: clafoutis.

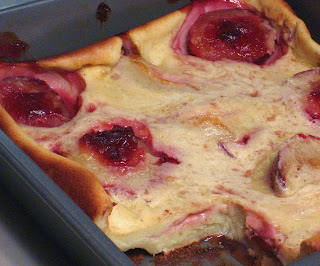
Clafoutis is an eggy, creamy, smooth almost-custard, not-quite-flan, traditional French dessert.  It's the kind of thing grandmothers make for their grandchildren, the kind of thing you can serve at a dinner party to guests, and the kind of go-to recipe you want for cold or rainy days when you want your kitchen to smell like heaven.  It is a breeze to make and it satisfies a sweet tooth without being too much (even if you decide to go for that second piece when you really know you shouldn't).  I've been having a love affair with clafoutis.

It's a breeze to make, it requires no special ingredients, and the recipe is easily tweaked to fit personal preferences.  Really, there is no reason not to make clafoutis.  Even if you're a new baker, you shouldn't be intimidated; this recipe is very forgiving if you make mistakes!

I happen to like my clafoutis with a fairly high cream-to-milk ratio, but don't let this throw you off.  If you don't have much cream on hand, you can still make clafoutis!  I just happen to keep heavy cream in my fridge for my coffee in the morning (this may sound unhealthy, but I like the richness it provides).  But for those who don't want to buy heavy cream or who are more health conscious, you can see my note below in the recipe.
And I personally love the aroma of rum in my baked goods and I adore how the flavor melds with baked fruit and vanilla, but if you don't have rum handy, you can easily replace it with another liquor (something with an appropriate flavor, such as brandy) or you can leave it out entirely.  If you don't like cinnamon, you can omit it.  I actually forgot to add vanilla once, and the flavor of the rum and plums was so wonderful, you couldn't even tell something was missing.

This plum clafoutis is delicious served warm or cold.  I can actually never resist digging into it as soon as it comes out of the oven, golden, puffed up, and pipping hot.  A slightly burned tongued is a small price to pay for the instant gratification of the silky, creamy, slightly tart but simultaneously sweet taste of a clafoutis that has just finished baking.  And when this clafoutis cools, its nuances are somehow revealed and you can better appreciate the subtle notes, the beautiful way the rum melds with the vanilla to complement the earthier, muted jam tones of the plum.  With its simple elegance, this clafoutis is not just any dessert, and it satisfies a craving much deeper than just a desire for something sweet.


Saturday, March 5, 2011

Fresh from the Farm


I recently learned about a family-run farm close to my house that raises goats, lambs, pigs, and chickens for meat.  Called Fox Hollow Farms, they are all about natural farming, and so their animals are pasture raised and aren't given any antibiotics or hormones.  I really liked the idea of this because supporting local farming and eating hormone-free meat are two very important things to me, and I told my mom that I wanted us to go visit the farm.

Since my sister and I moved out, my parents have eaten mostly vegetarian for health reasons and because of the fact that we, as a family, have issues with the hormone and antibiotic-laced meat that is sold at supermarkets.  Both my dad and I are carnivores at heart, however, so I've been wanting to find a source of high quality, local meat, rather than having to rely on Pennsylvania or Virginia farms or eat semi-vegetarian.  My mom was very interested in the idea of grass-fed, pasture-raised animals, and so this morning we decided to stop by the farm to visit.

It was a further drive than expected and we actually had to call to confirm their location, but it was absolutely worth it.  The store is connected to the family house, and visitors are invited to come to the back to see the animals.  We could see the goats grazing, and few of the chickens came over to say hello.  My mom swears that one of the sheep made a connection with her and would have smiled if it had the facial muscles to do so.

After a brief chat with one of the owners, we went back in.  We loved the set-up and how the animals were clearly happy and healthy and had plenty of space to grow.  We decided to buy a carton of goat milk, a dozen fresh eggs (taken in just this morning!), a broiler chicken, some frozen cubed goat meat, and a rack of spare ribs (pork).  It wasn't cheap, but we were both excited about our purchases when we left.  We actually ended up sitting in the car and sharing the goat milk immediately because we were hungry and wanted to try it.  It was delicious.  Creamy, flavorful, and vaguely sweet.  I've had goat milk before, but it was a very processed supermarket brand and I wasn't very fond of it.  This milk I thoroughly enjoyed.  A tall cold glass of this could cheer me up on even the worst of days.  That's what good food does for a person.


When we got home, we decided to soft boil a few of the eggs for lunch and have them with some green beans and black truffle salt.  I didn't want to do anything too dramatic with them since they were so fresh; I just wanted their natural flavor to shine.  And oh, they were delicious.  Plus, the eggs were gorgeous.  Look at that light speckling of white on the outside!  Nature is beautiful.


Best of all was that fact that I actually spent the entire day in the kitchen with my mom.  It's rare that I have time to come home and just immerse myself in food (not literally, of course; I never do that), but today was one of those days.  I mixed and baked and tasted and improvised and made various sweet items while my mom cooked goat curry, baked the ribs, marinated the chicken, and made some savory sticky rice.  My dad played French music in the background and worked close-by.  Then, after a wonderful dinner and cleaning up, we watched Food Inc. on my computer.  It was a perfect day.

I will be posting the recipes for what I've made in the upcoming days and weeks, but I just thought I'd throw you a bone now: there is a candy recipe, a cupcake recipe, and a frosting recipe waiting for you.  Future plans do include a cheesecake and some chocolate goodies.

It is good to be home.

Saturday, November 20, 2010

Versatile Vegetable Tart (aka dressed up Tarte à L'Oignon)


I often read blogs that post Thanksgiving recipes before Thanksgiving and I sometimes wonder how they do that. I haven't cooked yet for Thanksgiving, how could I have a recipe with photos to share with you? But I suppose it would be somewhat useless for you, as the reader, to hear about my Thanksgiving recipes after the fact. So here is a recipe for you to consider which I made last year: a beautifully versatile vegetable tart.

I do love quiches and savory tarts and the like, but I often find that their recipes include a rather ridiculous amount of heavy cream or large amounts of cheese. I don't particularly like rich foods--I tend to find that the fatty taste gets tiring after a couple bites and you never feel good afterwards, which ruins the experience of eating--and I have a slight cheese aversion, so when I found this recipe, I was quite pleased.

This vegetable tart recipe, besides being fairly healthy and cheese-free, is also incredibly versatile. It is originally a tarte à l'oignon, but it can be made with zucchini, bell peppers, ham, or anything else you find appropriate (probably not tomatoes or pumpkin though, since their textures aren't quite right).

I actually made this with a friend last year for a potluck with his friends. Being a somewhat stereotypical male, he was not the kitchen/cooking type, so I picked this to make together since it was easy and unintimidating. Granted, I still ended up doing the majority of the work, but I think it's a good recipe if you're looking for something easy to make with a partner who is unexperienced in the cooking or baking arena.


Versatile Vegetable Tart
Adapted from André Soltner, The New York Times (October 20, 2003)

Pre-baked tart shell/pie crust
1-2 tbsp olive oil
2 cloves garlic, minced
1 large yellow onion, peeled and thinly sliced
1 small zuchinni, sliced (can substitute with other savory items*)
1 large egg
½ cup heavy cream
dash of salt
dash of freshly ground pepper
pinch of ground nutmeg

Preheat oven to 375°F.

Heat the oil in a skillet over medium heat, and sauté the onions and garlic with salt and pepper, stirring regularly, until they are lightly golden, caramelized, and tender (10-15 minutes). Pour off into a separate bowl. Sauté the zuchinni in the same skillet until just tender, add more oil if needed. Remove the skillet from the heat.

In a small bowl, beat the egg and cream together. Add a dash of salt and pepper and a pinch of nutmeg. Add this to the onions and garlic mixture, stirring to combine.

Fill the tart shell with the onion, garlic, and egg mixture. Top with a few slices of zucchini, arranged in some decorative pattern.

Bake tart for 25 minutes, or until the filling is golden brown and set. Serve hot, warm, or even cold.

*Other ideas: bell peppers, ham, cooked bacon, shredded chicken, shredded turkey (a great use of Thanksgiving leftovers!)

Thursday, October 7, 2010

Scrambled Eggs Two Ways

I think I may be a convert.

I think I might slowly be turning into an olive person. I don't mean that I have any plans to go out and buy myself a jar to snack on or that now I'm primping my salads with olives or that I have a sudden urge to serve my alcohol with the skewered green ellipsoids, but I have made a discovery. Scrambled eggs with olive paste.

It is just as good as I thought it would be. Actually I do think this could probably be improved, but I wanted so much to share this with you, I didn't want to bother with a secondary experiment since I don't have the ingredients right now.

So what did I do? I had planned to caramelized some onions and then add some garlic, the Paté di Olive di Gaeta, and some diced tomatoes, but when I went to get onions, they did not look good, and neither did the tomatoes, and I didn't want to use poor quality ingredients, so instead I went with some nice cauliflower.

I cooked the cauliflower in a pat of butter first, to get some color on it, and then I added a tiny bit of minced garlic. I would have added more, but hey, this was like date #15 or something between me and the olive paste, and I like her (of course it's a her, she's complicated, but she just wants to be loved) and so I let her take center stage, hence why I added over ½ tsp of the olive paste (that stuff is strong). Then I cracked in 2 eggs and scrambled!

I don't think I'd entertain with this, because 1) you don't entertain with scrambled eggs and 2) the olive paste does turn the whole thing a weird grey-green color that honestly, I associate with mold (e.g. the kind that grows on spaghetti sauce if you leave it in the fridge for too long), but it did taste good.

The natural sweetness of the cauliflower and the egg goes really well with the olive paste, and the saltiness of the olives means that you really don't need to add more than a very light sprinkling of salt. (I was, of course, very liberal with my black pepper.)

In order to use up some random leftovers (namely, petite peas), and also because I loved cooked eggs where the yolk stay whole and is kind of runny, I made what I call a "fake scramble." This is a technique I've perfected over time, and what it involves is cracking an egg into a hot pan as if you would make it sunny-side up, but then tilting the pan and carefully using a spoon to separate the whites from the yolk. You definitely need a good non-stick skillet for this, to prevent the yolk from getting stuck to the pan and breaking when you're nudging the yolk around and getting it away from the whites.

The reason why I like this is because I love my yolk runny, but I'm not a huge fan of undercooked whites. This techniques allows me to scrambled my whites while cooking my yolk just enough so that it is definitely properly cooked, but still deliciously soupy on the inside (although upon re-reading, "deliciously soupy" doesn't sound as delicious as what I was trying to express). Then I can break my yolk over my scrambled whites and have a delicious meal that is mine all mine.

So for the second scramble, I gently sautéed some petite peas in butter with minced garlic, and then added in one egg. Once my fake scramble was done, I combined a little bit of the scrambled egg #1 mix with the scrambled egg #2 mix, and then I pierced my lovely yolk, and tada! A lovely lunch. Really, you should try it some time. The blanket of creamy yolk over the peas, cauliflowers, and scrambled eggs with olive paste was delicious.


NOTE: For those of you who are so inclined to try this Olive Paste and don't have random friends who bring things back for you from Europe, I can tell you that this would be really easy to make, if you can just get your hands on some good quality black olives. The olive paste is really just olives, specifically Olive di Gaeta (varietà itrana), extra virgin olive oil, and a bit of salt. Get all your ingredients, throw the olives (pitted!) into a food processor, give it a whir, and slowly add in the olive oil till it is the consistency you like. Then salt according to your taste. Easy!

Wednesday, September 29, 2010

A Microwave Lesson (In Lieu of a Recipe)

I haven't had any new recipes to offer you lately because life has been so hectic I haven't been doing much cooking. I've been on a pasta and pesto diet for many of the past few days--not homemade, gasp!--and today, for lack of time, I actually microwaved an egg instead of taking out a pan and cooking it properly.

I know there are probably a million chefs just rolling over in their graves because of what I just wrote, but hey, I never called myself a gourmet. I like food, and I like good tasting, good quality food, but I'm a busy person and I don't always have the time to carefully plan out a well-cooked meal.

Now I'm not advocating the use of a microwave to cook eggs--I still like the traditional stove method best--but I can tell you that if you've got a nice egg and an empty belly and not enough time to deal with pots, pans, spatulas, dish washing, etc., you can still have your egg (and eat it too).

What does this require? Well generally it requires a soup, stew, or pasta with accompanying sauce. I've done it with all of the above and gotten great results, with cooked whites and a slightly runny yolk... yum.

Here's how to do it:
Heat your food in a container (tupperware, bowl, etc) till warm. On my microwave, I'll heat a bowl of pasta and pesto for about 1 min. Then crack your egg into your food. If it's a stew/pasta, cover the egg a bit with some of the sauce/liquid. Heat for 15-20 second. Take out of the microwave and mix gently (don't break the yolk!). Heat for another 15-20 seconds. Mix. Heat for 15-20 more seconds. Your whites should be set and your egg yolk should be cooked, but slightly runny. Eat and enjoy!

See? You can get a beautiful egg from the microwave.

Tuesday, September 7, 2010

Of Chicken and Frozen Eggs

So this weekend I took a trip to New York City as I return with a recipe and a story.

NYC was great, as it normally is, because the city is fun to explore and perfect for walking. Plus, as I was staying in my friend's apartment, we got the chance to cook together. We did have some difficulties, however, as her stove top/range is unlabeled, and it took us a rather long time to realize that the dials were set counterclockwise instead of the normal clockwise direction. This meant that turning right was the highest setting and turning left was the lowest. Very odd. Of course, once we figured this our, we figured the oven would work the same way (there is no temperature setting for the oven), but it actually works clockwise. All very counter-intuitive.

Anyhow, back to the food:

We went out in the afternoon and bought some chicken and then cooked that for dinner along with carrots and pasta. The chicken recipe is what I will share with you now. It's actually fairly easy and adjustable, so play with it as you see fit.

We bought a small package of chicken with only two drumsticks and thighs, but we used a large amount of marinade because the liquid was actually fantastic for dressing the pasta.

Because I hadn't thought about sharing this "recipe" (more like marinade) with you, the pictures are not great, so I apologize.


We marinaded the chicken in roughly 1 cup of milk and 2 tsp of lemon juice (we used the kind that comes in that plastic squeeze bottle shaped like a lemon). As usual, I eyeballed everything. Then, we added about 1 tsp of dried oregano, ½ tsp garlic powder, 1 ½ tsp salt (we used kosher salt, but I'm sure table salt will work fine), and 1 tsp ground black pepper. We let the chicken sit in this marinade in a tupperware container for about 20 minutes at room temperature. The marinade almost completely covered the chicken. This is what you want. It helps if you move the chicken around occasionally. We also pierced the meat/skin with a fork to help the flavor really get into the meat.

The flavors would probably meld and deepen more if you let the chicken marinate for longer, but I wouldn't leave it in the marinade for any longer than 1 hour really, since we're talking about a marinade that involves acid and protein at room temperature.

Our attempts at browning the chicken in butter and olive oil did not really succeed because so much liquid came out of the chicken (the marinade), but with some patience and a little bit of time in the oven, the chicken eventually cooked all the way through. I would probably recommend that if you want to try this, you should shake the chicken out a bit or put it on a rack to allow the liquid to drip down before browning it. After the chicken has browned on both sides, add about half of the marinade liquid and allow the chicken to cook through. This may require both stove time and oven time, depend on what cut of chicken you use.

After the chicken is done cooking, remove it from the pan, and use the cooking liquid to dress the pasta. The end result was incredibly fragrant. The lemon and oregano melded together beautifully, and the the chicken was great. Served with a side of carrots and a nice cider, it was a lovely fall (well, technically, end-of-summer) meal. I'm sorry I don't have more pictures.

But I do have the story I promised you:

Upon my return from New York City, I open my fridge to find some food, and decided that a sunny side up egg sounded lovely. But when I took out my carton of eggs, three of the eggs had long jagged looking cracks running all the way down their sides. I was horrified. What happened??? I always check my eggs for cracks before putting them in the fridge.

What was even more odd was that despite the long, jagged cracks, none of the eggs had leaked. I picked up an egg. It was ice cold. Had my refrigerator somehow frozen my eggs? I checked the fridge and yes, I had left it on the coldest setting, and yes, my milk was frozen. Lovely.

Of course, I'm not one to let food go to waste, so I had to check to see if the eggs were salvageable. I carefully tapped the shell against the counter and peeled an egg. It was surprisingly easy. Easier even than peeling a hard boiled egg. And after all the shell was peeled off, I found myself with an oddly beautifully little gem:


Sunny side up eggs were definitely out of the question, and I didn't know if letting the other eggs defrost slowly in the fridge was a good idea--especially considering the size of the cracks in some of them (remember: water expands when it freezes), so I decided that some nice scrambled eggs were in order. I peeled all of the eggs and after beating them up a little bit with my fork, I added them to a hot skillet, with a pat of butter.

The eggs cooked up a little oddly, especially since different parts defrosted at different times, but after taking the scrambled eggs off the stove, I took a deep breath and put a forkful in my mouth. It tasted just fine. With a little salt and pepper, you couldn't even tell that the egg had previously been frozen!

So now you know that frozen eggs can indeed be eaten with no awful side effects, because I have lived to tell the tale. And that's the story of chicken and frozen eggs.