Showing posts with label recipe. Show all posts

Thursday, September 1, 2022

Sugar Free Banana Bread / Cake for Baby Birthday

 So, uh, I don't think I ever really mentioned this specifically, but I have a child now.  And to my surprise, trying to keep [processed] sugar out of a baby's diet is not that easy.  Everything has sugar.  Even when you google "baby birthday cake" or "smash cake" or "sugar free baby cake" the options are limited and often have "alternative" sugars like stevia or monkfruit or whatever other nonsense.

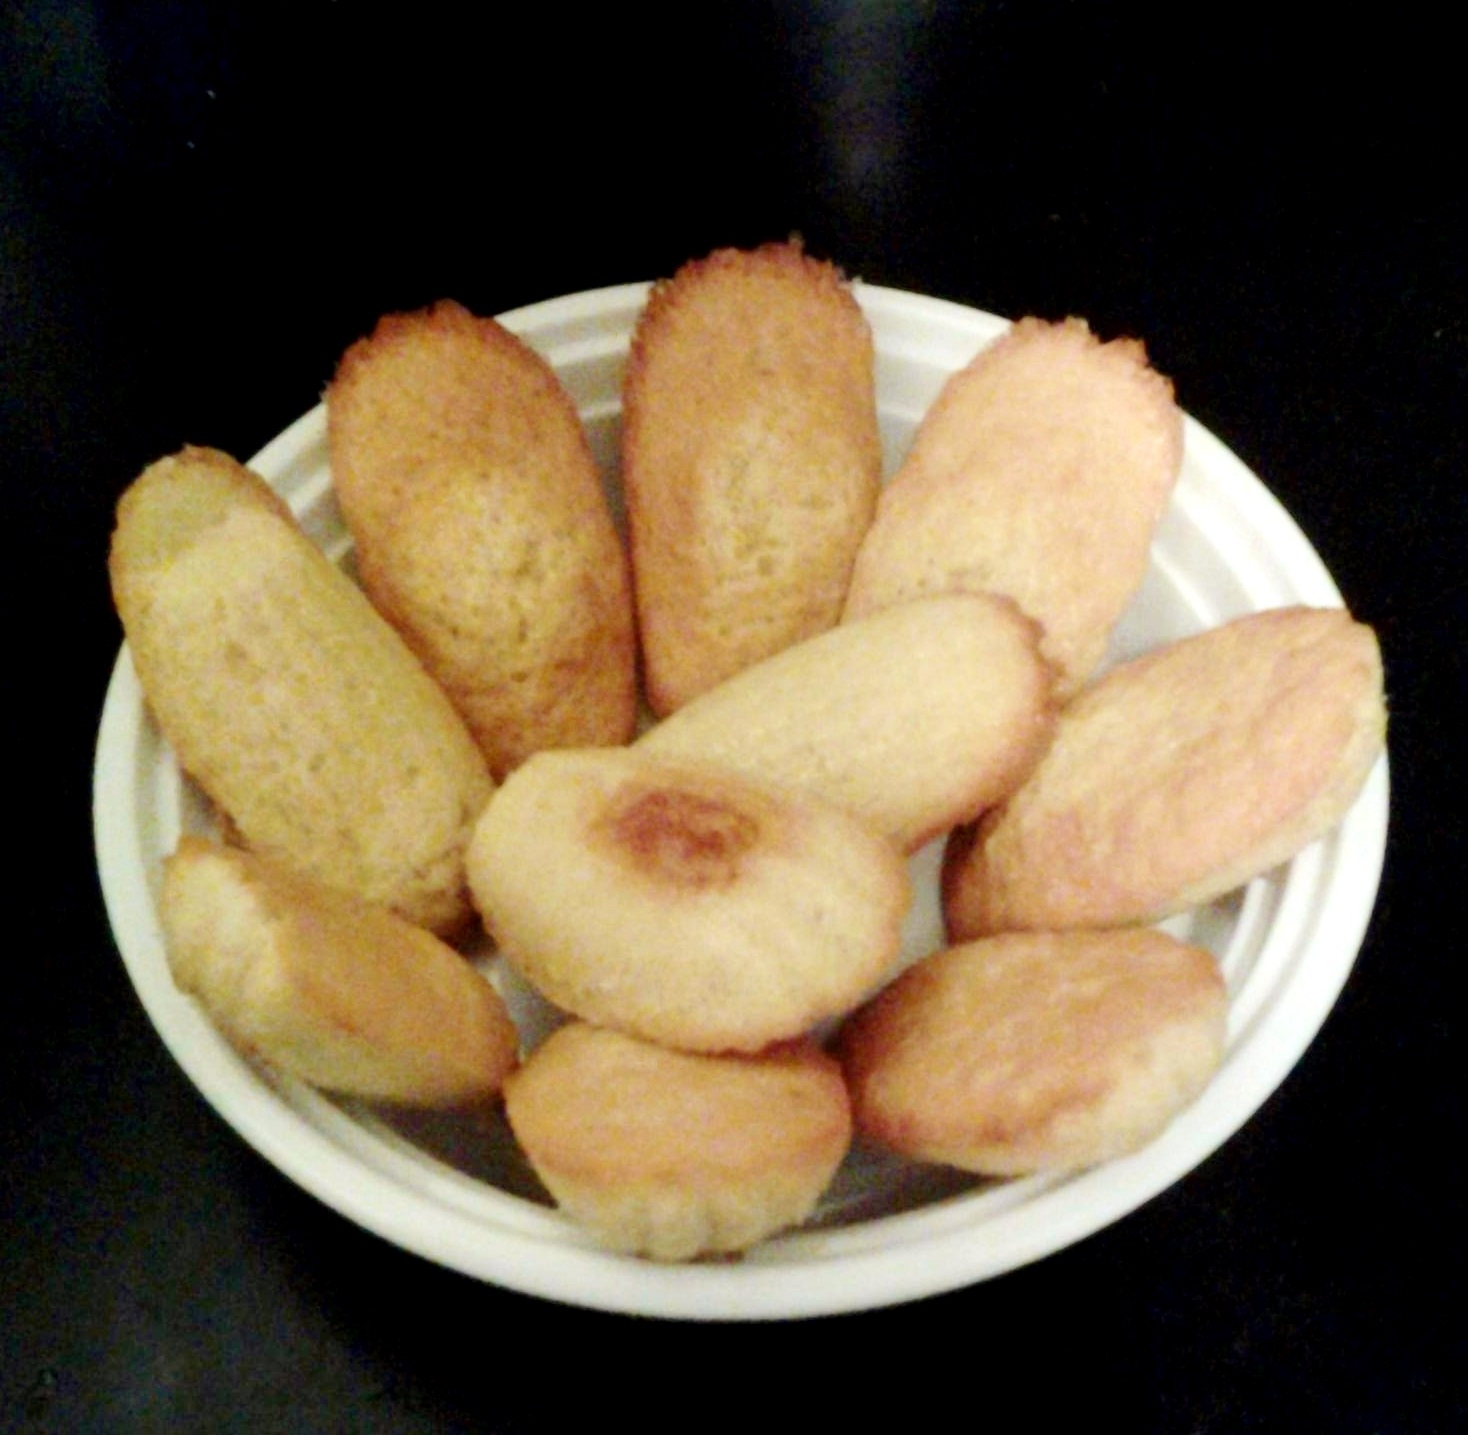
With some research, I found a recipe that worked for us and that has since been approved by multiple babies AND adults.  Because I'm very anti-waste when it comes to food, I did not like the idea of giving my baby a huge cake and having a bunch of crumbs / messy food that wouldn't actually get eaten.  So I decided to make the "cake" in a mini muffin tin.  It actually works great, because you can cut off the muffin top and build a tiny little layer cake with "frosting."

This recipe made 24 mini muffins and a little 4 inch round cake (which was actually just me trying to use the extra batter).  It keeps well at room temperature for at least 2 days, but probably longer.  In the fridge, it's great for at least 3 days.  I can't speak beyond that because the cake is all gone now.

You'll find that this recipe is basically a banana bread.  If you double the recipe, it should be enough for at least two 6 inch rounds if you want to make a bigger layer cake (according to the original recipe I edited).

You'll notice that this has a good amount of "flavoring agents," aka lemon, cinnamon and vanilla.  That's because I believe that baby food should be flavorful and tasty, and that exposing our kids to strong flavors early in their life helps develop their palates and hopefully result in less picky eaters.  

You can also just use this recipe as an easy way to use ripe bananas when you have no eggs and want to avoid sugar.

Banana Baby Cake

  • 2 very ripe bananas (it doesn't matter what size, baking science is not that exact)
  • 3 tablespoons butter*
  • 1/4 cup full fat oatmilk (what I used) OR breastmilk, regular milk, etc.
  • 1 teaspoon lemon juice
  • 1.5 teaspoons vanilla extract
  • Full 3/4 cup flour (I did not sift or level, just scooped)
  • 1/2 tsp baking powder
  • 1/4 tsp baking soda
  • 1 teaspoon cinnamon

Preheat oven to 350F.  Melt your butter in the microwave.  Get a pastry brush and butter your mini muffin tin.  Use the remaining butter for the cake; it should be more than 2 tablespoons.  Alternatively you can use spray oils for your pan and just melt 2.5 tablespoons of butter for your cake.

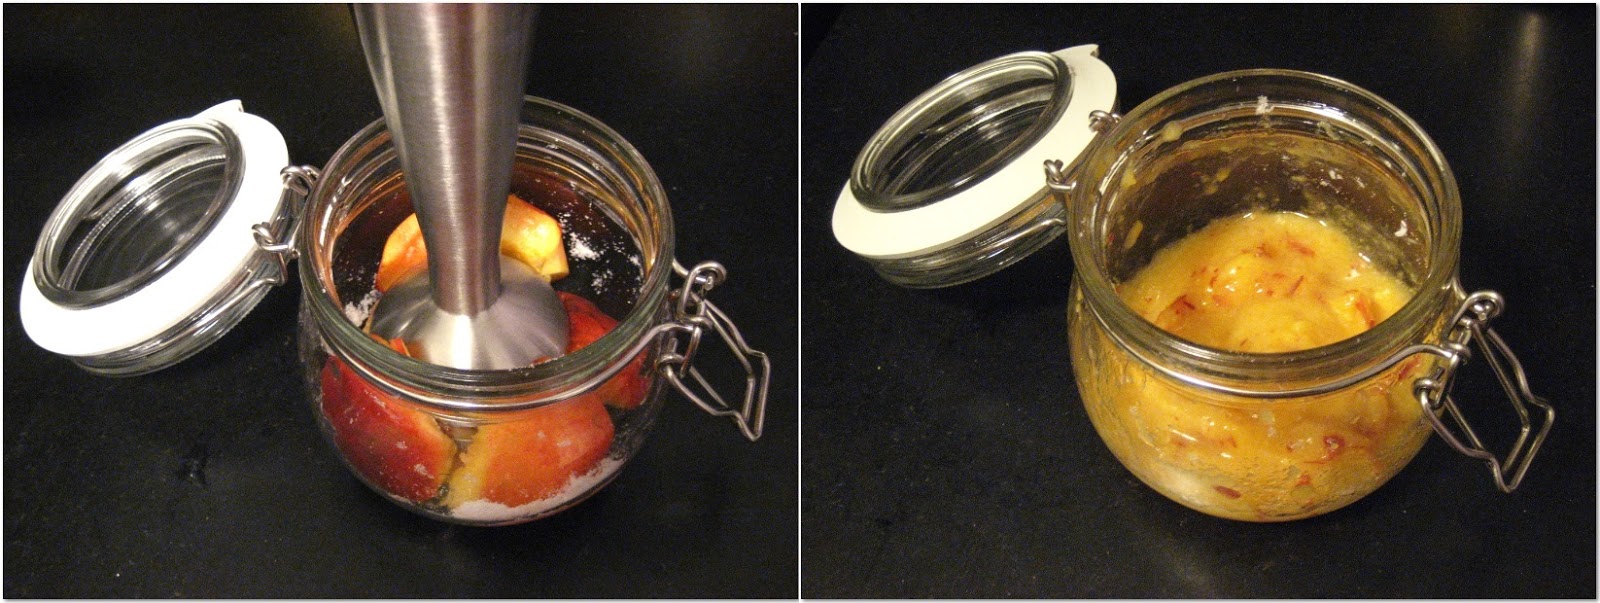
Combine all the first 5 ingredients in a food processor / blender: peeled bananas, butter, milk, lemon juice, and vanilla.  Blend / puree until it's all smooth.

Pause and add your flour, baking powder, baking soda, and cinnamon.  Take a little spatula and stir gently so that the flour is a little bit incorporated.  This just stops it from exploding / splattering all over the place when you turn on your blender.  You can skip if you don't mind flour particles in the air.

Pulse blend several times until all combined and smooth.  People are overly anxious about overmixing. You won't; it's fine.

Pour into the mini muffin tin.  I recommend using a standard cookie dough scoop for this.  One scoop per well.

Bake at 350 minutes for 10 minutes.  If you're making a 4 or 6 inch cake, bake for 20-25 minutes.

Allow the cake to cool before frosting.


PB Frosting 

Combine 2-4 tsp of natural creamy peanut butter with a roughly equivalent amount of heavy whipping cream, slowly. Once the mixture is smooth, add 1 cup of cold heaving whipping cream and beat on high till stiff peaks form.  Keep refrigerated until use.

I prefer using a no salt, no sugar, no other additives peanut butter, but you can obviously use anything.  You could also just use plain whipped cream as frosting, no PB, but I like using common allergens because exposure helps decrease incidence of allergies.  Also you can easily replace with sunbutter or almond butter.

Friday, August 14, 2020

A return for cherries

 It's been a really long time.  Blogging was put on the far back burner while I dealt with residency and life, and then I wasn't sure if I would or should ever come back to it.  But the truth it, I was still coming back to this blog all the time to find my favorite recipes, and then I've been developing new ones and struggling to keep track of them on post it notes and emails to myself.

So in a fit of optimism, I will write about this new recipe I tried today, in the hopes that it will be a keeper.

We hit the end of Rainier cherry season in Washington, which always makes me sad because those cherries are one of my favorite things at the farmer's market.  The last week I bought them, I knew it was the end of the season, but I persisted in buying several pounds anyway.  Because of Covid19, I could not painstakingly hand select each and every cherry, so I got many many bruised ones that just weren't that tasty.  They were also getting to that too sweet point that they hit at the end of the season, where the tart balance just isn't there any more.  I'd never baked or cooked or done anything with Rainiers except eat them fresh, so I had to do my research.

It turns out, very few people recommend cooking or baking with them.  Because, as I said, they are too sweet.  You need a little acid to make things taste balanced.

However, I did find some recipes for cocktail cherries aka Maraschino cherries (or Luxardo cherries) which immediately piqued my interest because I. Love. Cocktail. Cherries.  I'm not a big cocktail drinker because alcohol makes me feel both sleepy and also vaguely ill, but I'll happily sip a Shirley Temple.  And so I went and bought myself a cherry pitter (did you know they make cherry pitters that pit six cherries at a time???  I'm not normally a kitchen gadget person so this blew my mind a little), cooked up a little syrup, and now I'm sitting at the counter admiring some jars of cherries marinading in sweetness.

A lot of recipes I read depended on a lot of alcohol or, conversely, no flavoring at all except water and sugar.  I decided I didn't like either of these options, so I looked for cherry juice.  I couldn't find any at Costco, and because there's a pandemic going on currently, I decided I wasn't going to another store and so pomegranate juice would work just fine.

Here's what I threw together:

- 1 cup pomegranate juice (100% juice, no sugar added)

- 2/3 cup granulated sugar

- pinch of salt

- small piece of a cinnamon stick (I smash whole sticks with my mortar and pestle)

 - two allspice berries

- 1/2 teaspoon almond extract

- a dozen cherry pits, smashed (again, with my mortar and pestle)

- splash of leftover red wine that's been in my fridge for 2-3 weeks, maybe 2 shots?

- splash of bourbon, less than 1/2 a shot

- splash of honey drinking vinegar because I am fancy and have that in my fridge (it was a gift from a friend)

- 1/2 cup of water

I had already pitted about a pound of Rainier cherries.  Some of the pits I saved to cook, since that's apparently a technique (says Google and other food blogs) for infusing some bitter almond flavor.  Possibly from the cyanide.  It's fine though, just take some extra Vitamin B12*.

I let all that come to a boil and then simmer for about 10 minutes,** then I poured it through a strainer, and into my glass jars filled with cherries.  And tada!  They were gorgeous in their redness.  Also, I did have some extra juice, which I tasted and it is delicious.  What a way to come back to blogging.


*This is not medical advice.

**According to my brief internet research, at least 50% of the alcohol is gone.

***No pictures because this is always what has made me so slow about posting.

Tuesday, April 4, 2017

Chicken Liver Pâté or "French Peanut Butter"

When I was growing up, my family would very frequently go to France for the summer.  It was my birthday, the French independence Day, and my maternal grandparents and maternal aunt and cousin lived in Paris.  My parents and my sister and I would rent a room or two in the apartment building where my grandparents lived, and we spent glorious days together exploring the city and eating good food.  There is still - and always will be - a fond place in my heart for the neighborhood of Marie des Lilas.
There was a butcher shop that sold pâté de foie and jambon and we often got this to eat with a baguette; the perfect breakfast.  (There was also milk and yogurt, jam and nutella, and always my mother's favorite President butter.)  For years, as a child it never occurred to me to think about what pâté was; I just thought it as the French version of peanut butter.  It was creamy, it was savory, it was delicious on bread.  Later on, I learned that it was essentially pureed liver.  Now, my mother had always seasoned and baked the gizzard and liver that came with whole chicken when we bought it, and I had no problem eating them when I knew what they were, so this mystery now solved didn't phase me in the least.  The only thing I learned that day was that I really loved eating liver.
I still have a tremendous fondness for pâté - I can rarely resist ordering it when it appears on restaurant menu - and eating it has a sweet sort of nostalgia for me in that it reminds me of my second home; the place of my childhood summers.
For some reason, it took me years to dare to try making it own my own.  I had some strange belief that it would be difficult, or that I would somehow be terrible at making it.  Instead, I've found it to be ridiculously simple and delicious when made at home.  The hardest thing is finding the chicken livers.


Chicken Liver Pate
1 large shallot
7-8 tablespoons of butter
approximately 1lb chicken livers, preferably organic if you can get them
1/4 teaspoon flaky salt
75ml (or roughly 1/3 cup) sweet white wine
dash of allspice
tiny splash of balsamic
freshly ground black pepper

Heat a knob of butter in a frying pan over a medium heat. Add the shallot and saute until caramelized.
Add the remainder of the butter and livers and cook until the livers are just starting to brown on the outside.
Add the wine, salt, allspice, balsamic, and black pepper and lower the heat to simmer lightly until the livers are no longer bloody when pressed.  They should still be pink on the inside.  If you're a little worried about undercooked livers (as I often am), cooking them a little longer doesn't change much.
Tip into a food processor OR use your handy dandy immersion blender to blend the livers.
Optional: (And I'll be honest, I really don't think it's worth the extra time or things to wash because it doesn't change that much of the texture)  Pass through a sieve into a serving dish.
Level out the top of the puree and chill for at least an hour before serving.  Delicious with fig jam or onion compote.

Friday, February 10, 2017

Homemade Masala Chai


"Everyone needs a place. It shouldn’t be inside of someone else." -Richard Siken


The greatest thing that I have learned in these months here in Seattle is how to take care of myself.  I have always been good about what I considered the basic things, like feeding myself, making sure I got enough fruits and vegetables, and dressing appropriately for the weather, but I often assumed that happiness and mental health were things that just happened.  That I should just let the cards fall where they may.  But in the past year, with all the tremendous changes that have happened, I have come to realize how simple and important it is to create joy, to foster a sense of peace and gratitude inside my own heart.

I left a very different life on the East coast and I followed a job.  I moved to Seattle chasing an idea, a hope that this place that I fell in love with years ago at twenty-one might become home, that it might give me something that I hadn't found anywhere else.  In settling down here, I discovered the beauty of gratitude.  I feel lucky to have been fortunate enough to find work among people that I respect and trust, to make friends that care about me and support me, to fall in love again with someone who prioritizes our partnership like it is his second nature.  My gratitude fuels my joy in the simple things.  Being so content enables me to give love wholeheartedly, to my patients, to my friends, to my family, to my partner.

Food is love - I say it now like I've said it so many times before - and as I feed my body, so too have I learned to feed my soul and to care for my heart.  On days when I am stressed or down, I do something about it.  I call the people I love; I drive to the ocean; I build a fire and lie down in front of its glow and read; I drink tea in bed and listen to music.

There's something to be said about the appeal of a hot drink on grey day, whether that grey is coming from the weather or a state of mind.  For those times, I love masala chai.  When I was growing up, my mom used to buy "Chai Tea" bags which she steeped in the microwave and then served to us with vanilla ice cream.  It was one of my favorite treats.  In college, one of my good friends was Indian, and I went home with her one weekend.  Her mother made tea for us on the stove, with real spices.  I loved how the smell of it permeated the house, and the cups, made with generous amounts of honey and milk, were a delicious breakfast treat.

I learned then that "chai" is actually just a word for tea, so "chai tea" is fairly redundant.  Most of the time, what Westerners are referring to is masala chai.  It's easy to make, and I adore having a big pot on the stove and letting the smell of the warm spices fill my apartment.  Though recipes vary, this is one that I love for its spice and heat.

Masala Chai
5 cups water
2-3" fresh ginger
3 inches of cinnamon bark, broken
1/2 teaspoon peppercorns (I generally use black, but I've read that white may be better)
3 star anise, broken
15 cloves (about 1 teaspoon)
1/2 teaspoon ground cardamom
5 black tea bags (or 5 teaspoons loose black tea)
1/3 cup raw sugar or honey
1 cup milk (I've used skim and 1%, but it's your choice)
optional: additional milk for serving

In a medium pot, bring the water, ginger, cinnamon, peppercorns, star anise, cloves, and cardamom to a boil.
Once boiling, add the tea bags and steep for 10 minutes.
Remove the tea bags.
Bring the mixture to a boil again.  Once boiling, lower the heat.  Add the sugar or honey and 1 cup milk and simmer on low heat for 25-30 minutes.
Strain out the spices.
Serve with more milk if desired.
You can store your chai tea in the fridge for several weeks.  It reheats well.

Thursday, September 8, 2016

Plum Torte Cake Buckle Heavenly Thing

Write this recipe down on a little sheet of paper and put it on your fridge.  That's what I did.  After I had already made it twice.  Now, that I've made it five times in the span of about two weeks, I can pat myself on the back and say, smart girl, you are.  This is one for the books.
This recipe - which I didn't even know was famous, but apparently, it is - is worth the hype, even if you didn't know it had any hype.  The plums (or peaches, or nectarines... really this is the easiest recipe ever to alter) bake up into these delicious sweet/tart pockets of jam that perfectly complement the light, fragrant, moist crumb of this cake.  Torte.  Buckle.  Heavenly thing, whatever you want to call it.


I can't say much more about this because I have already rambled on too much, but it's so easy to make, you might as well make two, because you're turning on your oven anyway, and you'll regret it if you don't.  Slice the extra one and store the slices in little ziplock baggies in the freezer.  Pull out anytime you need a snack or want to add an extra treat to someone's (aka your own, if you live alone, like I do) lunch.
Bring this to any birthday party, baby shower, picnic, or dinner party and it'll be a hit.  It's easy, elegant, and requires no additional side servings of whipped cream, coffee, or ice cream to be a hit.  But what the heck, it doesn't hurt to add them if you want.

As if typical of me, I took no pictures of this cake any of the times I made it, and now I am sitting in my apartment without enough eggs to make another cake in order to take a picture of it, so the lovely illustration above was done by yours truly for the benefit of whoever is reading this.  I hope you appreciate my artist representation.  If you want pretty pictures of this torte, go here, which the blog where I actually got the idea to make this recipe.


Heavenly Plum Thing
barely adapted from Marian Burro's recipe

½ cup salted butter, softened
¾ cup sugar
2 large eggs
1 teaspoon vanilla extract (optional, but why leave it out?)
1 cup unbleached all purpose flour, sifted
1 teaspoon baking powder
Pinch of salt  (not optional)
3-5 large plums or peaches, or 8-12 small plums (really just use your judgement here, this isn't hard)
1-2 teaspoons raw sugar (optional)
1 teaspoon cinnamon

Preheat your oven to 350F.
Cream the sugar and butter in a bowl.
Add the salt, eggs, and vanilla and beat well.  Let it all get very fluffy.
Add the flour and baking powder, and mix well.
Spoon the batter into a spring form of 8 or 9 inches.
Place the plum halves skin side up on top of the batter. Sprinkle lightly with cinnamon and raw sugar.
Bake one hour, approximately.
Remove and cool.
Eat.  Enjoy.
Repeat as many times as necessary.

Saturday, June 20, 2015

Zuni Cafe Chicken - an adaptation of the method


I have heard many stories about the Zuni Cafe Chicken: it's the best chicken in the world, it will change your life, you will never think of chicken the same way, etc., etc.  I honestly didn't understand the hype.  I mean, I enjoy chicken, but how amazing can a roast chicken be that it has an almost cult-like following?  Still, since I don't think I'll be traveling to San Francisco anytime soon and the recipe has been shared in the restaurant's cookbook and in the NY Times, I figured I could try it for myself.

Of course, I immediately ran into problems.  The original recipe calls for a small chicken, specifically, one between 2¾ to 3½ pounds.  I looked very hard for one in my grocery store, but the smallest I was able to find was a 4½ pound bird.  That's more than 25% bigger than what the Zuni Cafe recipe calls for.  I did my research, and it seems that the size of the bird is pretty integral to their technique.  A small bird can be roasted at a higher heat because there is a high skin/fat to meat ratio and the meat will also cook through in a shorter period of time.  So you need to do some changes to the recipe if you have a heavy chicken.

As for how things actually turned out?  Well, one of my friends scarfed down his plate in about 5 minutes, if that tells you anything.  In fact, he barely waited for me to finish carving the meat for my plate before he was digging in.  It was understandable though; the delicious smell of the roasting chicken had been permeating through the apartment long before the meal was ready, so we were both salivating.  The skin was blistered and golden; the meat was very moist and succulent; the pan juices were so good, they made me wish I had some bread to mop it all up.  It was a delicious dinner.  I would say this recipe is well worth the trouble.


Some basic tips if you have a large bird:
  1. Season for at least 2 days before serving.  I imagine 3 days would be even better, but I honestly wasn't patient enough to do this; I did 48 hours.
  2. Take a small knife and carefully, from the inside of the bird, slash the chicken breast on each side at its thickest point.
  3. Bring to room temperature before roasting.  This means taking it out of the fridge up to 8 hours in advance.
  4. Preheat your pan in the oven so that it gets really hot.
  5. Open the oven as little as possible.  Your bird needs all the heat it can get.
  6. Roast for about 40-45 minutes before flipping for the first time.  You want to see the top beginning to brown, not just yellow.
  7. Roast for about 20-25 minutes before flipping the second time.  You want to see the top really caramelized.
  8. Decrease your oven temperature down to 400F to finish cooking the bird, for another 10 minutes or more, as needed.  Use a meat thermometer to check for an internal temperature of 165F or stick a paring knife into the thickest part of the breast to see that the juices run clear.
The original recipe also calls for slashing the bird after it is done roasting to allow all the juices to drip out; these are used to make a sauce / gravy that is served alongside the roast chicken.  Now I like gravy as much as the average person, but I am strongly against draining meat of its juices.  So I didn't do this.  You'll have pan juices as it is, I think those are plenty.

One last recommendation?  Roast some vegetables at the same time as you roast your bird.  I particularly like roasted onions and carrots, which I tossed with some garlic and thyme.  The veggies only need to roast for about 35 minutes, given the high temperature.


Zuni Cafe Chicken
adapted from The New York Times

1 chicken, preferably under 4lbs, but if not, refer to my notes about larger birds
4 sprigs fresh thyme (or rosemary or sage if you prefer)
3 cloves of garlic, minced (my addition)
sea salt (about ¾ tsp per pound)

Remove and discard the lump of fat inside the chicken. Rinse the chicken and pat very dry (a wet chicken will spend too much time steaming before it begins to turn golden brown).
Season the chicken 1 to 3 days before serving.  Slide a finger under the skin of each of the breasts, making 2 little pockets, then use a fingertip to gently loosen a pocket of skin on the outside of the thickest section of each thigh. Push an herb sprig and some garlic into each of the 4 pockets.  Using about 3/4 teaspoon sea salt per pound of chicken, season the chicken liberally all over with salt and the pepper. Sprinkle a little of the salt just inside the cavity and on the backbone. Twist and tuck the wing tips behind the shoulders. Cover loosely and refrigerate.
Take the chicken out of the refrigerator at least 2 hours (but no more than 8 hours) before baking so that it comes to room temperature.

When you’re ready to cook the chicken, heat the oven to 475F.
Choose a shallow flameproof roasting pan or dish barely larger than the chicken, or use a 10-inch skillet with an all-metal handle (I used a skillet). Preheat the pan in the oven.
Wipe the chicken dry and set it breast side up in the pan (I actually set mine breast side down, whoops!). The chicken should sizzle.
Place in the center of the oven and watch for it to start sizzling and browning within 20 minutes. If it doesn’t, raise the temperature progressively until it does. Depending on your oven and the size of your bird, you may need to adjust the heat to as high as 500 degrees or as low as 450 degrees during roasting to brown the chicken properly. I went up to 500F on my gas oven.  Because my pan is only oven safe up to 500F, I did not continue to raise the temperature, even though I didn't really see browning until about 25 minutes.  According to the Zuni Cafe recipe, the skin should blister (this did not happen for me), but if the chicken begins to char, or the fat is smoking, reduce the temperature by 25 degrees.
After about 30 minutes (40 minute if you have a larger bird), turn the bird over; you want to see that the top side has browned and caramelized at least a little.
Roast for another 10 to 25 minutes, depending on size.  (At this point, I began to really see my bird crisping beautifully)
Flip once more to re-crisp the breast skin, another 5 to 10 minutes.  
If your bird is large, decrease the oven temperature to 400F and roast for an additional 10-20 minutes. Use a meat thermometer to check the internal temperature of the bird; it should be around 165F.  Or, use a knife to test the deep part of the breast meat; the juices should run clear.
Allow to rest for at least 10 minutes before cutting into it.  This allow the delicious juices to redistribute.  (It also prevents you from burning your tongue.)
You will still have some pan juices, which I high recommend you serve with the chicken so that you can dip your meat, veggies, bread, etc. into it.  Food this good should not be wasted!

Sunday, May 10, 2015

Creme Brulee French Toast - my new favorite


This is it.  You've found it: the only thing you'll want to eat for breakfast, brunch, lunch, and dessert for now on.  I mean, who doesn't like French toast?  Now add on the textural component of a crunchy caramelized crust and this dish is irresistible.

I made this crème brûlée French toast (aka The Best French Toast Ever) for the first time when I had some girlfriends coming over for brunch.  I've never actually hosted a brunch before, so I wanted something that was easy, but also really delicious.  Step in New York Times.  A few months ago when I was browsing their food section, I stumbled across this recipe, which I immediately printed out.

The New York Times recipe was for oven baked French toast with a brown sugar caramelized crust.  I typically make my French toast in a skillet (as I assume most people do) and it ends up being very annoying because you can't make French toast and eat it at the same time.  This obviously makes serving breakfast or brunch to other people somewhat difficult if you're trying to do a big batch.  The idea of baking French toast is not unheard of, but it was the caramel that really sold me.

Now, of course, if you  know me, you know that I never follow any recipes, so I had to make some edits.
First of all, the original recipe calls for challah bread.  I don't know about you, but I never have challah bread just sitting around at home.  I also don't know if my regular grocery store sells it all the time.  But I do know that they sell croissants.  In fact, in the "clearance" section of the bakery, where they place items that are close to expiration, there is almost always a container of croissants, which are perfect for making French toast (especially since French toast is best made with bread that is slightly stale).  I also find that croissants make much more attractive French toast and their texture is perfect for absorbing the "custard mixture" while still retaining some wonderful pastry flakiness.
Secondly, I didn't soak my French toast overnight.  To me, this is overkill since I prefer my French toast "crunchier" or "flakier."  Feel free to soak yours though, if you're partial to the bread pudding texture.  I only did a quick dip into the egg mixture and that was enough.
Third, the original recipe had a ridiculous amount of liquid: 6 eggs and 3 cups of liquid.  Too much milk, too much cream, and way too many eggs.  What for?  You just end up throwing away most of it!  It's wasteful!  So I seriously cut back on the liquids.  I wanted to use every single drop.  I also didn't use cream, since this is already a pretty indulgent dish; we don't really need that extra fat content.
Lastly, and most importantly, I wanted the sugar to truly become caramel; I didn't just want wet sugar.  So I actually place the baking sheet with the brown sugar in the oven first, so that the sugar starts to melt and caramelize, and then I put the French toast slices on top to bake.

The result was stupendous.  The croissants were flaky on top, crunchy with on the bottom from the caramelized sugar, and luxuriously decadent in the middle.  Served with some bacon (which can be baked in the oven at the same time!) and some berries, this is a great way to entertain any breakfast guests... or, just you and your partner!


Crème Brûlée French Toast  aka 
The Best French Toast Ever
3/4 cup pack dark brown sugar
3 tablespoons salted butter, cut into small pieces
4 croissants  (alternatively, use 8 one-inch thick slices of challah bread)
2 large eggs
1 cup milk (I use non-fat)
2 tablespoons dark rum  (optional, if you're serving this to children)
1 teaspoon vanilla extract
generous dash of kosher salt
pinch of cinnamon (optional)
pinch of nutmeg (optional)


1.  Cut the croissants in half like you're about to make a sandwich.

2.  Spread the brown sugar evenly over a 9x13 baking pan and add the piece of salted butter on top.

3.  Preheat the oven to 350F.  Put the baking pans with the sugar mixture into the oven on the middle rack.  This will start to cook the sugar while you prepare the rest of your ingredients.
*The whole process of making the "custard" and dipping the slices should take you less than 5 minutes.  If it takes you longer than that, don't put your tray into the oven until later; you don't want the sugar to burn.

4.  In a large bowl, whisk together the eggs, milk, rum, vanilla, salt, nutmeg, and cinnamon.  

5.  Dip each slice of croissant / bread into the custard mix, making sure to coat both sides evenly.  Make a pile of dipped slices on a plate.

6.  Once all of the slices have been dipped, take the baking pan out of the oven.  The brown sugar and butter should be melted and bubbling hot.

7.  Arrange the croissant / bread slices onto the baking tray, on top of the caramelized sugar.  I placed the cut-sides of  my croissants face-down (in the picture above, the slices were flipped, after they finished baking).

8.  Bake at 350F for 20-25 minutes or until the tops are golden brown.

9.  Serve while hot, with the caramelized brown sugar side up.  Goes well with berries, sliced peaches, and bacon.

10.  Bask in the glory of crème brûlée French toast.

Sunday, February 22, 2015

The Best Chocolate Chip Cookies

Sometimes, I get really carried away with cravings for specific foods.  Prime example: chocolate chip cookies.  Who doesn't like chocolate chip cookies?  And I know that everyone always talks about the "best" chocolate chip cookie, whether it best the New York Time's best chocolate chip cookie recipe, of the "world's best" chocolate chip cookie recipe, or maybe some famous chef's version of the best chocolate chip cookie recipe.  But for me, this one is it.
It's taken some tweaking and some little edits here and there, but this is now my constant go-to recipe, my version of "the best chocolate chip cookies."

A lot of the measurements are by weight, and seriously if you don't have a digital scale, stop reading this sentence right now and go get one.  Okay, are we all good?  Because digital scales will change the way you bake.  First of all, measuring your ingredients by weight is far more accurate and allows for more precision in baking.  One hundred grams of flour will always be one hundred grams.  But one cup of flour on one day might be more than the next day, depending on how well sifted the flour is.  So please, use a digital scale.  Also, less things to wash!  Just place a bowl on your scale, zero it, add one ingredient, zero it, add your next ingredient, and so one.  Easy peasy.

Now about the actual recipe: it has molasses and brown sugar which makes it chewy, it has just enough depth from whole wheat flour (although you can ditch this if you want and just use the all purpose), it has just enough salt, and these cookies taste delicious even when you bake them the same day that you make the dough.  I stopped believing that was true of cookies for a while.  I was making batches and batches of cookies, baking half immediately and half on the next day and all the recipes I tested did not taste as good if you didn't chill the dough.  This recipe though?  These cookies are delicious.  And, these cookies taste good hot.  Because honestly, I've found that most cookies don't taste good hot.  Most cookies are way better after you've let them cool.  These babies are tasty all the time.  Basically, I'm repeating myself over and over again.  This recipe is wonderful and these cookies are delightful.

More importantly, I've included in the recipe below, all of the notes that I put into my recipe when sending it to my sister who has previously messed up break-and-bake chocolate chip cookies.  If you follow all my notes in the recipe, you will be golden.  You will look like a pro.  So be kind to yourself and your loved one: make these.  Bake these.  Eat these.  You will find happiness.


Monday, May 19, 2014

Making Madeleines

On our first Christmas together, B. got me two trays of madeleine molds.  I didn't use them right away because I had never made madeleines before, but after about 6 months of disuse, he told me he would make me a batch.  I'm normally the baker in the house, so it was nice to be spoiled by him.  We used the recipe that had come with the trays, but it wasn't quite what we were looking for.
This week, my husband decided it was time to make madeleines again, so I looked up a recipe online.  One of the first recipes I stumbled upon was Dorie Greenspan.  Her recipes are quite popular among food bloggers and her pictures showed a very big "hump" -- which is very desirable in madeleines.  We had not had humps in our last homemade batch, so I was interested in trying her recipe and her method.

We were quite pleased with our results, and when B. brought some to his office to share with co-workers, he said they enjoyed them as well.  This recipe is not at all intimidating, and I'm glad we decided to try it.  I have no idea why it took me so long to get around to making them, but homemade madeleines are a lovely treat.


I did, of course, alter a few things.  First, the original recipe calls for lemon zest.  I never buy lemons because they're more expensive than limes.  These past few months, however, we've been eating a lot of oranges, and whenever I buy particularly beautiful citrus from a good source, I will wash them, zest them, and freeze the zest for uses in baking, cocktails (mocktails for me; cocktails for B.), cooking, and so on.  So I had orange zest on hand.  I eyeballed out what I thought was the appropriate amount for one orange (though really, this depends on how well you zest your fruit... on cooking shows when I watch them zest, I am appalled by how much they waste).  I thought the orange flavor was beautiful and I will be repeating the recipe this way from now on.

Second, I used a hand blender (also called an immersion or stick blender) to really chop up the zest and mix it with the sugar and egg.  I thought this helped infuse the flavor, but it's probably not a necessary step.

Third, I highly recommend browning the butter.  This will add a complexity to the flavor, and since you have to melt the butter anyhow, you might as well do it on the stove and make the house smell like magic.

Fourth, I would also highly recommend sifting your dry ingredients into your wet ingredients to prevent lumps.  I did not do this the first time and I think the texture is far better when you sift.  This will also help you in that you won't have to stir as much.

Fifth, this is a nit picky thing, but I always mix salt with sugar in my wet ingredients, as I think this makes the distribution of flavor better than having salt be with the dry ingredients.  I never know why recipe writers always insist on coupling salt with baking soda/baking powder and flour.  Also, I always used salted butter.  Yes it adds more salt, but I think it also adds more flavor.  I almost never use unsalted butter and if I do, it's normally because I ran out of the salted kind.

Saturday, May 10, 2014

Love and Lobster Risotto

B. and I moved into our apartment together in July.  It was my first time living with someone (and I mean someone whose relationship with me was not "female roommate"), and it was our first time being truly together on the same side of the ocean.
I remember two meals from then.  The first was the meal we had the day we moved into our apartment.  We had signed the final papers at 10:30am, spent all day moving things out of my storage unit and into our new apartment in the pouring rain, and then we'd gone to Ikea to buy a bed.  At this point it was past 7pm and we hadn't eaten all day.  We went to the food court and I had the famous Ikea meatballs for the first time.  I was sweaty, ravenous, and exhausted.  The food tasted amazing.
The second meal was a few weeks later.  The furniture we'd bought had just been delivered so we finally had a dining room table.  We'd been so caught up in all the business of settling into our new place, I wanted us to have a date night at home.  At luck would have it, lobster was on sale at the local market.  We bought two, broiled them, and ate them with steamed broccoli, corn, and rice.  It was lovely.  But this wasn't the meal I want to tell you about.  It was the remnants from that meal that made a second meal.
I'm one of those strange people who likes the "torso" of the lobster more than the tail, and so we had tail meat leftover, plus all the lobster shells and little tiny leg pieces.  There is so much meat you can't get out of shellfish and it occurred to me that this might be an excellent stock base.  I combined some shallot, a little bit of onion, and all the lobster shell pieces into our new pressure cooker and 20 minutes later, out came an incredible seafood stock.  And while flipping through our pressure cooker manual, I saw a recipe for pressure-cooker risotto.  It was too perfect of an idea to let pass.


The seafood stock (with a little help from some butter and rice) became lobster risotto, studded with the pieces of tail meat.  It was heavenly.  That meal we didn't talked much, but we scraped our bowls clean, and afterwards we leaned back in our chairs and smiled at each other in the comfortable quiet of our home.
B. and I have eaten many, many meals together since then - some great, some ordinary; some memorable, some forgettable - but this meal and this memory I hold dear.

I will note that the picture I have doesn't look like the typically texture of risotto - not quiet creamy enough - but this is actually because we had a little problem with our pressure cooking allowing steam to "leak" out, which meant that we lost quite a bit of the cooking liquid.  The first batch of "risotto" was therefore more akin to stove-top cooked rice, but the second batch I made (which, of course, there is no picture of) was perfect, and the risotto had the creamy, dreamy, perfect texture.


Saturday, August 24, 2013

Mini Cherry Pies


Confession: I have never truly made pie dough from scratch.

I love to bake, but my thing is normally cookies and cakes.  If I made pies or tarts, normally I just buy a grocery store crust.  Is that terrible?

But then the other week I saw a recipe for mini cherry pies that you can make in a muffin/cupcake tin!  The recipe, which, of course, involved making pie dough from scratch, seemed delicious, and sweet dark red cherries happened to be sale at the grocery store, so it seemed like good time to try the recipe and to try my hand at making pie dough from scratch.  Also, miniaturizing desserts is a great way to make them easy to pack for lunch or even to entertain (no messy cutting and serving)!


I know cherry season is ending soon, but this recipe is perfect, even with frozen cherries or end-of-season bruised/not-so-beautiful fruit.  The cherry, vanilla, and rum flavors are classic, and this pie dough was a cinch to make and tasty just as flaky and perfect as I hoped it would.


Wednesday, August 14, 2013

Fresh Peach and Ginger Beer Cocktail

I am currently sitting in my apartment drinking a cocktail.

I rarely ever drink cocktails because, quite frankly, I don't like the taste of most alcohol.  This is very prohibitive to my drinking.  I love looking at the drink descriptions at bars and speakeasies, but most of the time when I actually taste the drinks, the vodka/tequila/rum/whatever hard liquor it is ends up making me wish I ordered a virgin.  Of course most of the time if you go to a bar and try to do that you'll get weird looks.  So this is why sometimes I find it's nice to just fix myself a drink to enjoy at home, while reading a book on the very comfortable couch that B. and I bought.

Recently I've actually been making a lot of these "mocktails" all thanks to the beauty that is my new hand held blender (also called a stick blender or an immersion blender).  Given all the wonderful fresh fruit that is in season right now, I've taken to making drinks built on various fruit purees.  While it's easy to use sparkling water as a base, I also love using ginger beer.
Ginger beer, generally, is not actually alcoholic, and in my experience, tends to just be synonymous with ginger ale (though I'm sure some experts out there will know be able to explain the difference, I shall not feign knowledge of things when I am truly ignorant).  I find that the slight "bite" and spiciness of ginger beer works as a great addition to all fruit bases.  One of the "mocktails" I've made is a lovely plum, ground cinnamon, honey, and ginger beer drink, which I think would be a great pre-dinner drink in the fall (maybe even before Thanksgiving?).  A summer-flavored mocktail I made had raspberries, lime juice, cane sugar, and ginger beer.  This was lovely, although I did discover an unpleasantly large amount of raspberry seeds in the bottom of my glass, which I did not consume.

This particular cocktail that I am sharing today combines the classic flavors of peach, vanilla, and ginger, which to me are all the things that should be in a good peach pie or cobbler.  It captures the quintessential elements of summer in a glass.  If you are so inclined to add alcohol to this, vanilla rum (aka vanilla extract in the making; see my previous post) also is a delicious addition.


In order to make this, if you don't have an immersion blender, go ahead and pull out the big guns; you can easily double this recipe and make it in a normal blender.  If you don't use all of the fruit puree, you can save it in the fridge for another day; it will keep for at least 3 days.

 Fresh Peach and Ginger Beer Cocktail
makes two martini glasses (easily scaled up as needed)

2 peaches
1-2 teaspoons vanilla sugar or regular granulated sugar
splash of vanilla rum or regular rum (recommended: Bicardi Gold Dark Rum)
1 bottle of ginger beer (recommended: Reed's Extra Ginger Brew)

The ratios here are just suggestions.  I like my cocktails a little fruitier than some.  The amount of sugar you need to use will also depend on how ripe and sweet your peaches are.
For each of my cocktails, I used about 3 tablespoons of peach puree (that's a little less than one peach), 1/2 tsp of vanilla sugar, 1 tsp of rum.  Shake this in a cocktail shaker with some ice and then pour into a martini glass.  Top with ginger beer.

Optional: if you're feeling extra fancy, omit the sugar in the cocktail and instead just rim your cocktail glasses with some sugar.  (If you don't know how, this video is short and great.)


Now that you have this idea though, you can run wild with it!  Combine any fruit purees of your choosing, some ginger beer (or sparkling water), and an alcohol of your choice for a great cocktail.
And, before I go, I'll share one last little trick with you: if you want an easy way to clean your stick blender without risking cutting yourself, just fill a cup with some warm water and a few drops of dish soap and blend for 30 seconds, then rinse.  Presto!
Happy Wednesday!

Wednesday, August 7, 2013

Homemade Vanilla Extract with Rum

Recently, I decided to make homemade vanilla extract.  Because I enjoy baking, I can easily go through about 5-7 bottles of vanilla extract a year.  Each 2 ounce bottle costs about $3 in the grocery store.  When you think about what you're buying and how easy it is to make, the cost of store-bought extract is actually pretty high.  Also store-bought vanilla extract doesn't always provide as much flavor as I would like.  Sometimes I increase the vanilla in my recipes because I just want a deeper flavor profile.  If anything I just said rings true for you, homemade is the way to go.

So how do you go about making vanilla extract?  The process is fairly simple.  I should have done it a long time ago.  All you need is some vanilla beans, a glass container, and some rum/vodka/bourbon.

I actually decided to make homemade vanilla extract because I found a very nicely priced vanilla bean supplier online who had good ratings.  The company (who is not paying me for this and does not know I am writing this) is called Beanilla.  The are predominantly a vanilla bean supplier, though they also sell other products.  Currently, they are having a sale on Madagascar Bourbon Vanilla beans; you can buy a package of ten for $8.95, which, if you've ever looked at buying beans in stores or online you know is a great deal.  They also have free shipping right now for vanilla beans and they have a coupon code SAVE10, which gives you 10% off your order.  When I saw this, I had to order them.

I got my beans in the mail, vacuum packed, within a few days.  And they even slipped me an extra bean (accidentally, I assume), so that I got 11 vanilla beans for $8.05!  When I opened the package the beans were fragrant, moist, and very plump.  They were the highest quality vanilla beans I'd worked with in a long time.  The last time I bought vanilla beans at a grocery store in France, they were rather dried out when I worked with them.

The "recipe" for vanilla extract is very simple.  You just need to take your beans and split them in half.  Using a knife to scrape the seeds (actually called "caviar") from the pods and then add both vanilla seeds and the scraped out pods to a large glass container.  I used a bottle that I bought from Ikea for $3.99 (I'm listing the price here because again, this is far cheaper than anything you can find online).
 
Now everyone has different ratios that they suggest.  After much reading, I decided that I would use seven vanilla beans (one of which I scraped out the caviar from and used in a cherry compote), and about 4 cups of dark rum.  Many people use a much higher vanilla bean to alcohol ratio, but they also expect their extract to be done in about 6 weeks.  I am fine with letting my extract takes it time to reach maturity.  Also, vanilla beans continue add flavor as long as they are submerged in alcohol, so many people re-use their beans to continue making extract.  I simply started with a more dilute mixture and will wait longer, probably 9 weeks, before testing my solution.  This is what it looks like for now.


One handle of Bicardi Dark Rum (1.75L) cost me $21.39.  I used about half of this, so let's say that was $11.  The 11 pack of vanilla beans cost me $8.05.  I used 7 of them, so that comes to about $5.  The bottle that I bought was $4.  The total cost of making this thus is roughly $20.
That may seem a bit high for now, but again, I can continue to use these beans to make more vanilla extract afterwards.  Also, I used high quality ingredients that will impart far more flavor into my baked goods later on.  I imagine this could also be used to make some pretty amazing mixed drinks.
Hopefully this project turns out well!  I'll give updates as more time passes.

Wednesday, June 19, 2013

Vietnamese Food that isn't Pho - A recipe for Bánh Bao

Being a non-Caucasian in America, I often get asked what my ethnic background is.  When the question is phrased as something less vague than "Where are you from?" (which normally prompts me to respond, "Maryland," because I now live in New Jersey and I am surrounded by the Jersey born-and-bred), I tell people that I am Vietnamese.  More than 90% of the time, the response I get is, "Oh my god, I love pho!"  The last word is always pronounced "foe."

I find it very weird.  Can you imagine if you told someone you have an Italian background the person replied, "Cool, I love spaghetti!"  It's strange.  There is so much more to my heritage and cultural background than phở, which, by the way, is pronounced "fuh-ah?"  Because Vietnamese is a tonal language, "phở" is pronounced like a question and as if the word had two syllables.

So instead of sharing a recipe for a Vietnamese noodle soup like bun bo hue or pho, today I want to share with you how to make Bánh Bao.  First, of course, I will tell you what it is.  Think of a stereotypical pork bun you get in Chinatown.  Now imagine that the doughy outside is fluffy and light and the inside has ground pork, eggs, and vegetables.  That is a bánh bao.

When I was growing up, this could serve as my breakfast, a snack food, or lunch.  The filling can be changed to be whatever you want, but the standard bánh bao has a piece of hard boiled egg, some ground meat, and normally lap xuong (also known as Chinese sausage, for all you non-Asians).  I love them.  They're nutritious and healthy, and once you make them, you can store them in the freezer for at least a month, steaming them in the microwave for about a minute whenever you want to eat one.

While writing this recipe, I was faced, yet again, with the problem of transcribing a Vietnamese family recipe into a recipe that others can follow.  On one hand, I was lucky that this recipe is one of the ones that my mother actually has written down, since most things she makes from memory.  On the other hand, the notes she had written read something like this, "half a bowl of milk, add to the flour until it feels right.  If it doesn't feel good, add more milk" and "1/4 bowl of sugar, if you like it sweeter (it tastes better like this)."  I had to ask my mother exactly what "one bowl" measures out to.  Thankfully, we made these together and I could get some measurements down for you.


Friday, March 15, 2013

No Bake Matzo Brittle (aka Chocolate Caramel Matzo)


This recipe really speaks for itself.  It's matzo covered in a layer of delicious caramel that snaps satisfyingly, just like a brittle should, and that caramel is covered in a thin layer of chocolate.  There can even be sea salt or chopped almonds sprinkled on top.

This is a fantastic snack, an easy dessert to make without turning the oven on, and it's great for entertaining.  Given that Passover begins this Monday the 25th, I thought it was an appropriate time to share this recipe.  I'm not Jewish, but I grew up with a good number of Jewish friends, so matzo  (note: singular is matzah) is a familiar thing to me.  I've had matzo brownies, matzo chocolate chip cookies, and matzo ball soup (which I love), but this is by far my favorite way of using matzo.  Of course, if you don't have any matzo on hand, you can also make this recipe with saltine crackers.

I feel like I must say, before sharing this recipe, that the photos really don't do this justice.  Melted chocolate and caramel are hard to capture with a digital camera in a way that captures all the beauty of the two.


Monday, January 21, 2013

Slow-Cooked Apple Cider Pork on the Stove


There is a reason I don't post a lot of savory recipes on this website.  Quite simply: I don't have a lot of recipes.  By that I mean, I make different savory things to eat all the time, but I just don't keep track of what I'm using and how much of it went into the pot.  I do almost everything by eyeballing it or taste-testing; I don't use measuring spoons or cups except when I bake.  This, of course, makes it very hard to share recipes, because I don't even remember all the time what I put into my food.  If I think something needs some curry powder, I add some in.  If I think garlic would be a nice addition, in goes some garlic.  Because I cook for myself, I don't have to worry too much, because I know I'll eat whatever I put on the table.

What I am giving you here is my best effort at actually creating a recipe for other people to follow.  I had some country-style boneless pork ribs on hand that I used as the meat, but you can make this with pork shoulder or loin or such.  This inspiration for this meal was just that I wanted to get more flavor and moisture into the meat.  I don't actually like white meat, so I really shouldn't have bought it, but I did not realize how little dark meat there was in this cut.  Also, it was on sale.

I marinated the pork overnight with soy sauce, balsamic vinegar, and honey, and then I baked it in an oven at 350F until it was done (about 30-40 minutes).  Then, I decided to slow cook it on the stove, to really get the meat soft and tender, so that it would melt in my mouth.  I wanted that fall-off-the-bone pork texture, except that there was no bone for the meat to fall off of, but you know what I mean.

Pork and apples are a classic combination, and balsamic goes wonderfully with pork, so I made up a little recipe with what I had in my kitchen. The end result was absolutely delicious.  I love the way the meat just falls apart - it is perfect for a sandwich or with a salad - and the reduced cooking liquid makes an incredible sauce.  The apple flavor is so faint, it's almost like a homemade barbeque sauce, and who wouldn't like something like that?

Slow-Cooked Apple Cider Pork on the Stove


3 splashes of balsamic vinegar (probably about 2 tbsp)
1 splash of red vine vinegar (probably a scant tablespoon)
roughly 1 teaspoon of salt
2-3 cups of chicken stock (I used a homemade stock made with only chicken bones, breast meat, salt, garlic cloves, and water)
2 packets of instant spiced apple cider (I used Alpine brand, which contains sugar, malic acid, mltodextrin, tricalcium phsphate, apple juice solids, caramel color, sodium citrate, ascorbic acid, natural and artificial falvors, spice extractive... and now that I've written those ingredients, I'm horrified)
1/2 cup of unsweetened apple sauce (I used Motts because it was on sale)
3-4 cups of water
4 lbs of cooked pork (see above)
3 cloves of garlic
a splash of fish sauce because I'm Vietnamese  (optional)

Combine everything in a large Dutch oven or non-stick pot.
Bring the pot to a rapid boil on high heat, while stirring occasionally.
Once the mixture has come to a boil, lower the heat to medium so that it is still simmering.  For me, on an electric stove that goes from 1-2-3-4-5-6-high, I left the heat around 4.  Allow the mixture to cook for at least 1 hour and 30 minutes, with the lid on.  The meat will be tender at this point, but not falling-of-the-bone (if you have no bone, they it will not be at the point of pulled pork yet).

Stir occasionally and check the level of your cooking liquid, especially after about 45 minutes.  The liquid will reduce as it cooks, but if the sauce gets too thick and the level gets too low, it can burn; just add a bit of water (about 1/2 cup) if you see this starting to happen.  You can reduce the braising/cooking liquid at the end, after pulling all the meat out, if the sauce isn't thick enough for you.  In my case, I had to add more water 3 times during a total cooking time of 2 hours, and the sauce was perfect at the end (I had no need to reduce it).

After 1 hour and 30 minutes, reduce your heat to low.  If you like your meat to be very tender, crush the pieces of meat with a fork and allow to continue to cook for another 30-50 minutes, depending on the size of your pieces of meat.  I was working with pieces about the size of half a hockey puck and had a total cooking time of 2 hours.

Serve with veggies and some sort of carbohydrate for a complete meal.

Thursday, December 20, 2012

Mexican Hot Chocolate Brownies


I don't like brownies.  Really.  I don't see the appeal in them.  Most brownies just taste like chocolate and flour, and I don't mean that in a good way.  I find 99% of brownie recipes to be one note. They are dense, and taste of cake-y chocolate with no real character and after about one bite, they get incredibly dull.  If a dessert requires a cup of coffee, a scoop of ice cream, or whipped cream in order to be good, then it is not a good dessert.  Good desserts should be able to stand on their own.

So it goes without saying that I rarely ever make brownies, yet here I am, posting about a brownie recipe.  I like this recipe so much the first time I made it, I had to make a second batch the next day to be sure that it wasn't a fluke.  This is no mistake: this recipe is gold.

The brownies that this recipe turns out are just sweet enough, but not at all cloying.  You don't need coffee or milk or ice cream to make these good.  In fact, I've eaten them for breakfast.  The espresso in the batter heightens the deep flavor of the dark chocolate, and the cinnamon adds a warm background fragrance.  Best of all are the lingering notes of black pepper and cayenne pepper.  They add just enough heat to makes your tastes buds light up, but it isn't at all overwhelming.  In fact, I find the spiciness rather comforting.  Of course, you can adjust this to your liking.  The first time I made this recipe, I omitted the cayenne pepper but used freshly ground black pepper.  It was delicious.  The second time I used both.  Also delicious.  Seriously, I have no complaints about this recipe.

If you're like me and you don't normally make brownies, I beg you to make an exception in this case.  Or if you the type of person who loves brownies, I highly suggest trying these.  The recipe is very easy to make.  I did this in a food processor for easy clean up, but you can also make this with a standard mixer.

Happy Holidays all!

This pictures speaks for itself.  Make these brownies.

Tuesday, December 18, 2012

Custard-Filled Corn Bread

A good recipe for both Thanksgiving and Christmas — or really anytime of the year when it's cold outside and you want comfort food — is corn bread.  I love corn bread.  It is filling, sweet, savory, and cornmeal gives the bread a lovely texture that is both crumbly and cake-y.

This cornbread is everything you're looking for. When it comes out of the oven, it has beautifully crispy edges and a soft and delicate crumb.  What sets this apart from other corn bread recipes though is the moist interior... the creamy and luscious custard layer.  When it is cold, from the fridge, the creamy custard layer is like a savory icing, inside of a corn bread cake.  I wish I could describe it better.  I only know that after Thanksgiving, when I went Black Friday shopping with my mom and my sister, I kept thinking about how I wanted to go home and eat this cornbread for lunch.  It's that good.


Tuesday, November 6, 2012

Election Day Chocolate Cupcakes with Salted Caramel Frosting


My fiancé once pointed out to me that although I love to cook, I have nearly no savory recipes on my blog; instead, I tend to write exclusively about sweet recipes for baked goods.  The reason for this is mostly that when I cook, I don't use recipes.

For example, I made a Vietnamese-style duck soup (mi vit tiem) the other night with dried lily bud flowers (kim cham), Chinese dried apples (tao tau), ginger, and orange peel.  It was the perfect thing for the cold weather we're having here in New Jersey.  But I couldn't tell you how much water was in it or how much soy sauce I put in the broth or how much ginger I used.  I just know that I tasted along the way and the end product was delicious.  Also, I made the soup with duck bones and I seriously doubt that you, my dear readers, keep Asian marinated duck bones in your fridge that are just waiting to be made into a delicious stock.  In fact, 90% of the ingredients that went into that soup are things that I'm willing to bet no one who isn't Vietnamese keeps in their kitchen.  In fact, my own mother, who knows how much I love this soup, doesn't always keep all the ingredients for it on hand.  Long story short, the point it, I do make savory foods.  I just don't know how to write about them, since I don't have recipes for a lot of what I make.

I do, however, have a lovely recipe for a chocolate cupcake with salted caramel frosting.  And I promise you, this salted caramel frosting is a breeze to make.  This caramel never fails, never cracks, never breaks... it is perfect.  You don't even need to keep your eye on it the entire time you're making it.  I've probably made it close to a dozen times in the past two months and it's never gone wrong.


I made these cupcakes to eat as my friends and I watch the election results, and I'm hoping they will be celebratory cupcakes.  Of course, since it'll probably be too late for you to make these in the spirit of the election, they also work well as birthday treats.

This recipe makes 36-42 cupcakes, or two 10-inch layers, or three 8-inch layers (if you're the cake making type).  You can also mix this combination up and bake 12 cupcakes and two 8-inch layers, or so on.

The cupcakes are the perfect level of chocolate-y.  They are flavorful, with a moist and delicate crumb, and the salted caramel frosting is the perfect ooomph to elevate everything to perfection.  Unlike other cupcakes, these don't taste like brownies.  By that, I mean they aren't overwhelming fudge-y in a way that makes you feel sick after three bites.  And the combination of vanilla, coffee, and rum in this recipe makes this all just irresistible.

I recommend making these cupcakes a day in advance.  Frost them and then keep them in a covered container in the fridge.  The flavors seem to just get better on the second day.  The chocolate is more intense and the nuances of vanilla and coffee seem to meld in a very lovely way.

Monday, July 23, 2012

Three Good Years & Paella

Today marks the three year anniversary of this blog.  When it started, I had no idea this little project would ever become what it is now.  It was honestly just an impulse that I went with one summer day when I was working as a intern.  I had a desk job with a lot of free time, and I had recently had a birthday lunch with my cousin at a restaurant in DC.  I started writing an email to my parents and my sister about the meal, and then, on a whim, I decided to make it into a blog post.  I didn't even have an introduction.
The first year honestly was a very slow one.  I didn't write much, and when I did, I don't think anyone was really reading.  Then I went to France for the summer and prolifically published about the places that I ate at while on vacation.  My parents showed the link to various friends and family and before I knew it, I had an audience.
I am still learning how to write and trying to figure out the rules of the blogging world, but it is incredibly rewarding whenever I check on my Stats page (that's right, non-bloggers; I get a report of how many people are reading, what links and google search bring them here, what posts are being read, what countries readers are from... it's amazing) and I see that someone has tweeted about a post I wrote or someone has pinned a picture that I took onto Pinterest.  It is also wonderful to have those around me support me in this.
One of the strongest supporters of my food blogging is my boyfriend.  He understands how important this is to me, even though it has nothing to do with my career path, and he stands by as I take 30 pictures of a plate of food before letting him eat it and he smiles at my note-taking when we go out to dinner (even when we're with his friends).  But best of all, because I've been too swamped with work to write or cook anything to mark this three year anniversary, B. sweetly stepped in and wrote a special guest post.

~~~


For this special occasion today, I wanted to share a family recipe we do for family reunions, Sunday lunch and big occasions: Paëlla.
Europe is an exciting mix of culture and history and as a French-Catalan-Algerian, this Paëlla is a great example of how to present a traditional dish with your own influences, inspiration and techniques.  Originally, it was a poor man’s dish made out of leftovers but after many generations, it became a tradition and an equivalent of a feast.

What you’ll need for 6-8 people:

- 500g medium-grain rice
- 2 onions
- 1L chicken / vegetable stock
- 2 bell peppers (preferably red & green)
- 2 tomatoes
- 250g of calamari
- 4 pieces of chicken (usually drumsticks)
- 4 rabbit hind legs (optional)
- 200g chorizo
- 12 Spanish mussels
- 1 cup of cooked regular mussels
- 6 langoustines (Scampi)
- 350g shrimp
- 1 cup of peas
- 1 cup of white wine
- Armagnac / Cognac
- 3-4 pinches of saffron
- olive oil
- salt and pepper

You will need a big pan. I used a traditional 15-inches paella pan, but any large pan is good. Everything will be cooked in the same pan one step at a time, no need to wash it in between steps. We want to keep all the flavors from each step.

1- Heat the stock in a separate pan, chop the onions, wash the Spanish mussels, and rinse the calamari rings. Slice the chorizo and remove the “skin." Peel, seed, and dice the tomatoes. Peel, seed, and slice the bell peppers. Peel the shrimp, remove the heads and tails (note: don’t do this with the langoustines!).  Once your stock is hot, set aside about ½ cup and add the the saffron to "marinate" this stock.


2- Add enough olive oil for 3-4 turns around the pan. Sautee one-third of the chopped onions in the pan (don’t use all of your onions; the rest will be used later) with the Spanish mussels on medium-high for about 5-7 minutes. Once the mussels are ready, remove them from the pan and set them aside on a plate. Make sure every mussel is open, otherwise let it cook a little bit longer.


 3- Caramelize the calamari in the pan. Add onion if needed. Don’t cook the calamari completely here because they will cook longer at the end.  Remove them when they have a nice golden color (about 5 minutes) and set them aside on another plate.

4- Add a bit more onion and olive oil and cook the langoustines for 5-7 minutes. Get the Armagnac (or Cognac) ready to flambé. When the langoustines are almost done, pour the Armagnac on them, and use a match to set it on fire (be careful not to burn down the kitchen...)

5- Add the rest of onions (should be roughly ⅓ of the original amount) with the chicken, rabbit and bell peppers. Sautee for about 5 minutes, stir and add the tomatoes. Simmer on medium and add the peas and chorizo. The chorizo and the tomatoes should release their juice; don’t remove it.  Remove the chorizo before it is cooked completely as it will be cooked again at the very end.

6- While the meat is cooking, prep the Spanish mussels on the half-shell. This is mainly for presentation.

7 - When the meat is ready, take it out of the pan and put it on a plate on top of the stock pot (which should be on medium-low heat) to keep it warm (pretty much like a water bath)

8- Add the shrimp to the pan and put back the calamari with the cooked mussels (not the Spanish mussels!). On medium heat, add your rice evenly in the pan. Stir gently, then spread the rice to cover as much surface as possible. If you “stack” the rice, it won’t be cooked properly. Pour in the stock with the saffron and some of the regular stock to cover everything. Let this simmer and little by little pour in more stock as it reduces. The rice takes 20-25 min to cook.
In Catalonia, people like their rice to crack a little bit under the teeth (think al dente but cook it to your personal preference). After 15 minutes, put the chorizo back in.

9- When the paella is ready, put the chicken, the rabbit, the scampi on top of the rice. Add the Spanish mussels around the edge of the pan. Put the pan in a preheated oven at a low temperature between 85°F-140°F until your guests arrive to make sure everything will be warm when served.

Optional: Arrange slices of lemon on top before serving. You can also top with sprigs of parsley.


We finished our meal with a crêpe with red fruits and homemade chantilly... but that is a different story, for another day.