Showing posts with label vegetables. Show all posts

Wednesday, June 19, 2013

Vietnamese Food that isn't Pho - A recipe for Bánh Bao

Being a non-Caucasian in America, I often get asked what my ethnic background is.  When the question is phrased as something less vague than "Where are you from?" (which normally prompts me to respond, "Maryland," because I now live in New Jersey and I am surrounded by the Jersey born-and-bred), I tell people that I am Vietnamese.  More than 90% of the time, the response I get is, "Oh my god, I love pho!"  The last word is always pronounced "foe."

I find it very weird.  Can you imagine if you told someone you have an Italian background the person replied, "Cool, I love spaghetti!"  It's strange.  There is so much more to my heritage and cultural background than phở, which, by the way, is pronounced "fuh-ah?"  Because Vietnamese is a tonal language, "phở" is pronounced like a question and as if the word had two syllables.

So instead of sharing a recipe for a Vietnamese noodle soup like bun bo hue or pho, today I want to share with you how to make Bánh Bao.  First, of course, I will tell you what it is.  Think of a stereotypical pork bun you get in Chinatown.  Now imagine that the doughy outside is fluffy and light and the inside has ground pork, eggs, and vegetables.  That is a bánh bao.

When I was growing up, this could serve as my breakfast, a snack food, or lunch.  The filling can be changed to be whatever you want, but the standard bánh bao has a piece of hard boiled egg, some ground meat, and normally lap xuong (also known as Chinese sausage, for all you non-Asians).  I love them.  They're nutritious and healthy, and once you make them, you can store them in the freezer for at least a month, steaming them in the microwave for about a minute whenever you want to eat one.

While writing this recipe, I was faced, yet again, with the problem of transcribing a Vietnamese family recipe into a recipe that others can follow.  On one hand, I was lucky that this recipe is one of the ones that my mother actually has written down, since most things she makes from memory.  On the other hand, the notes she had written read something like this, "half a bowl of milk, add to the flour until it feels right.  If it doesn't feel good, add more milk" and "1/4 bowl of sugar, if you like it sweeter (it tastes better like this)."  I had to ask my mother exactly what "one bowl" measures out to.  Thankfully, we made these together and I could get some measurements down for you.


Tuesday, December 18, 2012

Custard-Filled Corn Bread

A good recipe for both Thanksgiving and Christmas — or really anytime of the year when it's cold outside and you want comfort food — is corn bread.  I love corn bread.  It is filling, sweet, savory, and cornmeal gives the bread a lovely texture that is both crumbly and cake-y.

This cornbread is everything you're looking for. When it comes out of the oven, it has beautifully crispy edges and a soft and delicate crumb.  What sets this apart from other corn bread recipes though is the moist interior... the creamy and luscious custard layer.  When it is cold, from the fridge, the creamy custard layer is like a savory icing, inside of a corn bread cake.  I wish I could describe it better.  I only know that after Thanksgiving, when I went Black Friday shopping with my mom and my sister, I kept thinking about how I wanted to go home and eat this cornbread for lunch.  It's that good.


Monday, June 25, 2012

Roasted Vegetable Salad


I love this cold roasted vegetable salad.  I mentioned this in a previous post, but just to say it again: I think this is one of the best things to eat during the summer.  You get all the concentrated flavor of the vegetables from roasting/grilling, but serving this chilled helps fight off the summer heat.  The flavors are also a firework symphony.  This is vibrant, bright, and fun.  You have sweetness, earthiness, creaminess (avocado), mellow warmth, bright acidity (lime juice in the dressing), umami (also from the dressing)... Really, do I need to say more?  This salad goes on the must-make list.

You'll need: 1 medium-sized eggplant, 1-2 ripe tomatoes, 2-3 bell peppers, and 1 ripe avocado.  I like to use red, yellow, and orange bell peppers for the colors they add, but green would work just as well.  If you like the flavor of garlic, you can also throw in 3 cloves of garlic.
  1. Slice the eggplant into medallions about a finger's-width in thickness.  Brush the medallions with olive oil on both sides
  2. Slice the bell peppers into matchsticks.  Toss with olive oil.  
  3. Score the tomatoes on the bottom with an X.
  4. Toss the garlic cloves in a healthy dose of olive oil (optional).
  5. Arrange the eggplant, bell peppers, tomatoes, an garlic cloves onto a baking sheet.  Bake at 350F for 30 minutes.  Flip the eggplant medallions and toss the bell peppers around a bit and then turn off the oven leaving the vegetables inside for another 20 minutes.
Alternatively, you can grill the eggplant and bell peppers.  You can also roast the tomatoes over the grill by scoring them on the bottom and wrapping them in aluminum foil.


After the vegetables have been roasted and cooled, peel the skin off of the tomatoes and garlic cloves (if using).  Slice the eggplant into matchsticks like the bell pepper.  Chop the garlic clove and the tomatoes.  Dice up the avocado (without the skin, obviously).  Combine all the vegetables into a large bowl/container.

Up till this point, this probably sounded like a very boring/normal recipe.  But this part is the most important part: the dressing.

I make a salad dressing out of lime juice that is my go-to for all salads.  It works wonders on romaine, spinach, etc.  Juice one lime (I can often get about 2-3 tablespoons).  Add enough sugar to cut the acid.  I think I probably use 3 tablespoons, if not more, but taste it as you go.  You don't want it to be sweet, but you also don't want to make the oh so sour! face when you try it.  Then I add 3-4 good dashes of Maggi seasoning sauce, maybe a scant quarter teaspoon.  This stuff is the magic ingredient.  I know many people may not keep this in their kitchens, but honestly, it is amazing.  I add this to omelets and fried rice.  I use it to marinate chicken and ribs.  When I was growing up, sometimes for dinner all I wanted was Maggi sauce on white rice.  It is somewhat like soy sauce, except... bolder in taste.  And it isn't actually made from soy.  I really can't describe it any better.  Just go buy it.  You can probably find it in your local grocery store (it is a Nestle brand of seasoning).

Adjust the dressing to your taste.  It should be a good balance of sweet, sour, salty, and umami.  I probably use 4-5 tablespoons of this to dress the vegetable salad.  Toss/stir and then allow the salad to chill in the fridge for at least an hour.  Often, I wait 4-5 hours before serving.  (In a plastic container with a lid, this will keep in the fridge for about 5 days, if it lasts that long.)


The end result is a roasted vegetable salad that is cold, refreshing, and vibrant.  The lime brings a bright flavor that compliments the earthy, warm flavors of the eggplant and bell peppers, while the roasted tomato has a soft acidity to it that works well with the avocado's creaminess.  All of the flavors harmonize with the umami, sweet, sour, and slightly salty dressing.  This salad can be a meal in and of itself, but it also works great as a side to steak, grill chicken, ribs, pork chops, you name it.

Thursday, June 21, 2012

My Short List of Recipes for the Summer

Now that it is officially Midsummer's Day, I feel like I can share with you my short list of my favorite recipes for the summer.  Personally, I think the best summer recipes are ones that are light, refreshing, and generally served cool or cold, like carpaccios or fruit salads.  Summer is also the time for grilling and for eating popsicles.

No, this isn't a popsicle, but my popsicles
didn't photograph beautifully and they
tasted too good so I stopped taking
pictures and ate them instead.  So here is a
yogurt and honey parfait. Almost the same thing,
just not frozen.
Let's talk about the popsicles first.  I am a big fan of frozen treats.  I like ice cream, gelato, and sorbets.  (I even enjoy eating frozen peas, but that's probably not universally considered a "frozen treat," so we don't have to focus on that.)  I really enjoy reading recipes on making ice cream or sorbets at home, but I don't have an ice cream maker and I don't think it would be a good idea for me to invest in one simply because I don't want to give myself diabetes.  That said, the idea of making my own ice cream at home is still fun.
Unfortunately, without an ice cream machine you'll have a hard time getting the dreamy, light, and creamy texture of store bought ice cream, but you can get something close to it.  So what is summer recipe #1?  Frozen yogurt and honey popsicles.  These are deliciously easy to make.
  1. Get some store bought plain yogurt (normally I buy mine in 32oz plastic containers).  Open it, stir it, close the lid and come back in a few hours, or better yet a day.  The yogurt will probably have separated a little bit, so that there is some water on the top.  Carefully pour that off.  You can do this a few times, or you can move on to the next step.
  2. Pour in some honey.  I normally do about 1 teaspoon for every quarter-cup of yogurt.  Blend the yogurt and honey with a hand held mixer, or some vigorous whisking.
  3. Pour the yogurt into little plastic/paper cups.  You can add some chopped up peaches or cherries if you'd like.
  4. Put a plastic spoon into the middle (this will work as the popsicle stick).  I find that the best popsicle molds are actually individual yogurt cups (e.g. Activia) which have been washed and saved.
  5. Freeze for 4-6 hours, depending on the size of the popsicles you are making.  To remove the popsicles from the mold, just quickly run some hot water around the outside of the mold.

Another favorite recipe of mine is roasted eggplant, tomato, bell pepper, and avocado salad.  You grill/roast the vegetables (everything except for the avocado), and then you serve the salad chilled with a deliciously easy dressing.  I eat this salad as a full meal, but it also tastes great with chicken, steak, ribs, you name it.  I also love that you can prep the ingredients in one day, make the salad another day, and eat it two days later and everything still tastes amazing.


My third favorite summer recipe is my mom's zucchini "carpaccio" with avocado, shrimp, and pistachio (recipe and pictures coming soon!).  This recipe just thinned sliced zucchini and avocado dressed with lime juice and olive oil.  Add some grilled/sauteed shrimp and some crushed pistachios, and you have a beautiful harmony or flavors that'll quickly become your go-to summer lunch, especially since this recipe tastes better after some time "marinating" in the lime juice and olive oil.

I have other favorites that include lightly sauteed sweet corn, potato blinis with salmon, and a melon/cantaloupe salad that I've already written about, but we've got the whole summer ahead of us.  For now let's just enjoy the peaches, nectarines, and cherries that the farmer's markets have given us.  There's plenty of time for sharing recipes.


Wednesday, February 29, 2012

Kale Chips


I know, by this point in time, kale chips are no longer an innovation.  I remember reading about them a couple years ago, but for some reason I never got around to actually making them until last Thanksgiving.  I had various reasons to put it off — I couldn't justify turning on my oven just to dehydrate a leafy vegetable, I don't actually like kale that much, I thought the recipe was harder than it actually is — but now I am so glad I finally gave in to my curiosity.  This is one of the easiest and healthiest recipes ever.  Honestly, it's not even a recipe so much as a set of easy-to-follow instructions.  But please.  Learn from my mistake.  Make these.  Really.


All you do is get yourself several pounds of kale, wash it, dry it well (salad spinners are great for this), and cut out the hard fibrous ribs of the kale.  Gather up all the large leafy greens you have and toss them with a very minimal amount with olive oil (I'm talking about 1 teaspoon for a pile of greens the size of a newborn child) and a dash of salt.  You can even eliminate the salt and the oil if you're feeling really healthy.  Spread the leafy greens out in a thin layer on a baking sheet lined with aluminum foil and bake at 350F for about 4-8 minutes (depending on the size of your pieces of kale).  It's so easy!

I check on the kale at about 4 minutes, rotate/flip any pieces that are bigger and start removing smaller pieces.  It's a very fast process.  If your oven has a convection setting, you can do 3 trays at a time.  I actually had two Cornish hens baking while I baked two cookie sheets of kale.

And the end result?  Tasty!  It's fun and easy to eat, and best of all, healthy.  The crispiness of the kale is fantastic.  My family scarfed down a huuuge bowl of this during Thanksgiving.  My mom even suggested that the next time we have a family movie night (which we always do around Christmas) that we make kale chips instead of popcorn.  Mmmm, a delicious way to get a good dose of beta-carotene, vitamin K, and vitamin C.

Wednesday, November 2, 2011

Whole Poached Chicken & Homemade Stock

We had snow this past Saturday.  And I don't mean little flurries for five minutes, I mean a record-breaking 5.2 inches of accumulation, resulting in suspended train service, downed trees, and loss of power in some areas.  Yes, it is still October.  I slept under two sheets, a duvet cover, a coverlet, and a comforter with the heat on.  I was also wearing two shirts, pajama bottoms, and running socks.  It was cold.  Thank goodness I had this in my fridge to keep me warm.


It may not look like the most glamorous thing in the world, but this whole poached chicken in homemade stock is hands down the easiest and best comfort food I've ever had.  With less than 5 minutes of prep work and about 20 minutes of cooking, you can get an amazing broth that is out of this world and some of the moistest, velvetiest (apparently that is a word) chicken you've ever tasted.  And can I say again how easy this is?

I know I write a food blog, but here's a deep dark secret: until I made this, I'd never cooked a whole chicken before.  I know, it's a basic kitchen skill that most people who spend as much time as I do in the kitchen should have mastered a long time ago.  But I never did.  I had many excuses: I always worried about undercooking the chicken, I don't have a meat thermometer (I actually don't own any kitchen thermometers), I don't like white meat, so on.  But even with all these excuses, I knew I would had to get around to it someday.

I joke with my family and friends that every time I try a new recipe I am adding to my "dowry," as my future husband will benefit from whatever kitchen skills I've acquired over time.  It may sound a little strange, but sometimes I do work on building my recipe base with the thought that someday I will have to use my knowledge to feed someone else, someone who may not be as content as I am with eating poached eggs and arugula salads all the time.  Thus, I figure knowing how to cook an entire chicken is a fairly important skill.  (So is knowing how to properly cook a steak, but that's for another day.  [Though, for the record, I have made steak before and it was delicious, but steak is one of those things that, much as I love it, I can't justify making it for myself, and I'd much rather have someone else make it for me.])

People say roasting a chicken is easy but I find that the white meat when it is cooked that way gets to tiresome.  I can't make myself eat it.  And now that I'm cooking for one, I don't want to make something that I won't enjoy.  So instead of roasting, I found a recipe for poaching a chicken, which sounded so good I had to try it.  All the ingredients are fairly standard, and I was blown away by the simplicity of the recipe.

I spent no more than 30 minutes in the kitchen, then I turned off my stove, left my apartment, went to the lab for 4 hours, and came home to a perfectly cooked chicken.  I thought that kind of thing only happened in movies!  And this one pot recipe that gives you two amazing products at the end: some delicious chicken stock and a succulent poached chicken, which can be used in other dishes.  Think sandwiches, salad, risotto.... endless possibilities!

And best of all?  It really is the most moist and velvety meat I've ever tasted.  And the stock is amazing.  I wasn't too sold on it when I tasted it before dropping the chicken in, but the extra time at the end of the poaching makes all the difference.  Now I can't get enough of it.  It's delicious, comforting, and just the right thing for this season.  It's the perfect rainy day food.  And the perfect snowy day food.  It's also great if you're starting to feel sick or taking care of someone sick.  You know what?  It's great for any day.  The stock and the chicken make the perfect comfort food.  So if you're feeling a little down this week, here is what the doctor (okay, medical student) ordered.


Wednesday, October 12, 2011

What I've been eating

With my study schedule here at medical school, I haven't had time to cook much lately.  Because I knew earlier in the year that these days would come, I stocked up my freezer with plenty of food for days when cooking wouldn't be an option.  I have spicy butternut squash soup, basil and pine nut pesto, some crusty French bread, and goat curry from home (one of my absolute favorite cold weather foods).  But sometimes I don't even have the time to put together a warm meal; either I didn't think ahead to defrost the food I want to eat, or I have no rice or pasta in the fridge to eat and I'm too hungry to take the time to cook some.  In those moments, I am incredibly grateful for the abundance of fresh fruit I have access to.

Every Tuesday where I live there is a farmer's market.  Not only are they a source of great fresh everyday produce, like garlic, potatoes, basil (rooted!), onions, and zucchini, but they also carry some amazing out-of-ordinary products  at incredibly affordable prices, such as organic California Brown Turkey figs, local Concord grapes, Flavor Heart pluots, and gorgeous Georgia Muscadine grapes.  I had never actually tasted fresh Concord grapes before living next to this market, but the vendors are incredibly friendly about answering questions and allowing customers to sample.  Once I tasted one, I was hooked.  I've been buying them every single week since then.  The Muscadine grapes were also a discovery.  They look like small plums or very large grapes, and they burst with a flavor that is akin to lychee and Muscat grapes.  As for the pluots, if you haven't heard of them yet, they are hybrids that combine the best qualities of an apricot with those of a plum.  The Flavor Heart variety is one of my favorites, partially because it really does have a distinctive heart shape to it, and because its deep purple skin contrasts so beautifully with its pale golden flesh.

With such beautiful produce, it isn't hard to throw together a simple meal in little or no time.  Being so fresh, these fruits need no coaxing to shine in all their glory; they are delicious as they are.  I eat the figs with clover honey and plain yogurt as an afternoon snack.

The rooted basil I bought two or three weeks ago from the market is now thriving on my window sill.  I take some of its leaves and roughly chop them and mix them with a beautiful yellow heirloom tomato I bought to make a simple salad, dressed with balsamic vinegar, olive oil, and grapeseed oil.

For a quick lunch today, I washed a bunch of organic roquette (arugula).  I became addicted to this spicy green while I was in Paris this summer, and now that I've found it at the markets here, I indulge myself by buying some almost every week.  It goes well with chicken, fish, pork, bread and butter... honestly, I can't think of many savory things it wouldn't accompany well.  But since today was farmer's market day, I had an abundance of fruit, and so I made a salad with with the Concord grapes, local end-of-season peaches, and Flavor Heart pluots.  A little balsamic vinegar, olive oil, and black pepper and my lunch was served.

I haven't just been on a raw foot diet though.  As beautiful as the produce is, I am at heart a baker, and I couldn't resist the call to make something sweet with the plums I had on hand.  Because I didn't have the time to make an elaborate cake or tart, I went with a classic: clafoutis.  I won't be sharing the recipe here yet because I want to take the time to dedicate a real post to it, but here is a teaser of what is to come.  It may seem a little bit homely, but trust me, this plum clafoutis is the perfect thing for a night in, curled up on the couch with a book.  (Unfortunately for me, that book is a USMLE Step 1 Question Bank)

Monday, May 2, 2011

"Fire and Ice" Cucumber and Cantaloupe Soup


With the weather getting warmer, it's hard to want to eat hot and heavy meals.

I doubt most people think of spring being a great season for soup, but this soup fits the season perfectly. This recipe was something that I believe I saw in the Washington Post a couple summers ago and quickly made my own.  It's comparable to a gazpacho, if you've ever had the cold Spanish soup, except that the base is not tomato.


This is an elegant and easy way to use up extra cucumber, which we always seem to have in the house, leftover from salads and sandwiches.  It also shows off cantaloupe beautifully.  The "fire and ice" soup gets a nice kick from some hot pepper, but that can be controlled by your own hand,  and the heat is a nice contrast to the mellow sweetness of both the melon and the cucumber.

This recipe is a great one to make if you're serving guests, since it can be made ahead of time, very quickly, and is served chilled.  As usual, I served this in our china tea cups.  Just a little quirk of mine.  Tea cups are a great vessel for serving soups.  Chocolate mousses too.  But that's for another day.


"Fire and Ice" Cucumber and Cantaloupe Soup
1 small cantaloupe (about 1 ½ lbs)
2 cups diced cucumber (about 1/3 the quantity of cantaloupe)
juice and zest from one lime
½ tsp ground ginger
½ tsp hot pepper (e.g. jalepeno)
½ tsp salt
4 tsp sugar
1 to 2 tsp honey (to taste)
¼ to ½ cup milk (to taste)

Slice the cantaloupe into wedges and remove the flesh from the skin.  Add with the skinned and diced cucumber into a blender.  Add the lime juice and zest (alternatively, you can use a lemon) along with a dash of cold milk.  Blend until relatively smooth.  Add the ground ginger, pepper, salt, and sugar.  Blend till smooth.  Add honey or milk to taste.

Serve cold with cream swirled in and cilantro for garnish (optional).

This yields a very generous portion, probably enough for 8 people as an appetizer.  I usually serve this to my family of four.  The leftovers keep just fine in the fridge for 1-2 days.  Just be sure to stir well before serving.

Friday, February 18, 2011

Sauteed King Oyster Mushrooms

The other night, my friends and I were exhausted and it was past dinner time—about 9pm—but we were hungry and I had a dish I wanted to share. It was pretty simple.  It featured one star ingredient, plus a little love, and that was basically it.  And once it was done, three hungry girls swarmed in, eating right from the skillet, not even bothering with plates or bowl.  It was a true communal meal, and it was wonderful.

It's moment like that that I love.  Moments like that are why I cook, and why I truly do believe that food is love.  Food brings people together, and there is a feeling of closeness and intimacy created when someone cooks for you or when you cook for someone.  This dish is nothing fancy, but I made it because I love it, and I wanted to share it my friends.

Most people haven't heard of king oyster mushrooms, but they can be found pretty easily at any Asian supermarket, and occasionally it is also sold in regular grocery stores.  King oyster mushrooms are large white mushrooms that are both tall and fat, and have a lovely meaty and chewy consistency that is more comparable to abalone than oyster.  I like these prepared simply, as that allows the mushroom's natural sweetness to shine.  You may feel like you need to add water or more butter or something since the mushroom seem a little "dry," but the heat will do it's job and the mushrooms will soften up beautifully and caramelize.  Even if you're not a "mushroom person," I recommend you trying these.  They are unlike any other type of mushroom.  I'm not a huge fan of white button mushrooms or shiitake, but these I will eat any chance I get.  They are simple, hard to mess up, and full of flavor.


Wednesday, January 26, 2011

Spicy Butternut Squash Soup

I know I've called cold weather the perfect weather for risotto, but when it comes to January—cold dreary January, with its icy rainy, slushy grey snow, and frozen sidewalks—I think the thing everyone needs in their repertoire is a good soup.

A good soup should be complex in flavor. It should have layers. It can't just taste like soup or just taste like peas, and it can't just be spicy. It needs to have a little something extra so that the tongue doesn't tire of its taste after five or six spoonfuls. A good soup should be filling and most of all, I think a good soup needs to be something that can be shared.

So I share with you this: a spicy butternut squash soup that is rich, but not heavy; slightly sweet, but also spicy enough to warm a person on a January night.

This soup is vaguely related to a recipe I saw here, but really I think they are so different now, they are more like in-laws than blood relatives. This recipe, like all the recipes I post here, is easily adapted to your taste. You can use pumpkin just as easily as butternut squash, but keep in mind that pumpkins are much larger than your average squashes, and so you may need more coconut milk and broth (or water), and perhaps more spices. Also, if you can't find these specific curry powders, feel free to use what you have on hand; curry paste works just fine. I'd recommend starting with no more than 1 teaspoon, and then increasing from there depending on your own preferences.

As for serving the soup, you might have noticed by now that I have a thing for serving my soups in teacups. This is generally because when I make soup, it is part of a larger meal, and I think a teacup serving is the perfect size for an appetizer. But in a bowl or a teacup, it doesn't matter. This soup is elegant and delicious, and can be served with toasted pumpkin seeds, croutons, or caramelized pear slices. I chose to serve it with some Forelle pear slices which I lightly caramelized in a skillet with some salted butter. This soup can also stand alone. Maybe warm up some good bread though, to wipe your bowl clean when you're done, if you're that sort of person. And yes, I do confess, I am that sort of person.


Spicy Butternut Squash Soup
1 medium butternut squash
1-2 tablespoons butter
about 1 can chicken stock
about 1 can of coconut milk
1 ½ tsp Madras Curry Powder (yellow)
¾ tsp curry powder mix (Vietnamese “bôt ca ri” made from turmeric, annatto, chili, coriander seed, cloves, fennel, and bay leaf)
2 tsp cinnamon
½ tsp ground ginger
2-3 tsp sugar
2 tsp salt
Cover a baking sheet with aluminum foil. Slice the butternut squash into 3 or 4 sections (leave the skin on!), place on the baking sheet, and butter each slice. Broil on low for about 10-15 minutes before flipping the slices. Butter this side, and then broil for another 10-15 minutes until soft. Alternatively, bake the squash at 375 F for about 35-40 minutes.
Allow the squash to cool for a bit before scooping the flesh into a large pot on medium heat. Add 1 can (about 14 ounces) of coconut milk and 1 can of chicken stock (or alternatively, water or vegetable stock... no worries, I have made this with water and the flavor profile was not at all diminished). Bring to a simmer.
Add the curry powders/paste, cinnamon, ginger, sugar, and salt.
Remove the soup from the heat and either puree with an immersion blender or transfer in batches into a blender. If using a blender, allow the soup to cool a bit, and then cover the top of the blender with a clean kitchen towel, and blend in small batches. Remember to use care when blending hot soups!
Transfer the now smooth soup back to the pot (if you used a blender), turn the heat to medium, and add water or stock a little bit at a time until the soup is your desired consistency. Add additional seasoning to taste.
Serves 6-8 people.

Friday, December 10, 2010

Pesto Potato, Asparagus, and Green Bean Salad

I know I'm late on the band wagon, but I didn't get into pesto until this year. Beautiful, flavorful, bright green pesto. Now, I can't get enough of it. I eat it all the time. I'm surprised my teeth aren't turning green from all the basil.

Now before you say anything about seasonality, because pesto is generally, I know, considered a spring dish, I want to say this: seasonality smeasonality. When I crave something and it's available, I'll take it, even if it is out of season. If you look hard enough and are willing to pay good money for it, you can generally find good produce year-round, even if it is out of season. The only exceptions to this, I've found, are tomatoes and corn. Sometimes it feels impossible to find a good tomato in the fall and winter. But that's for another post. (Still got a tomato craving though? Here's an idea to try if you've got some not-in-their-prime tomatoes that you want to use) And yes, before you try to argue, berries can be found out of season. In fact, for the past week, I've been eating blueberries and blackberries with my yogurt and granola. Delicious!

Anyhow, my apologies for the tangent. The point is, pesto is wonderful and versatile (use it on pasta, potatoes, chicken, green beans, asparagus, grilled zucchini, fresh mozzarella cheese), and you shouldn't put it aside just because winter doesn't feel like the appropriate time for to make this recipe. The bright green color is perfect for the holidays, and if you want a potato dish that doesn't feel heavy with butter and cream, this is a great way to go.


Pesto Potato Salad with Green Beans
adapted from Smitten Kitchen

2-3 pounds small Yukon gold or red-skinned potatoes
½ pound green beans
1 pound asparagus
2 garlic cloves
4 large bunches of basil (washed and dried, about 4 ounces?)
1/4 cup olive oil
2 tsp + 1/4 cup pine nuts, toasted
grated Parmesan cheese to taste
1/4 to 1/2 tsp kosher salt (depending on your taste)
ground black pepper

Cook potatoes in large pot of boiling salted water until fork tender. Drain, cool, and quarter. Put into a large enough bowl for serving.

Cook the green beans until fully cooked, but still snappy (do not just blanch them, this is the only cooking they'll get). Cut the green beans in half and add to the potatoes.

Cook the asparagus like the beans, then cut in half. If serving to guests, I use only the pretty pointy end. Add to the green beans and potatoes.

To make the pesto, crush and peel the garlic. Put into the bowl of a food processor along with the washed and dried basil leaves (discard the stems). Add in 2 tsp pine nuts. Pulse to combine. Drizzle in the olive oil with the food processor running. Add just enough to get it to an appropriately "sauce-y" consistency. Season with kosher salt and pepper.

Pour the pesto over the potatoes and beans and mix. Add in the remaining pine nuts. Add Parmesan cheese to taste.

Serve at room temperature for best flavor. This can be made one day in advance.

Serves 6, as a side.


Monday, November 29, 2010

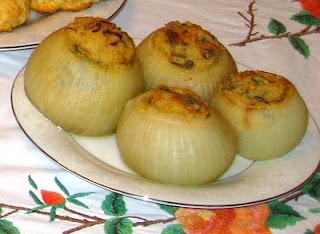
Roasted Onions & Cornbread and Sage Stuffing


I know it might seem to you a little bit late to be posting stuffing recipes, but while this is something that we served at the D. house for Thanksgiving, this recipe actually works all year round, and it is so delicious, it really shouldn't just be saved for one day in the year. And if you do happen to try it, be prepared to replace your old Thanksgiving stuffing recipe with this one. I wouldn't be surprised if this beats the socks off some more traditional recipes.

The recipe actually just started as a regular cornbread stuffing. We bought store-bought cornbread (for simplicity's sake) and crumbled it and mixed with some various fun ingredients and then baked it all in a glass casserole/pie pan. It was delicious. It quickly became a Thanksgiving staple (like the Rosemary Cornish Hen). Then this year, I saw a recipe for roasted onions with stuffing inside and I thought it was a really clever idea. But I couldn't bear to part with our family's stuffing recipe. So with a little bit of tweaking, we now have this, a recipe for roasted Vidalia onions, filled with cornbread and sage stuffing.

If you want to skip the roasting and stuffing of the onions for the sake of time, feel free. I'll also warn you that hallowing out those onions was a huge tear-jerker. I'm not normally an onion crier--in fact, I've never teared up before from cutting onions--but while I was scooping out the inner layers of those onions, I could not stop crying. Those were some very real tears. But it was worth it.

This stuffing is sweet and savory, and the caramelized onions go so well with the sweetness of the corn and the earthiness of the sage. I also love the moist texture of this stuffing. Having the stuffing inside of the roasted Vidalia onions just put the icing on the cake, so to speak. It was perfect, and well worth the tears.


Roasted Onions
These instructions work for any number of onions. Just change your pan size based on your amount of onions. I used sweet Vidalia onions. Yellow onions work just as well. I wouldn't use white onions, however, as they don't have the same flavor.

To make the onions shells, cut and discards the tops and bottoms of the onions (about ¼ inch). Using a small ice cream scoop, scoop out the inner layers of the onions. Leave the outer 2 layers intact. The scooped-out onion can be sautéed and reserved for cooking. Don’t worry if you make a hole at the bottom of your onion shells.

To roast the onions, preheat the oven to 400°F. Arrange the onion shells open side up in a 9x13 baking pan. Add enough water to go up the onions one-quarter of the way. Add 1 tsp kosher/sea salt. Cover the pan with foil and bake until onions are tender, 20 to 30 minutes.

Cornbread and Sage Stuffing
Crumble an 8x8 pan of cornbread (we use store bought for simplicity) into a medium bowl.
Add about ¼ cup chopped sage, a dash of salt, and some ground black pepper.
In a separate bowl, beat 1 egg with ¼ cup heavy cream and ¾ cup chicken stock.
Pour over the cornbread mixture and stir to combine.
Meanwhile, sauté 1 cup chopped onions (this is where you can use the excess onions from above) in 2 tbsp butter. Add the onions to the cornbread mixture.

If using the roasted onions, place the roasted onions in a large enough pan to contain them, and then stuff the onions with the cornbread mixture. Bake for 35-40 minutes at 400°F (until golden on top and a toothpick inserted comes out clean).

The cornbread “stuffing” (really, it has more the texture of bread pudding) can be baked in a casserole dish at 400°F for 45 minutes.

Serves 4, with plenty of leftovers, or 8, as a side. The stuffing recipe can be used to stuff AT LEAST 8 large onions.
We just stuffed 4 onions and baked the rest of the stuffing in a 6 inch round casserole dish.

With buttermilk biscuit and cranberry relish

On the table, stuffed onions on the far side,
(pesto potato salad in the middle),
and cornbread stuffing baked in a small casserole dish in the front.

Saturday, November 20, 2010

Versatile Vegetable Tart (aka dressed up Tarte à L'Oignon)


I often read blogs that post Thanksgiving recipes before Thanksgiving and I sometimes wonder how they do that. I haven't cooked yet for Thanksgiving, how could I have a recipe with photos to share with you? But I suppose it would be somewhat useless for you, as the reader, to hear about my Thanksgiving recipes after the fact. So here is a recipe for you to consider which I made last year: a beautifully versatile vegetable tart.

I do love quiches and savory tarts and the like, but I often find that their recipes include a rather ridiculous amount of heavy cream or large amounts of cheese. I don't particularly like rich foods--I tend to find that the fatty taste gets tiring after a couple bites and you never feel good afterwards, which ruins the experience of eating--and I have a slight cheese aversion, so when I found this recipe, I was quite pleased.

This vegetable tart recipe, besides being fairly healthy and cheese-free, is also incredibly versatile. It is originally a tarte à l'oignon, but it can be made with zucchini, bell peppers, ham, or anything else you find appropriate (probably not tomatoes or pumpkin though, since their textures aren't quite right).

I actually made this with a friend last year for a potluck with his friends. Being a somewhat stereotypical male, he was not the kitchen/cooking type, so I picked this to make together since it was easy and unintimidating. Granted, I still ended up doing the majority of the work, but I think it's a good recipe if you're looking for something easy to make with a partner who is unexperienced in the cooking or baking arena.


Versatile Vegetable Tart
Adapted from André Soltner, The New York Times (October 20, 2003)

Pre-baked tart shell/pie crust
1-2 tbsp olive oil
2 cloves garlic, minced
1 large yellow onion, peeled and thinly sliced
1 small zuchinni, sliced (can substitute with other savory items*)
1 large egg
½ cup heavy cream
dash of salt
dash of freshly ground pepper
pinch of ground nutmeg

Preheat oven to 375°F.

Heat the oil in a skillet over medium heat, and sauté the onions and garlic with salt and pepper, stirring regularly, until they are lightly golden, caramelized, and tender (10-15 minutes). Pour off into a separate bowl. Sauté the zuchinni in the same skillet until just tender, add more oil if needed. Remove the skillet from the heat.

In a small bowl, beat the egg and cream together. Add a dash of salt and pepper and a pinch of nutmeg. Add this to the onions and garlic mixture, stirring to combine.

Fill the tart shell with the onion, garlic, and egg mixture. Top with a few slices of zucchini, arranged in some decorative pattern.

Bake tart for 25 minutes, or until the filling is golden brown and set. Serve hot, warm, or even cold.

*Other ideas: bell peppers, ham, cooked bacon, shredded chicken, shredded turkey (a great use of Thanksgiving leftovers!)

Monday, January 4, 2010

Sweet Potato Biscuits for the New Year

I love holiday parties. Why? Because they involve celebrating the holidays and, well, it's a party. I don't see what's not to like. Also, I have to say that as a foodie, I especially enjoy parties not for the social scene, but for the food sharing. The idea of friends getting together to share dishes that they enjoy... it's just very heartwarming. After all, food is love.

So for a holiday party at my cousin's house, I decide to make some sweet potato biscuits. I made these for my family for Christmas, and they were a hit. Healthy, delicious, and fairly easy to make.


The thing I love about this recipe is that it is so forgiving. And that's important in a recipe during the holiday season. No one wants to work with a cranky recipe, a fussy recipe, a recipe that demands a lot of work and an exacting amount of attention. No. We like the easy-going recipes during the holidays. The recipes that we can let our six-year-old nephews help out with, without fear that the end result will be disastrous.

So here is it: a biscuit recipe that requires no rolling pin, no biscuit cutters, no specified number of times to be kneaded. This biscuit could win the "Best Biscuit of All Time" award just for that alone.

But.

It is also delicious. It is sweet and nourishing and the slightly crumbly, but also bread-y texture of it is the perfect foil to your holiday ham, turkey, or (as we do in my house) rosemary chicken. Enjoy!

Sweet-Potato Biscuits

5 ¼ cups all-purpose flour
6 Tbs light-brown sugar
2 tbsp granulated sugar
¾ tsp cinnamon
6 ½ tsp baking powder
2 tsp salt
1 ½ tsp baking soda
18 Tbs chilled salted butter
2 ¼ cups chilled sweet potato puree (read: peeled, boiled, and pureed sweet potatoes)
1 cup buttermilk (read: 1 cup milk with juice from ¼ lime, sit at room temp)
extra butter for brushing the tops of the biscuits

Make the buttermilk if needed (let it sit at room temperature for at least 10 minutes).

Boil the sweet potatoes (about 4-5 medium ones), peel, and chop. Allow to cool before pureeing. Combine with buttermilk.

In a DRY food processor, combine the flour, brown sugar, sugar, baking powder, salt, cinnamon, and baking soda. Once combined, cut in the chilled butter and pulse till mixture resembles coarse meal.

Combine the dry flour mix with the wet sweet potato mix. Do not overmix.

Preheat oven to 425°F.

With floured hands, roughly knead and shape the dough into large balls (about the size of a fist). Arrange the biscuits snugly into one 8x13 inch pan and on 9x9 inch pan. Brush with melted butter. Bake for 15 minutes, brush with butter again. Rotate pans and bake for 5 more minutes. Total bake time about 20-24 minutes. Makes about 20 large biscuits.


Note: If 20 biscuits is too much for you, after the biscuits cool, you can put them in a ziplock bag and FREEZE them. They taste delicious defrosted and toasted.
Also, I have never actually made this recipe with buttermilk. It seems too much of a hassle to go out and buy some, so I just make it with milk and lime juice. Works every time!

Friday, November 27, 2009

A Vegetable Flan for Thanksgiving

I know what you're thinking. Vegetable flan?? But it was good! It was velvety and didn't scream I CONTAIN ASPARAGUS or RUN AWAY CHILDREN, so please, don't judge me yet. I really liked it.

See? It looks good.

The one thing I would say is that the broccoli complicates things. Its tiny little floral buds will not blend down to anything other than those tiny little floral buds, and so the resulting flan is not as smooth as could be. I tried to pass it through a sieve, I really tried, but it would have resulted in losing most of the puree, so I decided to forget about it and just blend the vegetables as smooth as possible and then throw caution to the wind. Perhaps you might want to use all asparagus though?

The all asparagus version is actually what is pictured above (yes, I have made both versions), but I think the broccoli one is actually prettier, because of the aforementioned "buds" (what are they called?), which add a nice, dark green spottiness. Although maybe that's not what you're looking for in a flan.


Vegetable Flan
1 cup fresh asparagus, diced
1 cup fresh broccoli
2 large eggs
½ cup skim milk
1/6 cup heavy cream
1 tbsp freshly grated Parmigiano-Reggiano
1 tsp salt
a pinch or two of freshly ground black pepper
a pinch or two of freshly grated nutmeg

Preheat the oven to 325
°F, and set a rack to the middle position. Butter four 5” tartlette shells. Wrap then with aluminum foil on the outside of the tartlette shells if they are the type with removable bottoms, as mine were. (That phrase “removable bottoms” sounds a little funny, doesn’t it?).

You will need a baking dish large enough to hold the tarlette shells and deep enough to safely hold at least an inch of water.

Fill a large pot with water, and bring it to a boil: this water will be used in the water bath.

Place the asparagus and broccoli in the pot and boiled till tender. Allow to cool briefly before transferring to a food processor or blender and processing till smooth.

In a large bowl, whisk the eggs to break them up. Add the milk, cheese, salt, pepper, and nutmeg, whisking to blend. Add the vegetable purée, and whisk to thoroughly combine.

Divide the mixture evenly into the tartlette shells. If needed, place one folded kitchen towel into the baking pan first (like seen to the side), then place the tartlette shells on top. (This is only necessary for extra stability)

Carefully slide the pan into the oven and pour the boiling water into the larger pan until it comes about halfway up the tartlette shells. Bake until the flan is set and beginning to pull away from the sides and a toothpick inserted in the center comes out clean, 25 minutes. Transfer the cake pan to a rack to cool slightly, about 10-15 minutes.

Run a thin knife around the edges of the tartlette shells to loosen. Invert a serving plate over the shell, and invert onto the plate.


Yield: four-five servings (if using 5 inch tartlette shells)

Note: I suppose, to simplify life, you could just use seven or eight ramekins, but I am obsessed with presentation, and so I went with the tartlette shells.