Showing posts with label nuts. Show all posts

Friday, December 23, 2011

Revisiting an old recipe

Rosemary, Pine nut, and Pumpkin Seed Shortbread Cookies

I've written about these cookies before.  In fact, the last time I wrote about them, it was also right before Christmas.  That fact is merely coincidental.  It's not that these are holiday cookies per se, but they are unique in their flavor and texture and I like making them because they are different and delicious.  I came back to this recipe -- making a few changes, of course -- because I had been on the search for the prefect recipe to send to B.

B. is the one who cooks for me.  He is the one who dances with me in the living room.  And he is currently living an ocean away from me.  As part of his Christmas gift, I decided to send him cookies.  This may sound like a simple decision, but in reality, it was one that I agonized over for weeks.  Yes, weeks.  I couldn't send mediocre cookies.  I couldn't send cookies that he'd already tasted before.  And I had to send cookies that would travel well, since even with fast shipping, it was likely to take about 5 days for them to get to him.  

These cookies were winners.

These Rosemary, Pine nut, and Pumpkin Seed Shortbread Cookies are both savory and sweet.  Browned butter and ground, toasted nuts and seeds make the cookies very fragrant.  The rosemary and vanilla add an earthy sweetness.  There is nothing like these cookies.  They are flavorful, incredibly easy to eat, and so different that no one who you serve this to will forget about them.  (It may help that rosemary aids with long-term memory).  And don't worry, despite all the savory sounding ingredients, these cookies can most definitely be served as a dessert item.  They are also great as a gift since they can be easily packaged and they keep for a good amount of time (as do most shortbread cookies, since they aren't particularly moist).

These cookies made it safely to B.'s doorstep last night and now that they have his stamp of approval (and his mother's!), I share the recipe with you.

Merry (early) Christmas!


Sunday, March 20, 2011

Nutella Cupcakes & Bailey's Irish Cream Cocoa Frosting

I'm not really a huge fan of hazelnuts and I really don't like when hazelnuts get mixed into my chocolate—like in boxed truffles and chocolate ganache in restaurants—but there is one exception to my rule: Nutella.  I love Nutella.  I still remember those school lunches in elementary school that my mom used to pack for me.  It was also such a thrill to discover a sandwich in my lunchbag, because a sandwich could only mean one thing: Nutella.  We didn't really do peanut butter and jelly sandwiches in my house because we didn't often have jelly or jam, and if we did, then we probably didn't have peanut butter.  Our fridge also didn't always have bread, so sandwiches were a rare lunch item.  I grew up eating rice for lunch.  But that's another story, for another day.

Those Nutella sandwiches were such a treat.  The soft white bread with the creamy chocolate-y filling.  I didn't even know Nutella had hazelnuts in it until I was a teenager; I really thought it was just a chocolate spread.  And by the time I actually read the label and discovered my mistake, I was too in love to back out.  Nutella and I, we're in it for the long haul.

Come on, who doesn't love Nutella?  And it's not just for sandwiches.  I have friends who dip strawberries in it, who will eat a spoonful of Nutella with an apple, who use nutella as frosting.  It was the last one that really struck a chord with me.  Nutella as frosting?  Well, what about Nutella inside baked goods?  There was something I wanted to try.

And sure enough, I stumbled upon a Nutella cupcake recipe that I liked enough to completely redesign and make my own.  That's how I work.  I see ideas, I like them, and then I scrap the original and rebuild things my way.  Kind of like Disney does with classic fairy tales.  I use recipes as only a backbone or foundation.


This Nutella cupcake is definitely good and I will be making it again, but perhaps with two changes: I doubled the amount of Nutella from the original recipe, but next time I would increase it more to give the cupcakes an even more pronounced Nutella flavor.  Also, I neglected to throw in my usual little pinch of salt because, well, I forgot, and I think that's something that would have rounded out the flavors more.  I like this recipe as a mini cupcake recipe because the bite-sized cakes are cute and perfect for serving, but if you want to make full-sized cupcakes, just increase your baking time to 18-20 minutes.  Either way, this cupcake is a crowd pleaser.  My parents loved it, as did my sister, and my friends who tried it.

I don't normally do frosting, but this time I thought it would be appropriate, especially since I was making them for my sister's birthday.  I found a recipe for a Kahlua frosting that I really wanted to try, especially because I thought the coffee and chocolate notes of the liquor would complement the Nutella flavors well.  But, to my surprise, our house was out of Kahlua.  I was shocked.  It's one of those things that we always have.  Like flour or cinnamon or lime zest (we keep that stocked in the freezer).  I was at a lost for a while, until I remember hey, I don't normally work from recipes!  And so I made something up.

I saw that we had Bailey's Irish Cream, and that's not too different from Kahlua, so I decided to improvise.  But, as luck would have it, we also happened to be out of powder sugar, which is inconvenient if you want to make frosting.  I thought about running to the store, but I was feeling lazy and this frosting was just for family, so I knew I would be forgiven for a slightly grainy texture.  I ended up using just what I had on hand, and it turned out very well.  My mom says the frosting is the most addictive thing she's ever tasted, and she's not into frosting.  My sister mourned the fact that she forgot to bring the cupcakes and frosting to work with her the next day.  These two recipes are definitely keepers.  Easy to make and definite crowd pleasers; what's not to like?  Plus boozy frosting is great for an adult twist on a childhood dessert like mini cupcakes.


Saturday, January 1, 2011

Cinnamon-Scented Plum and Almond Tart for the New Year

Happy New Year! I hope this year brings you plenty of wonderful new food experiences and good recipes. And in keeping with that wish, I shall be giving you a beautiful recipe which I recently made for my family: a Cinnamon-Scent Plum Almond Tart.

Being home for the winter holidays always means providing my family with a constant supply of baked goods. My mom bakes, but when I am home, the baking duty always falls on me. This is, no doubt, partially my own doing because I always talk about what new recipes I’d like to try. But this Christmas, when my presents including mixing bowls (with lids!), silicon spatulas, a special mini tartlette tray, and a hand mixer (sometimes more useful than a stand mixer) I knew that my role as family baker was official.

The thing is, my dad often tries my new desserts and then immediately and mournfully declares that “this” (whatever it is) will never top my apple tart cake, which has been a family favorite since the day I first made it. But I persist in trying new things. I just don’t know how to leave well enough alone. And sometimes, like in the case of this lovely Cinnamon-Scented Plum and Almond Tart, it works out beautifully.

This recipe was something I stumbled upon a long time ago, but just never got around to trying. Then when I saw that we had plums conveniently in the house, I decided to play around with this recipe, because—as I’ve said before—I just don’t know how to leave well enough alone. But it was good that I meddled, and my dad did end up relenting and accepting this dessert and did not seem to mourn too much the fact that I did not make his beloved apple tart.

Just one note: watch your crust. Be sure to check about halfway through the baking time to be sure that your crust isn’t over-browning. Happy baking!


Cinnamon-Scented Plum and Almond Tart
adapted from Bon Appetit, October 1998

2/3 cup whole almonds
2/3 cup sugar
½ tsp salt
¾ tsp cinnamon
2 large eggs
6 tbsp butter
3 tbsp rum
3-4 ripe red-skinned plums, pitted, cut in half
1 pre-baked pie crust

Preheat oven to 375°F.
Toast almonds lightly in pre-heating oven.
Finely grind almonds with sugar and salt in processor. Add eggs, butter and rum. Process until smooth.
Pour filling into pre-baked crust. Arrange plums halves on top filling.
Bake until plums are tender and filling is set and golden, about 45-50 minutes.
Cool tart. Serve at room temperature with lightly sweetened whipped cream or ice cream.

Note: you may want to cover your pie crust edges so that they don’t over-brown as mine did.

Friday, December 24, 2010

Rosemary Pine Nut Cookies

I'm sorry to do this, but I think I ought to give you all one last potential holiday recipe, and because these past few days have been crazy, I shall post this recipe without pictures. This will just be a one time thing though. (Well... I can't make any promises)

These Rosemary Pine Nut Cookies are delicious, with a mild nutty flavor, and they carry a beautiful background tone of rosemary. I have yet to make these for someone and have them be received with anything other than pleasure and enthusiasm.

If you're dying to know what these things look like, I can tell you that they are beautiful sand colored cookies and absolutely worth making. These cookies are great for gift-giving, or just as a quick dessert to wrap up a good meal. They also work great with a cheese plate.

Happy Holidays!


Rosemary & Pine Nut Shortbread Cookies
adapted from Martha Stewart

½ cup pine nuts
1 tbsp chopped fresh rosemary
1 stick unsalted butter, softened
¼ cup packed dark brown sugar
¼ cup granulated sugar
1 tsp vanilla extract
½ tsp salt
1 ¼ cups all-purpose flour

Preheat oven to 300 degrees.

Pulse the pine nuts and rosemary in a food processor until finely chopped and combined.

Add the butter, brown sugar, granulated sugar, vanilla, and salt. Pulse until smooth. [Note: It may be necessary to pull out the blade and scraped down the sides so that everything is evenly incorporated.]

Add the flour. Pulse until dough comes together and is fairly smooth.

Turn out dough onto saran wrap, and form a log with a diameter of approximately 2 inches (give or take). Refrigerate until firm, about 30 minutes, or up to 2 days.

Unwrapped the dough and slice the cookies into ¼ inch rounds. [Optional: dust with coarse/demerara sugar]

Transfer to an aluminum or parchment-lined baking sheet. Bake until just golden, 13 to 15 minutes.

Let cool, then store in an airtight container for up to 5 days (if they last that long) at room temperature.

Yields about 3 dozen cookies

Saturday, December 18, 2010

Wintery Cranberry Relish with Crushed Pecans

It's really been feeling like winter here the past few days. The wind howls at night, we've seen some flurries, anytime I look out my window, I see hats and scarves and thick coats with hoods.

Winter time always seem to signify busy time, doesn't it? If it's not holiday shopping, then it's having guests over or family visits. Work gets stressful and the days feel shorter (the days are shorter). So I won't linger. I will give you a recipe, but with no real story.

This is actually my sister's recipe. It is one that she found, I believe, in a newspaper somewhere (most likely the Washington Post) and then, as she proudly told me, edited a bit. Which is quite a feat for her. She's a recipe follower. She doesn't improvise with food. But this time she did, and so now I give you, with some of my own edits as well, a raw cranberry relish recipe that is at least ten times better than it sounds. It's also fantastically healthy and easy to make. Give it a go. Really. You'd be surprised how delicious it is, especially when served with a pecan pie or some ice cream or alongside some rosemary chicken. It goes great as a replacement for cranberry sauce or jelly in holiday meals.


Raw Cranberry Relish with Crushed Pecans
1 bag fresh cranberries
2 whole clementines, organic, skin included, washed and cut into chunks
3/4 cup shelled pecans
1/3 cup mild honey, such as clover
1/4 tsp cinnamon
dash of ground cloves

Place all ingredients into the bowl of a food processor and pulse. Blend to get a uniform, finely chopped mixture. If you want a crunchier texture, blend less. Chill until ready to serve.

Be sure to make at least 4-5 hours in advance. The longer the mixture is allowed to sit and marinate (in the fridge), the better it tastes, since the raw cranberries mellow out.

Tuesday, December 14, 2010

Cranberry Pecan Tart

I like pecan pie as much as the next guy, but I've always thought that it was a teensy bit one-dimensional. I mean, you have that gooey, delicious buttery brown sugar filling... and nuts. That's it. And there's nothing to balance the sweetness. Sure, you can throw in some dark chocolate chips or some brandy or rum, but sometimes I just want a little bit of something extra.

Well, this year, I found it.

This beauty, this Cranberry Pecan Pie, is perfect for entertaining and perfect for a night in. Not only is it really easy to make--just throw everything into the food processor!--but it also has just the right balance of sweetness, nuttiness, and slight tartness, with all the warmth of a proper holiday dessert.

My family liked this recipe so much that after I made it for our Thanksgiving dinner, it was gone the next day (remember, this was just for my little family of four), and I was asked to makethree more tarts the next day. Three. This is definitely a winner.

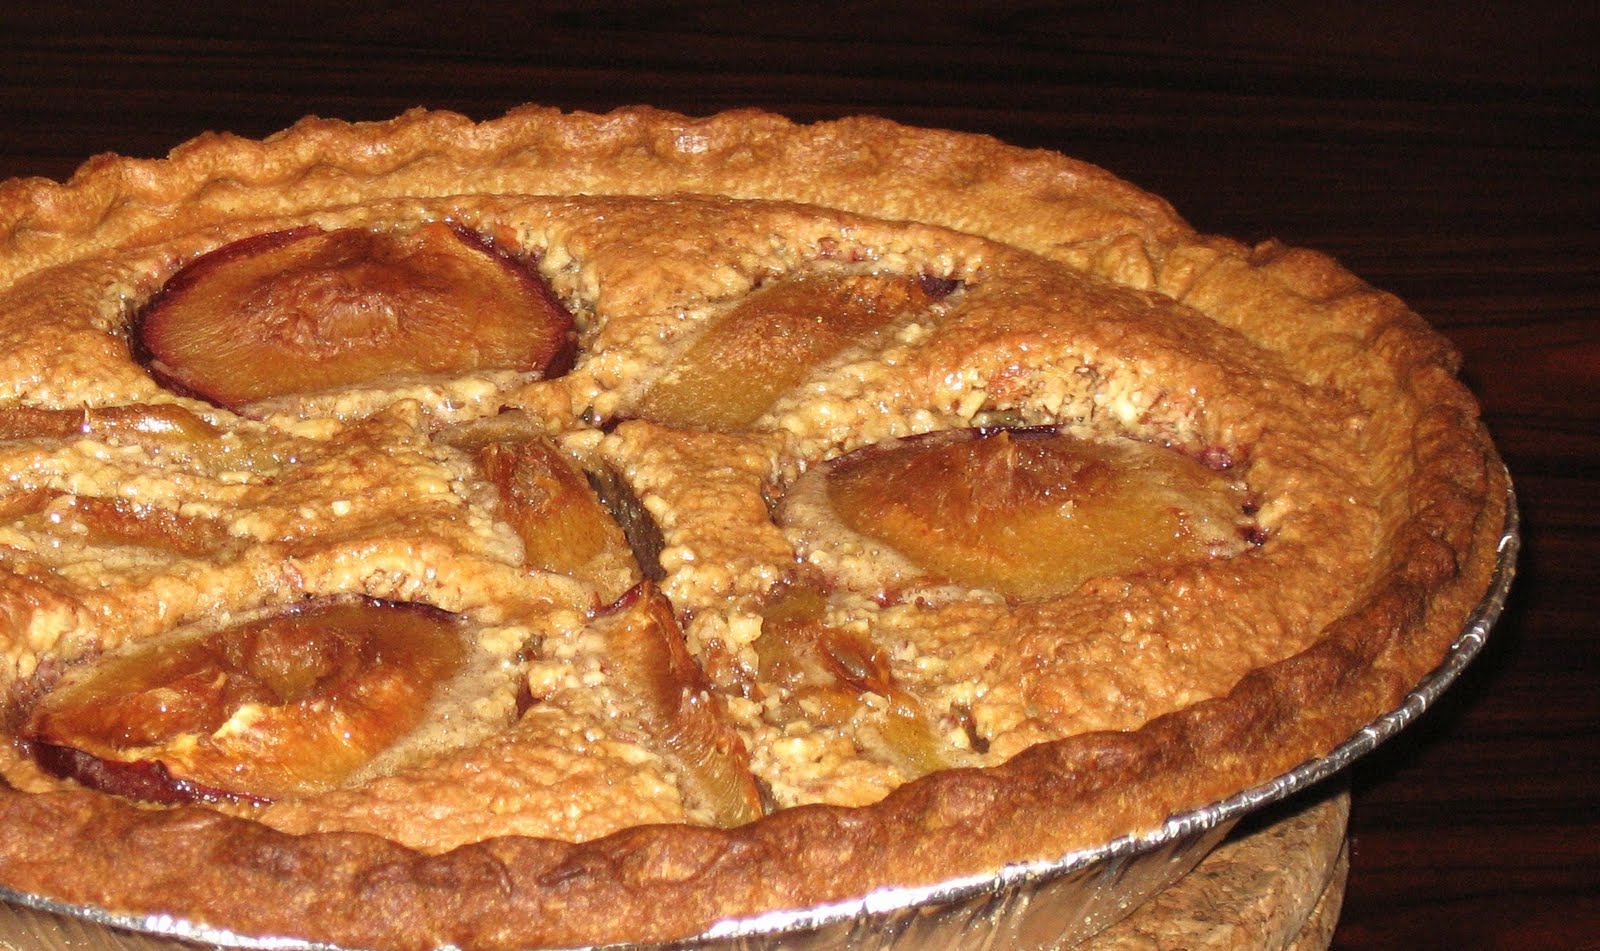
This tart has all the deliciousness of a traditional pecan pie--yes that buttery, gooey, filling--with the added bonus of some fruity, sweet, tart deliciousness from the cranberries. If you want to go with nuts on top, you can (you can see that I did for one of my pies, above, and neglected to add them for the pie below), or you can just decorate with some pretty red berries.

Either way, if you have a holiday party coming up, or some guests on their way over, or are just going to spend the night in and want a delicious but easy dessert to fix for yourself, this is the way to go. This tart is also delicious the next day, so it's great to make ahead of time (my family actually debated whether or not it was better the next day).

And since the holidays aren't the time to worry about your waistline, I just want to add that this is heavenly when served with lightly sweetened, fresh whipped cream. Just take some heavy whipping cream, some sugar and maybe a pinch of salt. Extra points if you use vanilla sugar or some good vanilla extract.


Cranberry Pecan Tart
adapted from Smitten Kitchen

1 cup pecans
½ cup cranberries
2/3 cup sugar
1 ½ tbsp all-purpose flour
zest from 2-3 clementines or 1 orange
½ tsp ground cinnamon
dash of ground ginger (optional, for a kick)
dash of ground cloves
½ tsp salt
1 ½ tbsp rum
1 large egg
1 large egg white
9 tbsp (1 stick + 1 tbsp ) softened butter
handful whole, fresh cranberries
handful whole pecans
1 pre-baked tart shell

Finely grind pecans, cranberries, and sugar in food processor. Pulse in flour, zest, cinnamon, ginger, salt, and rum till smooth. Add egg and egg white and blend. Blend in softened butter. Transfer filling to medium container, cover, and chill at least 3 hours. (This can be done up to 2 days in advance.)
Preheat oven to 350°F. Spread pecan filling evenly in baked tart crust. Arrange cranberries and pecans decoratively on top. Bake tart on middle rack until golden, about 45 minutes. Cool.


Important note: Only bake your tart shell until just done. Do not wait until it is golden. For example, packaged pie crusts say to bake for 10 minutes at 400°F. I baked mine for only 8-9 minutes. This will prevent your crust from over-browning later and you having to cover it with tin foil.

*Additional note: I used salted butter. I find that it provides a rounder flavor. I tend to think that people who talk about using unsalted butter to "control the salt content" are a little silly.

Monday, November 1, 2010

Almond Croissants

I’ve always had a weakness for almond croissants. We used to have a bakery near my house called La Vie de France which made the most wonderful almond croissants, but then one day they closed, and I mourned the loss of my croissants for months. They were so good!

There are other places that do sell almonds croissants, but for some reason they always lacked the amount of almond flavor and almond filling that I was looking for. They were, quite frankly, disappointing. And then one day it occurred to me that rather than continuously buying these disappointments and hoping that they would not fail me, I could, instead, try my hand at making them.

Since then, I haven’t bought an almond croissant. This is one of those cases where the homemade product is significantly better than the store bought product. It is also a breeze to make. Just buy some croissants from your grocery store/bakery (or you can make them yourself, but that will be another post, another day) and then with about 10 minutes of prep and 15 minutes of bake time, you will have some of the most delicious croissants ever.

The filling can also be made ahead 1-2 days of time and refrigerated, and any extra filling can be baked as little cookies (a take on florentines, if you will) at 350°F for 10-15 minutes, until golden brown.

Croissants aux amandes
150g sugar
150g almonds
100g (1 stick) salted butter, cut into pieces
1 egg
Splash of milk
½ tsp almond extract
8-12 croissants
*optional: a dash of vanilla powder or a few drops of vanilla extract

Preheat oven to 350°F.

Combine the almonds and sugar in the bowl of a food processor and pulse until of a desired consistency. (I like my fine, but if you like bigger pieces of almonds, don’t grind for as long)

Add the butter, pulse to mix. (If using unsalted butter, add in a generous pinch of salt)

Add the egg, milk, and almond extract , pulse to mix.

Cut the croissants in half (like you would a sandwich bread), then spread 1-2 tbsp of the filling inside. How much filling you put it is up to your personal preference and the number of croissants you have.

Optional: Spread 1-2tsp of filling on top of your croissant. This creates a nice crispy topping, but isn’t all that attractive, so it’s all about personal preference

Bake for 15 minutes on middle rack. Allow to cool (seriously), then enjoy!