Wednesday, December 25, 2013

Merry Christmas!


Christmas Dinner with the Foodie Next Door: cornbread stuffing (aka cornbread dressing), sticky rice, herbed potatoes, rosemary Cornish game hens, Brussels sprouts with bacon, and the traditional teacup soup (the only part that is tradition is serving it in our teacups... the soup changes every year).

May you and your family also eat well and enjoy the sweetness of each other's company.  Happy Holidays, readers!

Saturday, August 24, 2013

Mini Cherry Pies


Confession: I have never truly made pie dough from scratch.

I love to bake, but my thing is normally cookies and cakes.  If I made pies or tarts, normally I just buy a grocery store crust.  Is that terrible?

But then the other week I saw a recipe for mini cherry pies that you can make in a muffin/cupcake tin!  The recipe, which, of course, involved making pie dough from scratch, seemed delicious, and sweet dark red cherries happened to be sale at the grocery store, so it seemed like good time to try the recipe and to try my hand at making pie dough from scratch.  Also, miniaturizing desserts is a great way to make them easy to pack for lunch or even to entertain (no messy cutting and serving)!


I know cherry season is ending soon, but this recipe is perfect, even with frozen cherries or end-of-season bruised/not-so-beautiful fruit.  The cherry, vanilla, and rum flavors are classic, and this pie dough was a cinch to make and tasty just as flaky and perfect as I hoped it would.


Wednesday, August 14, 2013

Fresh Peach and Ginger Beer Cocktail

I am currently sitting in my apartment drinking a cocktail.

I rarely ever drink cocktails because, quite frankly, I don't like the taste of most alcohol.  This is very prohibitive to my drinking.  I love looking at the drink descriptions at bars and speakeasies, but most of the time when I actually taste the drinks, the vodka/tequila/rum/whatever hard liquor it is ends up making me wish I ordered a virgin.  Of course most of the time if you go to a bar and try to do that you'll get weird looks.  So this is why sometimes I find it's nice to just fix myself a drink to enjoy at home, while reading a book on the very comfortable couch that B. and I bought.

Recently I've actually been making a lot of these "mocktails" all thanks to the beauty that is my new hand held blender (also called a stick blender or an immersion blender).  Given all the wonderful fresh fruit that is in season right now, I've taken to making drinks built on various fruit purees.  While it's easy to use sparkling water as a base, I also love using ginger beer.
Ginger beer, generally, is not actually alcoholic, and in my experience, tends to just be synonymous with ginger ale (though I'm sure some experts out there will know be able to explain the difference, I shall not feign knowledge of things when I am truly ignorant).  I find that the slight "bite" and spiciness of ginger beer works as a great addition to all fruit bases.  One of the "mocktails" I've made is a lovely plum, ground cinnamon, honey, and ginger beer drink, which I think would be a great pre-dinner drink in the fall (maybe even before Thanksgiving?).  A summer-flavored mocktail I made had raspberries, lime juice, cane sugar, and ginger beer.  This was lovely, although I did discover an unpleasantly large amount of raspberry seeds in the bottom of my glass, which I did not consume.

This particular cocktail that I am sharing today combines the classic flavors of peach, vanilla, and ginger, which to me are all the things that should be in a good peach pie or cobbler.  It captures the quintessential elements of summer in a glass.  If you are so inclined to add alcohol to this, vanilla rum (aka vanilla extract in the making; see my previous post) also is a delicious addition.


In order to make this, if you don't have an immersion blender, go ahead and pull out the big guns; you can easily double this recipe and make it in a normal blender.  If you don't use all of the fruit puree, you can save it in the fridge for another day; it will keep for at least 3 days.

 Fresh Peach and Ginger Beer Cocktail
makes two martini glasses (easily scaled up as needed)

2 peaches
1-2 teaspoons vanilla sugar or regular granulated sugar
splash of vanilla rum or regular rum (recommended: Bicardi Gold Dark Rum)
1 bottle of ginger beer (recommended: Reed's Extra Ginger Brew)

The ratios here are just suggestions.  I like my cocktails a little fruitier than some.  The amount of sugar you need to use will also depend on how ripe and sweet your peaches are.
For each of my cocktails, I used about 3 tablespoons of peach puree (that's a little less than one peach), 1/2 tsp of vanilla sugar, 1 tsp of rum.  Shake this in a cocktail shaker with some ice and then pour into a martini glass.  Top with ginger beer.

Optional: if you're feeling extra fancy, omit the sugar in the cocktail and instead just rim your cocktail glasses with some sugar.  (If you don't know how, this video is short and great.)


Now that you have this idea though, you can run wild with it!  Combine any fruit purees of your choosing, some ginger beer (or sparkling water), and an alcohol of your choice for a great cocktail.
And, before I go, I'll share one last little trick with you: if you want an easy way to clean your stick blender without risking cutting yourself, just fill a cup with some warm water and a few drops of dish soap and blend for 30 seconds, then rinse.  Presto!
Happy Wednesday!

Wednesday, August 7, 2013

Homemade Vanilla Extract with Rum

Recently, I decided to make homemade vanilla extract.  Because I enjoy baking, I can easily go through about 5-7 bottles of vanilla extract a year.  Each 2 ounce bottle costs about $3 in the grocery store.  When you think about what you're buying and how easy it is to make, the cost of store-bought extract is actually pretty high.  Also store-bought vanilla extract doesn't always provide as much flavor as I would like.  Sometimes I increase the vanilla in my recipes because I just want a deeper flavor profile.  If anything I just said rings true for you, homemade is the way to go.

So how do you go about making vanilla extract?  The process is fairly simple.  I should have done it a long time ago.  All you need is some vanilla beans, a glass container, and some rum/vodka/bourbon.

I actually decided to make homemade vanilla extract because I found a very nicely priced vanilla bean supplier online who had good ratings.  The company (who is not paying me for this and does not know I am writing this) is called Beanilla.  The are predominantly a vanilla bean supplier, though they also sell other products.  Currently, they are having a sale on Madagascar Bourbon Vanilla beans; you can buy a package of ten for $8.95, which, if you've ever looked at buying beans in stores or online you know is a great deal.  They also have free shipping right now for vanilla beans and they have a coupon code SAVE10, which gives you 10% off your order.  When I saw this, I had to order them.

I got my beans in the mail, vacuum packed, within a few days.  And they even slipped me an extra bean (accidentally, I assume), so that I got 11 vanilla beans for $8.05!  When I opened the package the beans were fragrant, moist, and very plump.  They were the highest quality vanilla beans I'd worked with in a long time.  The last time I bought vanilla beans at a grocery store in France, they were rather dried out when I worked with them.

The "recipe" for vanilla extract is very simple.  You just need to take your beans and split them in half.  Using a knife to scrape the seeds (actually called "caviar") from the pods and then add both vanilla seeds and the scraped out pods to a large glass container.  I used a bottle that I bought from Ikea for $3.99 (I'm listing the price here because again, this is far cheaper than anything you can find online).
 
Now everyone has different ratios that they suggest.  After much reading, I decided that I would use seven vanilla beans (one of which I scraped out the caviar from and used in a cherry compote), and about 4 cups of dark rum.  Many people use a much higher vanilla bean to alcohol ratio, but they also expect their extract to be done in about 6 weeks.  I am fine with letting my extract takes it time to reach maturity.  Also, vanilla beans continue add flavor as long as they are submerged in alcohol, so many people re-use their beans to continue making extract.  I simply started with a more dilute mixture and will wait longer, probably 9 weeks, before testing my solution.  This is what it looks like for now.


One handle of Bicardi Dark Rum (1.75L) cost me $21.39.  I used about half of this, so let's say that was $11.  The 11 pack of vanilla beans cost me $8.05.  I used 7 of them, so that comes to about $5.  The bottle that I bought was $4.  The total cost of making this thus is roughly $20.
That may seem a bit high for now, but again, I can continue to use these beans to make more vanilla extract afterwards.  Also, I used high quality ingredients that will impart far more flavor into my baked goods later on.  I imagine this could also be used to make some pretty amazing mixed drinks.
Hopefully this project turns out well!  I'll give updates as more time passes.

Monday, July 15, 2013

Cronuts - a food trend that the Foodie Next Door had to try

 Anyone who keeps track of food fads or reads the news regarding trends in New York City (or in the USA even) should know about Dominique Ansel's Cronuts.

The cronut craze has literally swept the nation.  Bakeries in big cities like LA, DC, and Chicago are taking note of the huge success of this new baked good and selling knock-off creations called doughssants, cray-nuts, and doissants.

So what are these things?  They are hybrids: half-doughnut, half-croissant.  A flaky, deep-fried pastry filled with sweetened cream, rolled in sugar, and glazed.  And apparently something about these creations has them in high demand because even though they are selling at $5 a pop, people have been lining up outside Dominique Ansel Bakery in Soho for up to 3 hours to wait for theirs.  The cronuts are so popular that people start waiting around 5 or 6am and the bakery sells out each morning within a couple hours of opening, even though each customer is limited to two cronuts.  Cronut popularity is such that people have started scalping theirs for $20-40!

Still on vacation and now happily settled into our new apartment just 20 minutes outside of Manhattan, B. and I decided to give up some precious sleep one morning and see just how good these things could be.  We woke up at 4:45am, took the train into the city and groggily got in line.  We decided to do this on a weekday, just to make sure we weren't standing in line just to have them sell out before we got to try one.  This ended up being a very good plan, because when we got in line, there were only about 20 people or so in front of us.  The line quickly got longer though, and stretched around the corner and down the block as it got closer to opening time.

When the doors opened at 8am, Dominique Ansel himself came out and allowed a wave of people inside.  Of course, as luck would have it, B. and I were at the exact cut off point and so we had to wait outside.  But then a girl from the bakery came out with a tray of fresh, hot madeleines.  Each person in line was allowed to have one.  It was so nice, especially after a long wait.

At last, we were allowed inside.  The line moved quickly and efficiently, as the cronuts are pre-boxed and almost everyone knew exactly what they wanted.  Because of the new limit of 2 cronuts per order, B. and I split up so that he could order two and I could order two.  I was afraid this might be a bit excessive, especially since that total order came to $21.78 (post-tax), but in the end I'm glad we got that many.


There was space at a table in front, so we sat down to eat ours right away.  B. saw how good they looked and declined my offer to split one, saying that he wanted his all to himself.

The first bite immediately showed the complex texture of the treat.  The fried, sugar coated exterior gives ways to a pleasantly chewy interior, much like a yeasted doughnut, except that it has an airy quality to it.  On the second bite, I got some of the filling - vanilla crème and blackberry jam.  The jam had some acid to it, which perfectly balanced the sweet and fat of the cronut.  The glaze was very sweet (clearly the ingredients were mostly sugar and very little actual flavoring) and a bit of an overkill since there was already a sugar coating.  The cronut is very filling.  You can definitely feel the calories from the butter of the dough and the fat from the frying.  If it hadn't been for the very long wait, I don't think I would have been able to eat an entire one.

Overall, we both enjoyed our cronuts, but the price tag is a hefty one.  I'd never pay more than about $2.50 for a croissant, and a doughnut needs to be really good for me to consider it worth $3.50, so this cronut cost significantly more than I'd be willing to pay for its parents.  The cronut also didn't have the flakiness I would expect from something that is supposed to be half-croissant.

Would I like to eat one again?  Sure.  Would I like to wait 3 hours in line and pay $5?  No, thank you.


Dominique Ansel Bakery
189 Spring St (between Sullivan & Thompson)
New York, NY 10012
Tel: 212-219-2773

Hours: 8am to 7pm (Monday to Saturday)
            9am to 7pm (Sunday)
Closest subway stops: Spring St (C-E) or Prince St (N-R-W)

Wednesday, June 19, 2013

Vietnamese Food that isn't Pho - A recipe for Bánh Bao

Being a non-Caucasian in America, I often get asked what my ethnic background is.  When the question is phrased as something less vague than "Where are you from?" (which normally prompts me to respond, "Maryland," because I now live in New Jersey and I am surrounded by the Jersey born-and-bred), I tell people that I am Vietnamese.  More than 90% of the time, the response I get is, "Oh my god, I love pho!"  The last word is always pronounced "foe."

I find it very weird.  Can you imagine if you told someone you have an Italian background the person replied, "Cool, I love spaghetti!"  It's strange.  There is so much more to my heritage and cultural background than phở, which, by the way, is pronounced "fuh-ah?"  Because Vietnamese is a tonal language, "phở" is pronounced like a question and as if the word had two syllables.

So instead of sharing a recipe for a Vietnamese noodle soup like bun bo hue or pho, today I want to share with you how to make Bánh Bao.  First, of course, I will tell you what it is.  Think of a stereotypical pork bun you get in Chinatown.  Now imagine that the doughy outside is fluffy and light and the inside has ground pork, eggs, and vegetables.  That is a bánh bao.

When I was growing up, this could serve as my breakfast, a snack food, or lunch.  The filling can be changed to be whatever you want, but the standard bánh bao has a piece of hard boiled egg, some ground meat, and normally lap xuong (also known as Chinese sausage, for all you non-Asians).  I love them.  They're nutritious and healthy, and once you make them, you can store them in the freezer for at least a month, steaming them in the microwave for about a minute whenever you want to eat one.

While writing this recipe, I was faced, yet again, with the problem of transcribing a Vietnamese family recipe into a recipe that others can follow.  On one hand, I was lucky that this recipe is one of the ones that my mother actually has written down, since most things she makes from memory.  On the other hand, the notes she had written read something like this, "half a bowl of milk, add to the flour until it feels right.  If it doesn't feel good, add more milk" and "1/4 bowl of sugar, if you like it sweeter (it tastes better like this)."  I had to ask my mother exactly what "one bowl" measures out to.  Thankfully, we made these together and I could get some measurements down for you.


Friday, March 15, 2013

No Bake Matzo Brittle (aka Chocolate Caramel Matzo)


This recipe really speaks for itself.  It's matzo covered in a layer of delicious caramel that snaps satisfyingly, just like a brittle should, and that caramel is covered in a thin layer of chocolate.  There can even be sea salt or chopped almonds sprinkled on top.

This is a fantastic snack, an easy dessert to make without turning the oven on, and it's great for entertaining.  Given that Passover begins this Monday the 25th, I thought it was an appropriate time to share this recipe.  I'm not Jewish, but I grew up with a good number of Jewish friends, so matzo  (note: singular is matzah) is a familiar thing to me.  I've had matzo brownies, matzo chocolate chip cookies, and matzo ball soup (which I love), but this is by far my favorite way of using matzo.  Of course, if you don't have any matzo on hand, you can also make this recipe with saltine crackers.

I feel like I must say, before sharing this recipe, that the photos really don't do this justice.  Melted chocolate and caramel are hard to capture with a digital camera in a way that captures all the beauty of the two.


Monday, January 21, 2013

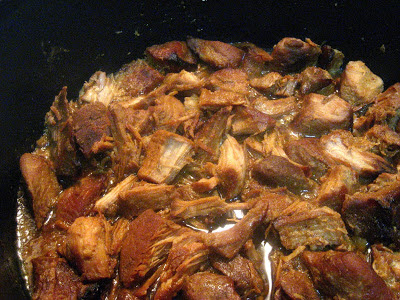
Slow-Cooked Apple Cider Pork on the Stove


There is a reason I don't post a lot of savory recipes on this website.  Quite simply: I don't have a lot of recipes.  By that I mean, I make different savory things to eat all the time, but I just don't keep track of what I'm using and how much of it went into the pot.  I do almost everything by eyeballing it or taste-testing; I don't use measuring spoons or cups except when I bake.  This, of course, makes it very hard to share recipes, because I don't even remember all the time what I put into my food.  If I think something needs some curry powder, I add some in.  If I think garlic would be a nice addition, in goes some garlic.  Because I cook for myself, I don't have to worry too much, because I know I'll eat whatever I put on the table.

What I am giving you here is my best effort at actually creating a recipe for other people to follow.  I had some country-style boneless pork ribs on hand that I used as the meat, but you can make this with pork shoulder or loin or such.  This inspiration for this meal was just that I wanted to get more flavor and moisture into the meat.  I don't actually like white meat, so I really shouldn't have bought it, but I did not realize how little dark meat there was in this cut.  Also, it was on sale.

I marinated the pork overnight with soy sauce, balsamic vinegar, and honey, and then I baked it in an oven at 350F until it was done (about 30-40 minutes).  Then, I decided to slow cook it on the stove, to really get the meat soft and tender, so that it would melt in my mouth.  I wanted that fall-off-the-bone pork texture, except that there was no bone for the meat to fall off of, but you know what I mean.

Pork and apples are a classic combination, and balsamic goes wonderfully with pork, so I made up a little recipe with what I had in my kitchen. The end result was absolutely delicious.  I love the way the meat just falls apart - it is perfect for a sandwich or with a salad - and the reduced cooking liquid makes an incredible sauce.  The apple flavor is so faint, it's almost like a homemade barbeque sauce, and who wouldn't like something like that?

Slow-Cooked Apple Cider Pork on the Stove


3 splashes of balsamic vinegar (probably about 2 tbsp)
1 splash of red vine vinegar (probably a scant tablespoon)
roughly 1 teaspoon of salt
2-3 cups of chicken stock (I used a homemade stock made with only chicken bones, breast meat, salt, garlic cloves, and water)
2 packets of instant spiced apple cider (I used Alpine brand, which contains sugar, malic acid, mltodextrin, tricalcium phsphate, apple juice solids, caramel color, sodium citrate, ascorbic acid, natural and artificial falvors, spice extractive... and now that I've written those ingredients, I'm horrified)
1/2 cup of unsweetened apple sauce (I used Motts because it was on sale)
3-4 cups of water
4 lbs of cooked pork (see above)
3 cloves of garlic
a splash of fish sauce because I'm Vietnamese  (optional)

Combine everything in a large Dutch oven or non-stick pot.
Bring the pot to a rapid boil on high heat, while stirring occasionally.
Once the mixture has come to a boil, lower the heat to medium so that it is still simmering.  For me, on an electric stove that goes from 1-2-3-4-5-6-high, I left the heat around 4.  Allow the mixture to cook for at least 1 hour and 30 minutes, with the lid on.  The meat will be tender at this point, but not falling-of-the-bone (if you have no bone, they it will not be at the point of pulled pork yet).

Stir occasionally and check the level of your cooking liquid, especially after about 45 minutes.  The liquid will reduce as it cooks, but if the sauce gets too thick and the level gets too low, it can burn; just add a bit of water (about 1/2 cup) if you see this starting to happen.  You can reduce the braising/cooking liquid at the end, after pulling all the meat out, if the sauce isn't thick enough for you.  In my case, I had to add more water 3 times during a total cooking time of 2 hours, and the sauce was perfect at the end (I had no need to reduce it).

After 1 hour and 30 minutes, reduce your heat to low.  If you like your meat to be very tender, crush the pieces of meat with a fork and allow to continue to cook for another 30-50 minutes, depending on the size of your pieces of meat.  I was working with pieces about the size of half a hockey puck and had a total cooking time of 2 hours.

Serve with veggies and some sort of carbohydrate for a complete meal.

Monday, January 14, 2013

Life, love, and some germs

I'm so out of it right now, I just read a recipe for "Chicken Liver Pate" thinking that it said "Chocolate Liver Pate."  I was fascinated, and it wasn't until I had read through the entire recipe and wondered to myself how the author could possibly put "chocolate" in the name and neglect to include it anywhere in the recipe that I went back and re-read the title and realized that was the one who was terribly mistaken.

Anyhow, I've been busy, as I always tell you.  But I have a very legitimate excuse (as I always do): I've been away in Paris.  I spent a lovely holiday with both my family and B.'s family.  I'm always amazed by how wonderful it can be to just do simple things with the man that I love.  Eat breakfast.  Go to the movies.  Go grocery shopping.  Clean an apartment.


But blissful as I may make our holidays sound, the reality is that for two days that we were together, I was truly, horribly sick.  I mean the kind of sick where I was sitting on the floor, unable to keep food or water down, and his brother and sister had to go out on Christmas morning to find a pharmacy that was open in order to buy me medicine.
Yet, even though I have never been so miserable in my life, it was also so nice to be taken care of by him.  He was wonderful to me.  I kept apologizing for being sick, and he stopped me at some point and told me, "I don't want to choose just the good moments. I am your partner."

It is those moments that I realize how lucky I am.  I know that with B., I will be taken care of.  I have someone who will hold back my hair, sit on the floor with me, and hand me toilet paper to use as tissues when I need it.  I have someone who will make me tea, heat up soup for me when my appetite returns, and carry me up the stairs when I'm too tired and in too much pain to do it alone.  I know that he will be there when I am at my worst, my least attractive, and my most vulnerable.  And for all this, I love him.

Of course, the way life is, in return for all his sweetness, I gave him my virus, and then he was horribly ill, but the point of this story is that what we have is great, germs and all.

As for any food news, before you know it, B. will be here again (long distance love is all about counting down the days in between seeing one another).  Hopefully, there will be no more germs and no more stories about sickness in the near future.

Happy belated new year, to all my readers.  Here's to hoping 2013 is even better than 2012!