

It's been a while since I really posted here. Life has been very crazy lately and it hasn't involved much sleep. The other weekend, for example, I slept a total of maybe 4 hours. Thank goodness sleep debt isn't financial debt, otherwise I'd have serious problems.
Anyhow, because of how things have been, I've had a recipe on file that I have wanted to share with you for weeks. So we have to backtrack a little bit. A month ago, I went to a potluck dinner party to, um, celebrate Christmas. [Whoops! Sorry this took so long to share!] It was among a big group of friends, and as usual I wanted to go with a dessert. I thought about baking something, but everyone always does cookies or cupcakes and, having recently made my first ever salted caramel frosting (more on that later), I was interested in trying a recipe with salted caramel and chocolate. Who doesn't like that combination?
 Because I love chocolate mousse, I decided to do a recipe with chocolate and salted caramel layers. The salted caramel mousse was my own recipe, completely written from scratch. I had looked up salted caramel mousse recipes online, but they all involved gelatin or they were chocolate and salted caramel (i.e. the two flavors were mixed and not kept separate). I don't have powdered gelatin and I wasn't interested in going to store to buy some, and also I had vegetarian friends who would be coming to the party and so using gelatin didn't seem too nice. Yes, agar agar could have been an option, but again, I didn't want to go to the store. So what is it that they say? Need breeds ingenuity? I decided to get creative.
I based the salted caramel mousse recipe off of other recipes I read for fruit mousses and for Italian meringue, so it used egg whites, whipping cream, and hot caramel. It turned out fairly well considering the fact that this was my first time completely making up a recipe. Granted, it wasn't quite as "mousse-y" as it should have been -- and by that I mean it could have been thicker -- but no one complained. In fact, many people at the party have been asking for the recipe since then, and so my apologies to them (if anyone's reading) for taking so long to post this.
This combination of salted caramel and chocolate is a real winner, and while it does take some time to make both of these mousses and layer them into little shot glasses, the delight you get from people who see these and try them makes it absolutely worth the effort. I forgot to count exactly how many little shot glasses I was able to make, but suffice to say it was enough for a party with more than 20 people. For anyone about to entertain, I would absolutely recommend this as a dessert. It's easy to make ahead of time and it's perfect for any and all occasions. The recipe can be fairly easily scaled up or down as well, based upon how many you plan to serve, and any leftovers still taste delicious the day after. Enjoy!
Chocolate Mousse
adapted from Cook’s Illustrated, 2006
[yield: approximately 15 individuals serving bowls]
12 ounces of dark chocolate, at least 60% cacao
3 tbsp cocoa powder
1 ½ tsp instant espresso powder
scant ½ cup water
1 ½ tbsp dark rum
3 egg, separated
6 tsp granulated sugar
scant 1/2 tsp salt
1 ½ cup + 3 tbsp cold heavy whipping cream
Combine the chocolate, cocoa powder, espresso powder, and water in a medium sized heatproof bowl. Melt over a saucepan of lightly simmering water (read: use a double boiler) or in a microwave. Stir frequently until mixture is smooth and well combined.
Add 3 egg yolks, 3 tsp of sugar, and the salt. Beat over the double boiler until smooth and shiny. Remove from heat and allow to cool.
Add the rum (or other kind of liquor) and stir till smooth.
In another medium sized bowl, beat the heavy whipping cream with 1½ tsp of sugar until fairly stiff peaks form (i.e. make whipped cream).
Then, in another medium sized bowl, using clean beaters, beat the 3 egg whites with 1½ tsp of sugar until soft peaks form.
Whisk about half of the egg whites into the chocolate mixture to lighten it. Then, use a rubber spatula to gently fold in the remaining egg whites until only a few white streaks remain.
Gently fold in the whipped cream until mostly incorporated and whisk together the mousse until there are no more streaks of white. Be very careful not to deflate the mousse!
Refrigerate for at least 2 hours. Best consumed within 24 hours, but will keep, covered, for about 2 days.
Salted caramel mousse
[yield: 4-5 cups of mousse]
1 cup sugar
2 tbsp water
1/2 teaspoon fine sea salt
2 tbsp heavy cream, room temperature
4 egg whites
1 cup heavy cream
First, beat the egg whites until medium peaks form. Set aside.
Stir together the water and sugar over medium heat in a saucepan until melted—about 3 to 5 minutes. Once dissolved, increase to high heat and cook, stirring frequently to prevent sugar crystals from forming on the sides of the saucepan. Cook until the sugar is amber, about 5 more minutes. It should be a dark coppery brown (but not burnt). Remove the pan from heat. Add the sea salt and heavy cream. Stir well to combine.
Now, very carefully and very slowly pour the salted caramel mixture (should be hot, but not scalding) into the bowl of egg whites whipping all the while with a hand held mixer. Be sure to pour the caramel in slowly and have your mixer turned on medium speed so that you do not scrambled your whites. The mixture will deflate a bit.
Whip your heavy cream on medium speed until it becomes whipped cream. Gently fold half of this into the egg-white and caramel mixture to lighten it. Then, fold in the remaining whipped cream.
Refrigerate for at least 6 hours. Best consumed within 12 hours, but will keep for about 2 days (it will deflate and separate a bit into a salted caramel liquid and a caramel fluff).
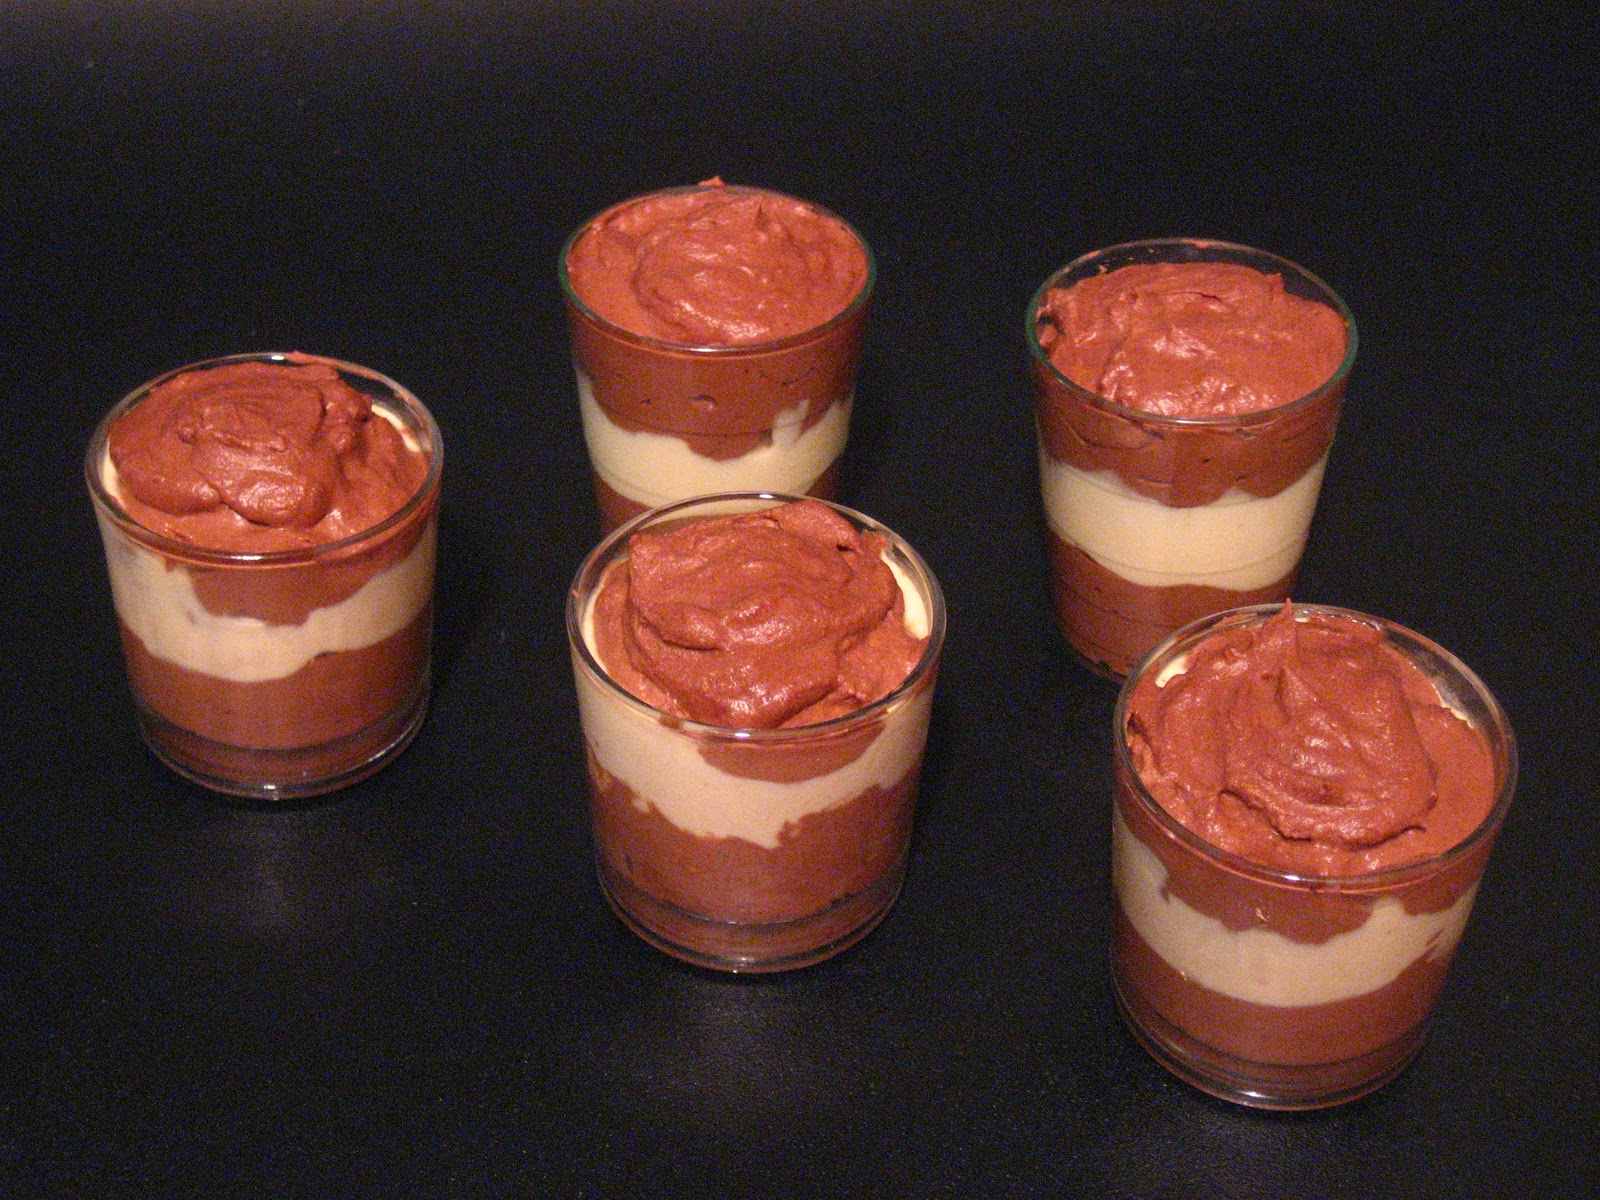
NOTE: If you are layering the chocolate mousse and salted caramel mousse, make the chocolate mousse first, then make the salted caramel mousse. Layer the mousses in your serving glasses before refrigerating. I did this with a spoon and gently tapped the glasses down to create even layers.
No comments:
Post a Comment