Wednesday, November 17, 2010

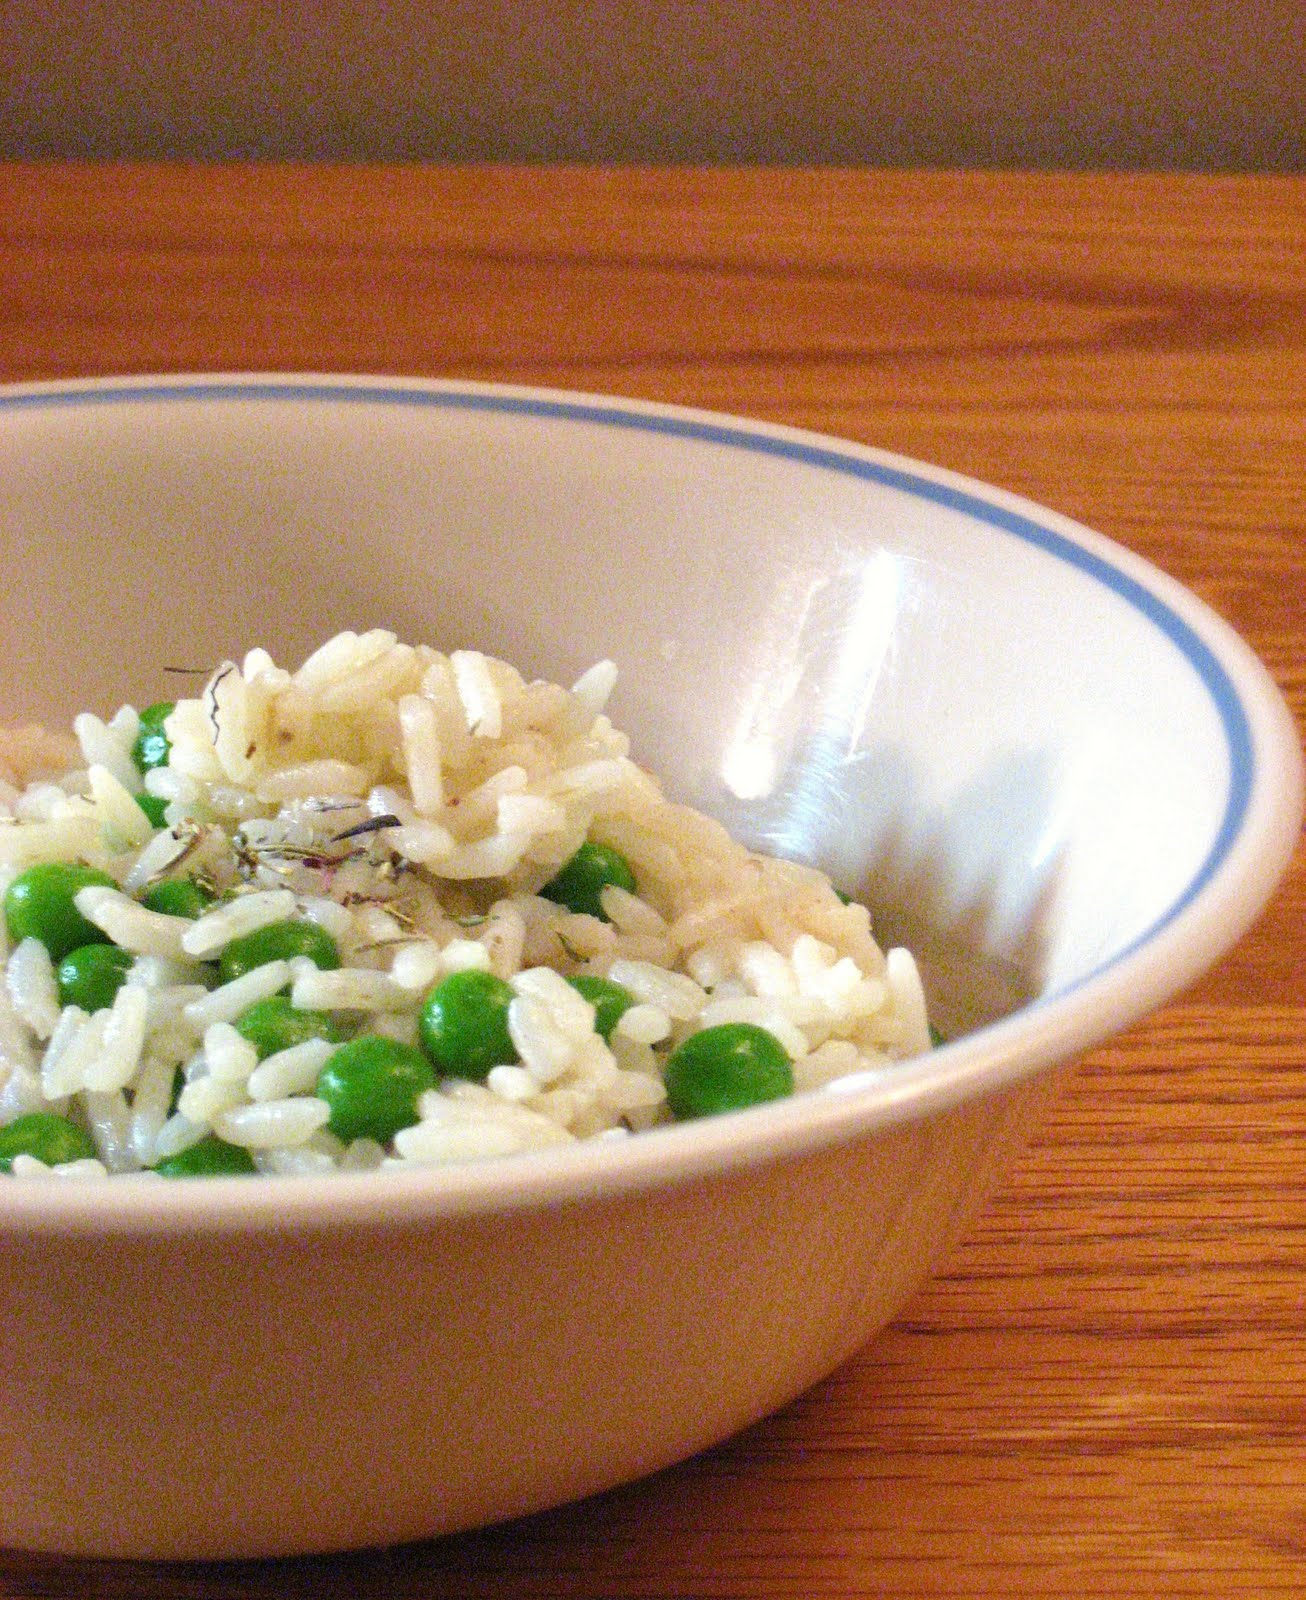
Pea Risotto

It is getting cold outside.

This isn't just the gentle cold of October that brings out the fall jackets. This is late November's cold. It is a more biting cold, a cold that calls for scarfs, but promises no snow. It is a cold that requires turning up the thermostat and bringing out the thicker blankets at night. This cold calls for risotto.

Risotto is one of those greats foods that I think is incredibly versatile, delicious, and fairly easy to make, yet not that many people do make it. I'm not quite sure why. I suppose it was just never popularized in regular households, which is shame, really, because it is such a perfect cold-weather food. It is also surprisingly healthy (I only say surprisingly because risottos can taste so rich and creamy), which is plus, since many hearty wintery meals can be heavy and full of cream or butter. Now, I don't have a problem at all with cream or butter, but sometimes I want a nice filling meal that doesn't weigh me down and make me feel like I need to take a nap afterwards. Thus, risotto. Unassuming, easily personalized, and not at all fussy. Risotto requires no intensive work or special ingredients.

So what are you waiting for? The cold, the wind, the rain, it all doesn't seem so bad when you've got a bowl on the table, ready to warm you up.


Quick Risotto
1 tbsp butter
2/3 cup long grain rice
3-4 cups chicken broth
2/3 peas (optional)
dash of milk (optional)
dash of oregano (optional)
salt & pepper

First off, I will admit that I used Uncle Ben's white rice (specifically, the "boil-in-a-bag" kind) because I had nothing better on hand. I don't think this significantly hurt my final product, because the risotto was still delicious, although if you have something else ready on hand, go for it!

I also used homemade chicken stock. I was never a homemade chicken stock kind of girl because it seemed like such a huge hassle, but now that I don't live with my family anymore, I find that making chicken stock is an excellent use of chicken "leftovers." Basically, whenever I eat rotisserie chicken, I avoid all the white meat (I'm not a white meat girl) and once I've eaten all the tasty bits, I collect all the bones and throw them into a pot with the leftover white meat, oregano, rosemary, onion, garlic, carrots, and water and let it boil and then simmer and reduce down into a delicious stock. Once the flavor is sufficiently concentrated, I remove all the bones/meat/veggies and salt to my taste. Sometimes it tastes so good, I'll admit to steal more than a couple spoonfuls before storing in fridge for cooking purposes. I told this to a vegetarian friend who was horrified by the idea of me drinking "chicken juice," but trust me, until you've made your own chicken stock, you really have no idea how wonderful it can be.

Okay, sorry for that tangent. Would you like to know how to make some risotto? Yes? Then we shall get started.

Melt the butter down in a 3-4 quart pot. Add the rice and sauté together until the rice is fairly translucent and has absorbed much of the butter. (If you feel like getting fancy, this is where you can also sauté some onions and garlic.)

Add about a cup of chicken stock, stir, keep on medium-low heat. This risotto is only about as needy as a five-year old child, meaning you don't have to be by its side all the time, but I wouldn't walk away for more than 3 minutes or so without checking back.

Once the rice appears to have absorbed the broth, add another cup of broth. Stir, allow to absorb as before. Then add another cup of chicken stock. Stir, allow to absorb. Add another cup of chicken stock and, if you feel like it, this is the step where you should add your defrosted frozen peas. Allow the broth to be absorbed. If you like a creamier taste, this is when you can add a splash or two of milk (the % fat shouldn't matter too much, I generally use skim milk). Once the milk has been absorbed, take the risotto off the heat, season to taste and sprinkle with a dash of oregano.

The whole cooking process should take about 25-30 minutes and should yield over 2 cups cooked risotto (rice alone, not including peas), which, for me, was enough for two meals and a snack.

When I'm feeling particularly miserable after a cold day, I serve this with a little pat of salted butter and a soft cooked egg. It is delicious, heart-warming, and the perfect thing to eat in bed while watching Lucky Number Slevin, if you were the type to do that sort of thing.

Also, I should note that this risotto heats up in the microwave just fine, although you might want to add a splash of milk or chicken stock to it before heating. I heat one bowl for 1 minute, stir, and then 30 more seconds before serving.


Thursday, November 11, 2010

Mini Cheesecakes

I was intimidated by the idea of making my own cheesecake for a long time. First of all, many cheesecake recipes involve making a huge 9-inch cheesecake and baking it in a waterbath and then turning off the oven and leaving the cheesecake in the half-open oven for a designated period of time and it all seemed like so much work for something which I would either have to eat all by myself, or which I would have to make to share with company, without knowing how the results would turn out.

But then I found this recipe for mini cheesecakes a few years ago which is not only simple, but also requires no water bath. It is also delicious and relatively quick.

This recipe makes about 12 mini cheesecakes, which can be baked directly in muffin tins. I especially like this recipe because it gives you a nice thick crust (which I like). If you're not a huge fan of the crust, then simply make thinner crusts and pour in more filling! If you have extra graham cracker crumb, you can easily bake this for about 5-10 minutes (depending on how much you have), and it makes an excellent topping for ice cream, yogurt, or baked fruit.


For the crust:
1 ¾ cups graham cracker crumbs
3 tbsps sugar
Pinch of salt
4 tablespoons melted butter

For the cheesecake:
½ lb (one 8-ounce box) cream cheese, at room temp
1/3 cup sugar
pinch salt
½ tsp vanilla extract
1 large egg
1/3 cup heavy cream

Stir the crumbs, sugar and salt together in a medium bowl. Pour over the melted butter and stir until all of the dry ingredients are uniformly moist.
Butter your cupcake tins.
Divide the crust ingredients among the cupcake tins. Use your fingers to pat an even layer of crumbs along the bottom of the pan and up the sides a bit (to create a nice crust).
Put the pan in the freezer while you preheat the oven.
Preheat oven to 350°F and bake for 5 minutes.
Set the crust aside to cool on a rack while you make the cheesecake.
Reduce the oven temperature to 300°F.

Beat the cream cheese at medium speed until it is soft, about 4 minutes.
Add the sugar and salt and continue to beat another 4 minutes or so, until the cream cheese is light.
Beat in the vanilla. Beat in the egg. Remember: you want a well-aerated batter.
Reduce the mixer speed to low and stir in the heavy cream. Once incorporated, beat till completely smooth.

Pour an even amount of batter over each cheesecake crust.
Bake the cheesecakes at 300 degrees for about 15 minutes on the middle rack (time can be anywhere from 15-20 minutes), until they seemed fairly set, although still a bit jiggly in the center. Then, turn off the oven, leaving the cheesecakes in the oven. Leave for 10-15 minutes.
Remove from oven and cool.
To remove the cheesecakes from the cupcake tins, I find it easiest to just throw the entire pan (after it has cooled a bit) into the freezer and removing the frozen cheesecakes. They hold their form better that way. Refrigerator-chilled cheesecakes tend to cling to the pan and break apart.

Enjoy!


Saturday, November 6, 2010

Homesickness & Vietnamese Food

The idea of home is simultaneously a complicated and a very simple thing for me.

While I was born in the United States and I've grown up all my life knowing the same suburban area and the same house, I never really felt American per se. I was taking trips to France before I even knew how to spell my own name and when I was growing up, I honestly thought pâté was the French version of peanut butter. Because my grandparents lived in the Paris, I spent many summers in France, and I often felt that I was culturally more French than American. But I had been raised in a Vietnamese household, and when I was thirteen, I went to my parents' homeland for the first time, and I quickly fell in love. There was a raw beauty in the humid, hot country which called to me and which brought me back again and again.
These mixing cultural dynamics made it so that it has been very hard for me to claim a home anywhere. I am by nationality American, but ethnically Vietnamese, and my heart is split between France and Vietnam. So a home in any particular country, really, is a complicated idea. I could never choose.

But home home, the place I can always come back to, the place I grew up in, that has always been the same. I have always known the same house, the same walls, the same rooms, the same beautiful kitchen and backyard and neighborhood. And the food. I have always had Vietnamese food. It has been a part of my life, a part of how I was raised. And when I am homesick, even though I don't always have a clear idea of where exactly I am homesick for, I always know what it is that I ache for.

I am homesick for Vietnamese food not just because of how it tastes, but because of how it makes me feel. There is something in my mind which always connects Vietnamese food with love and care. Perhaps because I have seen, while growing up, how much work must be put into many dishes. Traditional Vietnamese dishes can be very involved and they can require many different ingredients or many steps in the process of cooking. And for all my love of food, I have never truly made Vietnamese food on my own.
Of course, when I am home, I often make banh bao with my mom and I will help out in the kitchen, and sure, I can make the simple rice gruel we call chao like my mom and I can marinate meat in nước mắm and I can stir fry just like my dad, but I could never put together a truly traditional meal without help.
So now, as it is getting cold and I am starting to feel homesick for something that is missing in my life, I can't help but think of Vietnamese food. I think of my mom's mi vit tiem and my dad's plantain, eggplant, and tiá tô stew. I think of things that we go out to eat, Vietnamese food that we order casually, as though it were nothing special to find such things in the states, and fully expecting to be satisfied.

Here, where I am now in this not-very-diverse part of New Jersey, it has proven impossible to find Vietnamese food, authentic or not. I mourn the loss of what I had before, when I was living in the D.C. metropolitan area. Oh dear Vietnamese restaurants, when I return this winter, I will not take you for granted.


Nem nướng cuốn. This can be described as a spring roll, with grilled pork and fresh herbs wrapped in thin rice paper. Delicious and yet also very healthy. My sister and I love it when we come home and my mom sets up some kind of gỏi cuốn for us to make.


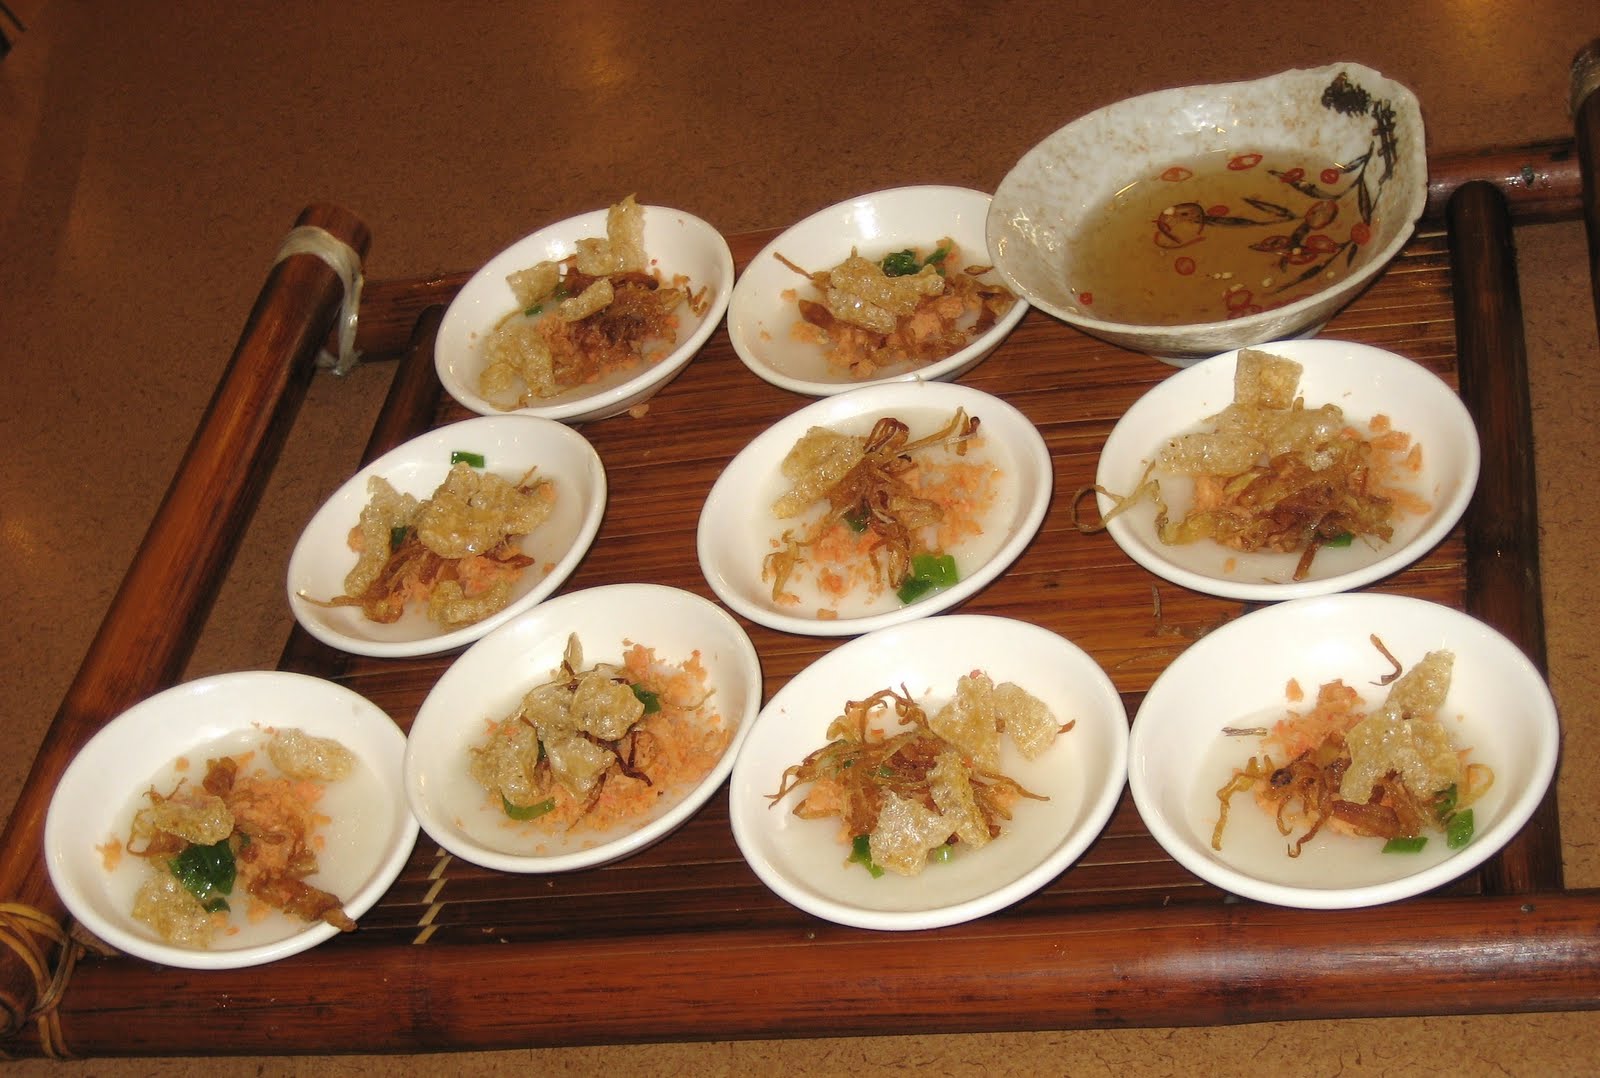
Bánh bèo chén. This is the central Vietnamese version of the dish (the South Vietnamese version is not normally served in these little bowls, and it is served with mungbean paste on top). It is hard to describe, the little bowls hold a glutenous kind of semi-pancake, which is topped with dried onions and ground shrimp paste. It is eaten with nước mắm, or fish sauce.


Bánh khoái. As my mom says, this is the Central Vietnamese version of our South Vietnamese bánh xèo. I love the crunchiness of the "pancake," as Americans often translate it. This is really nothing like a pancake though. It is thin and crispy on the edges, although the middle is somewhat thicker and wetter and more "cake-y." The inside of this one, as you can see, has mushrooms and bean sprouts. Often there is pork or shrimp. We eat this with lettuce and other fresh herbs, as you can see from plate piled high with leafy greens.


Bún hến with bánh đa mè đen (black sesame rice cracker). This is a noodle dish with little clams, bean sprouts, herbs, and a chili paste, and can be enjoyed with broth on the side and, again, nước mắm.


Funny enough, all these things which I had just described for you are Central Vietnamese dishes, but my parents are not from Central Vietnam. My dad is actually from the North, and my mom is from the South. The cuisines of north, central, and south Vietnam all differ, and yet the best images I could find to share with you were from Central Vietnam. In the future, I will have to honor my parents by sharing foods from north and south Vietnam. I am homesick for it all.

Monday, November 1, 2010

Almond Croissants

I’ve always had a weakness for almond croissants. We used to have a bakery near my house called La Vie de France which made the most wonderful almond croissants, but then one day they closed, and I mourned the loss of my croissants for months. They were so good!

There are other places that do sell almonds croissants, but for some reason they always lacked the amount of almond flavor and almond filling that I was looking for. They were, quite frankly, disappointing. And then one day it occurred to me that rather than continuously buying these disappointments and hoping that they would not fail me, I could, instead, try my hand at making them.

Since then, I haven’t bought an almond croissant. This is one of those cases where the homemade product is significantly better than the store bought product. It is also a breeze to make. Just buy some croissants from your grocery store/bakery (or you can make them yourself, but that will be another post, another day) and then with about 10 minutes of prep and 15 minutes of bake time, you will have some of the most delicious croissants ever.

The filling can also be made ahead 1-2 days of time and refrigerated, and any extra filling can be baked as little cookies (a take on florentines, if you will) at 350°F for 10-15 minutes, until golden brown.

Croissants aux amandes
150g sugar
150g almonds
100g (1 stick) salted butter, cut into pieces
1 egg
Splash of milk
½ tsp almond extract
8-12 croissants
*optional: a dash of vanilla powder or a few drops of vanilla extract

Preheat oven to 350°F.

Combine the almonds and sugar in the bowl of a food processor and pulse until of a desired consistency. (I like my fine, but if you like bigger pieces of almonds, don’t grind for as long)

Add the butter, pulse to mix. (If using unsalted butter, add in a generous pinch of salt)

Add the egg, milk, and almond extract , pulse to mix.

Cut the croissants in half (like you would a sandwich bread), then spread 1-2 tbsp of the filling inside. How much filling you put it is up to your personal preference and the number of croissants you have.

Optional: Spread 1-2tsp of filling on top of your croissant. This creates a nice crispy topping, but isn’t all that attractive, so it’s all about personal preference

Bake for 15 minutes on middle rack. Allow to cool (seriously), then enjoy!

Wednesday, October 27, 2010

Lavender-Scented Crème Brûlée

I love the smell of lavender, but it is often hard to bake with lavender and make it the star of the show without using excessive quantities. And as lavender can be difficult to obtain in the States and can come at a rather high price, I'd prefer to simply not bake with lavender than to waste it on some new project that isn't guaranteed to be a hit. Until this.

This was just a simple crème brûlée recipe, nothing special. In fact, the only reason why I even have this to share with you is because I was home, at my parents' house, and they had a little carton of heavy cream that was not being used and would have been thrown out it not used for some purpose soon. I abhor throwing out perfectly good food so I looked up some recipes with heavy cream, but everything seemed so involved. Then my mom found this in one of the cookbooks lying around the house. It seemed simple and we had all the necessary ingredients (milk, sugar, and eggs... how hard is that?), so we decided to go for it.

There was just one thing: the original recipe called for orange blossom water, which, honestly, does any regular cook ever have on hand? On a whim, we decided to replace it and use lavender. Since the lavender would be steeped in the milk and cream, not much would be needed, and as there were no other strong flavors involved in this recipe, the lavender could truly be the star. And it was.

This dessert was such a hit, we ended up going out and buying another carton of heavy cream so we could make it again the next night. And the recipe is so incredibly forgiving that when I accidentally added over twice the amount of milk needed the second time around, everything turned out fine. Actually, it was more than fine; it was delightful.


Lavender-Scented Crème BrûléeAdapted from Baking: A Commonsense Guide
236mL (1 cup) whipping cream100mL milk (2% works fine)
62g sugar (granulated works fine)
½ tsp vanilla sugar
10-20 lavender buds
2 egg yolks
1 egg white

pinch of salt (optional)
topping: 3 tbsp sugar


Preheat your oven to 275°F.
Combine the whipping cream, milk, sugar, vanilla sugar, and lavender buds into a pot and bring to a boil, stirring occasionally. If using salt, add at this point.
After the mixture has come to a full boil, turn off the heat and allow the lavender buds to steep for about 5 minutes.
Meanwhile, mix the egg yolks and egg white with a whisk or hand mixer.

The cream mixture should have cooled down slightly at this point. Strain out the lavender (and any milk solids) and then pour the mixture into the eggs. (I didn’t worry too much about tempering, even though my milk was very hot) Mix/whisk to combine.
Divide evenly into 4 ramekins. Place them in a pan with enough hot water to come halfway up the side of the ramekins.  Put tin foil over the ramekins to "seal them."
Bake for 1hr 15 min in the water bath.
Cool/refrigerate until almost ready to serve.
Before serving, sprinkle each ramekin evenly with the sugar.
Broil on low, watching carefully, for about 1-3 minutes until the sugar has melted and caramelized. (Alternatively, you can use a chef’s blowtorch)
This can be served immediately or can be refrigerated for up to 1-2hrs before serving.
*note: Conversion factors for your convenience: ½ pint = 236 mL = 8 fluid oz. = 1 cup

Also, if you want to use
vanilla extract, add this at to the mixture AFTER the eggs and hot cream mixture have been combined. Do not cook the vanilla extract, as this will dissipate the scent.

Friday, October 22, 2010

Cinnamon and Vanilla Baked Figs

Figs.

Fresh figs.

Fresh, ripe, black figs.

I was so happy to have these in my possession. So happy to be able to open my fridge, take out a fig, and snack on it. Unfortunately, my slow hoarding of the fruit meant that soon, the figs were past their prime. I mourned only momentarily, because then I remembered how delicious baked figs are. You don't need to get fancy. No need for tarts or pastry dough or almond frangipane (though the combination of baked almond frangipane and figs is amazing). Just baked figs, with a little bit of sugar and spice to bring out its beautiful natural flavors.

To start, I sliced the stems off my four figs and then made four slits in the top of the fruit (like quartering them, except without slicing through). Then I combined about 1-2 tbps salted butter, a dash of ground cinnamon, about 1/2 tsp of vanilla sugar, and a pinch of salt (yes, more salt). I topped the figs with this mixture, pushing it down into the center of the fig a bit using a chopstick.

Then, I baked the figs for about 25 minutes at 350°F in my toaster oven (no reason to use the big oven when I'm only doing four little figs). After 25 minutes, I removed the figs. A lot of delicious fig juice had seeped out of the fruit, so I spooned this back on top of the figs, kind of like basting a turkey.I popped the figs back into the toaster over for another 15 minutes at 350°F. You can taste test at this point, and see if your figs are sweet enough for you. Normally, I like to top them one last time with a dab of salted butter and a sprinkle of vanilla sugar and let that caramelize before I eat them.

They are delicious on their own, but if also wonderful with toasted almonds or vanilla ice cream.


Cinnamon and Vanilla Baked Figs.
A beautiful way to start the weekend.

Sunday, October 17, 2010

Lunch at Volt (with wine pairings)

I've been to Volt several times for lunch in the past, but those times were before Bryan Voltaggio entered Top Chef and became famous and everyone suddenly knew about the little gem in Frederick. Since the Top Chef extravaganza, I haven't eaten there, and so my family and I decided it was time to put Bryan to the test. Was the business boom going to hurt the quality of food?

We made our reservation for lunch today in early September and we still had difficulty getting the day and time that we wanted; the place is absolutely booked now. I don’t think you could walk in, unless you wanted to eat in the lounge.

We all decided to order from the three-course prix fix lunch menu ($25), with my mom opting to also try the wine pairing ($15).

Before ordering, each table is given thin house-made breadsticks. This time, they were salted and coated with fennel pollen. They were a little salty for my taste, but they are always a nice touch, and the flavors do change.

For our first course, we enjoyed a shitake velouté with pinenut sabayon, chili oil, and opal basil. The velouté and sabayon worked incredibly well together; their smooth, earthy tones sang of autumn. The flavor of the shitake really shined. Surprisingly, while the dish was velvety and creamy in texture, it did not feel heavy. My only complaint was that as the size of the portion was very generous, after a while, the dish rang a little bit as “one note.” I think had there been a textural component—say something crispy or chewy (e.g. toasted pine nuts or caramelized onions)—this would have been bumped up to the next level. As it was, we gave it a solid 8.5 out of 10.

For the pairing, we had EIEIO, which is the "Swine Wine" (there was a pink pig on the label) from Oregon. It was a Pinot Noir, light on tannin with a nice acidity. It was a successful pairing.

Next, we had Cherry Glen Farm goat cheese ravioli with butternut squash, maitake mushrooms, and sage air. This dish was very flavorful and had a lot of character. Although it was rich, it was neither overwhelming nor heavy. We couldn’t get any real flavor from the “air” (which is the foam that you see), but other than that we didn’t have any complaints. Again, a solid 8.5 out of 10.

Lastly, we had the Tuscarora Farm organic beets with Cherry Glen Farm goat cheese and upland cress. This was simple but elegant, and we liked how light and airy the goat cheese was. This appears to be a staple at Volt, as we’ve seen it on the menu (and we have eaten it) in years past. We gave it an 8 out of 10, because while there was nothing wrong with the dish, it did not wow us.

For our second course, or main course, we ordered the Barramundi with cauliflower variations, beluga lentils, verjus, and cilantro. This fish was flaky and perfectly cooked so that the meat remained moist, even while the skin was crispy. The sweetness and crunch of the cauliflower was a nice contrast to the melt-in-your-mouth lentils. We gave this a 9.5 out of 10. It would be hard to get any better. The wine pairing for this was a glass of Durigutti (Bonarda grape) from Argentina. This wine had a nice fragrance, robust structure, long finish, and was not acidic.


The next main course was this pork tenderloin with Brussels sprouts, braised red cabbage, and mustard greens. The Brussels sprouts popped with flavored, and the braised red cabbage was surprisingly sweet; we actually thought it was beets at first (especially given the vibrant color). The mustard greens were surprisingly not bitter, and the pork tenderloin was tender and juicy. We gave this dish a 9.5 out of 10 and we all agreed that we would be happy to order it again.

Then we had this marinated grilled hanger steak with Rick’s Yukon gold potatoes, chive pudding, lobster mushrooms, and bacon lardon (supplemental cost of $12). The steak was a little salty, and while the meat was bold and very flavorful—and I mean deeply so—it was a little too much. The steak was also fairly chewy. While there was nothing really wrong with the dish besides the slightly generous sodium content, it did not meet our expectations for something which had a supplemental cost of $12. We gave it an 8 out of 10.

The last second course/main course was this Freebird Farms roasted chicken and smoked chicken sausage with roasted shallots, confit potatoes, maroon carrots, and yellow oyster mushrooms. I had some doubts about this, as I find chicken to be a very plain meat and I think that ordering it in a restaurant is often a waste of an opportunity to be adventurous, but we gave this a chance because of our waitress’s recommendation, and the dish won us over. The chicken breast defied all expectations of what a chicken breast should be. It was unbelievably juicy and succulent. The natural sweetness of the chicken was astounding. The chicken sausage was fragrant with fennel, and the shallots, potatoes, carrots, and mushrooms did very well in their supporting rolls. We gave this a 9.5 out of 10. Who knew chicken could be so good?

A variety of breads are always offered along with the first and second course. Typically there are two rolls and one biscuit. On this occasion they offered an olive and rosemary roll, which was nicely seasoned (perhaps a little too generously salted), a chive biscuit, which was soft, flaky, and fragrant, and a French sea salt roll, which we didn’t try. All of their breads are baked in-house, so they are constantly turning out fresh batches, and they are perfect for sopping up every last drop of jus or soup in a bowl or plate.

Before our desserts arrived, our waitress brought us this orange mint semifreddo. It was an incredibly kind gesture. When making our lunch reservation, we had told them that it was my dad’s birthday and upon arrival, we discreetly reminded our hostess. We had thought that there would just be a candle, or at best “Happy Birthday” written on the dessert plate; this gift was an unexpected surprise (especially as it is not featured anywhere on the menu). And it was the perfect pre-dessert dessert: delicately sweet, fragrant with orange, and deliciously creamy.

Afterwards, our real desserts were brought out.

We started with this Gala apple tart with mascarpone gelato and opal basil. The baked apple was soft and sweet, but the dish wasn’t as strong or bold or original as his typical desserts. Thus while we enjoyed it, we gave it only an 8 out of 10. The wine pairing for this dish was a Kanu, which is a late harvest Chenin Blanc from South Africa. This was sweet and fragrant, and everyone enjoyed it.

Next, we had the textures of chocolate with dark chocolate ganache, chocolate caramel, and raw organic cocoa. This is a classic. Bryan Voltaggio has always featured some sort of “texture” chocolate dish on his dessert menu. Sometimes it is dark chocolate, sometimes it is mint chocolate, sometimes there is espresso, sometimes there is white chocolate. It always works, but the dark chocolate variation is my favorite. The dark chocolate ganache was incredibly smooth, and my mother, who does not like chocolate, raved about the taste of this. The marriage of all the elements—caramel, tuille, ganache, sorbet, cocoa—produced a symphony that we rated a very solid 9.5 out of 10. My favorite element? The tuille. I would come back for it again and again. I think this one element also displayed the talent in the kitchen. The tuille was slightly bitter—as good dark chocolate is—but the bitterness was well balanced by the sweetness of the caramelized sugar. Nothing was overwhelming, nothing was too much; it was perfectly balanced.

Lastly, we had the goat cheese cake with d’Anjou pear, spiced vanilla ice cream, and citrus tuille. This dessert was amazing, and incredibly sophisticated. My dad proclaimed that this was as close to a religious experience as he was going to get. The pear was cooked somehow so that it was firm—not mushy—and and yet infused with flavor, and the “crumb” that went along with the goat cheese worked nicely to mimic the crust of a cheesecake. There was nothing wrong with this dish and nothing that could have been improved—except, perhaps, a slightly larger portion size, as we couldn’t get enough of it. We gave this a solid 10 out of 10.

Before our desserts came out, my sister jokingly said she was afraid that dessert would be wonderful, because then the meal would have been flawless. As it was, dessert was wonderful, and the meal was very close to perfect.

With the check came four little poppy seed cakes for us to take home (one for each person). These little take-home treats are another standard at Volt, like the pre-meal breadsticks and the house-purified water (which is offered as either sparkling or still water). They are another great touch that adds to the fantastic experience of dining at Volt.

And the price? Unbeatable. We all agreed: there is no other place that you could get this quality of food (and service) for $25. We left happy and satisfied. The fame, or perhaps recognition, that Bryan Voltaggio gained from his time on Top Chef was well earned. Bryan, you never disappoint. I am so glad I live close enough to be a semi-frequent visitor.


228 North Market Street
Frederick, MD 21701
Tel: 301-696-8658

Overall rating for the price: 9.5 out of 10

Wednesday, October 13, 2010

Chocolate Chip Banana Bread

I think that by the time you reach your mid twenties, if you're a baker, you must have a banana bread recipe. It's just one of those things, kind of like how everyone has a way in which they like their salad.

Well, here's how I like my banana bread: nut-free, fat-free (you read that right), moist, filled with chocolate chips, and covered with a beautiful cinnamon sugar crust. In fact, now that I've got this recipe, I no longer feel the need to try any other banana bread recipes, because this one is the one. It's like they say: sometimes, you just know.

And the great thing about this recipe is that it is very forgiving. I appreciate forgiving recipes. This is not because I am a klutz in the kitchen, but because no one wants cooking or baking to be a stressful activity. It's supposed to be relaxing. Forgiving recipes help you relax.

This recipe is especially nice because it is flexible in terms of the star ingredient: the banana. I have made this many times, and it seems that this bread works just as well with two bananas as it does with three bananas, or five; just scale up or down. The ripeness of your banana also doesn't seem to be a huge factor in the quality of the final product, so if you're a little impatient and can't wait for your bananas to get that spotted black, really ripe look (the paper bag trick never seems to work as quickly as I'd like it to), that's okay. A plain yellow banana should work just fine. Just remember to really mash the fruit up.

Lastly, because I've always liked the "crusts" of bread (I've never been particularly fond of the slightly boring texture in the middle of breads, cupcakes, or muffins), I tend to spread my batter out of a little thinner in pans. So while this recipe can be made in a loaf pan, I like to make it in an 8x8 pan, simply because I like edges and crusts more (especially this cinnamon-sugar crust). If you know you like more substance to your bread though, and you want more of a bread shape than a cake shape, bake in the appropriate sized pan.

This recipes makes two pans, which may seem like a lot, but then you should remember that it's incredibly healthy and can be easily frozen and defrosted or given away to friends. So, make the whole recipe. Don't scale it down. I actually scaled it up from the original recipe, since one little pan was never enough.

Banana Bread with Chocolate and Cinnamon Sugar

Adapted from Orangette’s recipe

5 ripe bananas (any size will do)
3 large eggs
1½ cup granulated sugar
3 tsp ground cinnamon
1½ tsp vanilla extract (or vanilla sugar)
2 ¼ cups all-purpose flour
1½ tsp baking soda
1 ½ cups semisweet/bittersweet/dark chocolate chips

For topping:
4 Tbsp granulated sugar
1 Tbsp demerara sugar (if you have it)
½ tsp ground cinnamon

Preheat the oven to 375 °F. Butter two 8-inch square pans.

In a medium mixing bowl, mash the bananas with a fork or potato masher (this can also be done in a food processor). Add the eggs, and mix well to combine. Add the sugar, vanilla, and cinnamon, and mix till smooth. Add the flour, baking soda, cinnamon, and mix until just combined (don’t worry too much though; I’ve never had a problem with overmixing). Add 1 cup of the chocolate chips, and stir. Distribute the batter into the buttered pans.

In a small bowl, combine the topping ingredients. Sprinkle evenly over the batter in the pans, and then top with the remaining ½ cup chocolate chips.

Bake for 35-40 minutes in the middle rack, or until a toothpick inserted into the center comes out clean
.

This banana bread is delicious out of of the oven, delicious after it has cooled on the kitchen counter, delicious after sliced and toasted in a pan with a little pat of butter, delicious out of the fridge, and delicious out of freezer. (Yes, I've tried it all of these ways.) And really, I have to say, if you've never tried baked goods fresh out of the freezer, do it. It is amazing what a difference it can make. Sometimes I'll freeze my chocolate chip cookies or my cupcakes (sans frosting) and then eat them like that. The crumb texture doesn't change, but somehow the flavors are different. Certain flavors become muted when cold, and then when they hit the warmth of your tongue, they just explode; the difference is astounding.

Happy baking!

Thursday, October 7, 2010

Scrambled Eggs Two Ways

I think I may be a convert.

I think I might slowly be turning into an olive person. I don't mean that I have any plans to go out and buy myself a jar to snack on or that now I'm primping my salads with olives or that I have a sudden urge to serve my alcohol with the skewered green ellipsoids, but I have made a discovery. Scrambled eggs with olive paste.

It is just as good as I thought it would be. Actually I do think this could probably be improved, but I wanted so much to share this with you, I didn't want to bother with a secondary experiment since I don't have the ingredients right now.

So what did I do? I had planned to caramelized some onions and then add some garlic, the Paté di Olive di Gaeta, and some diced tomatoes, but when I went to get onions, they did not look good, and neither did the tomatoes, and I didn't want to use poor quality ingredients, so instead I went with some nice cauliflower.

I cooked the cauliflower in a pat of butter first, to get some color on it, and then I added a tiny bit of minced garlic. I would have added more, but hey, this was like date #15 or something between me and the olive paste, and I like her (of course it's a her, she's complicated, but she just wants to be loved) and so I let her take center stage, hence why I added over ½ tsp of the olive paste (that stuff is strong). Then I cracked in 2 eggs and scrambled!

I don't think I'd entertain with this, because 1) you don't entertain with scrambled eggs and 2) the olive paste does turn the whole thing a weird grey-green color that honestly, I associate with mold (e.g. the kind that grows on spaghetti sauce if you leave it in the fridge for too long), but it did taste good.

The natural sweetness of the cauliflower and the egg goes really well with the olive paste, and the saltiness of the olives means that you really don't need to add more than a very light sprinkling of salt. (I was, of course, very liberal with my black pepper.)

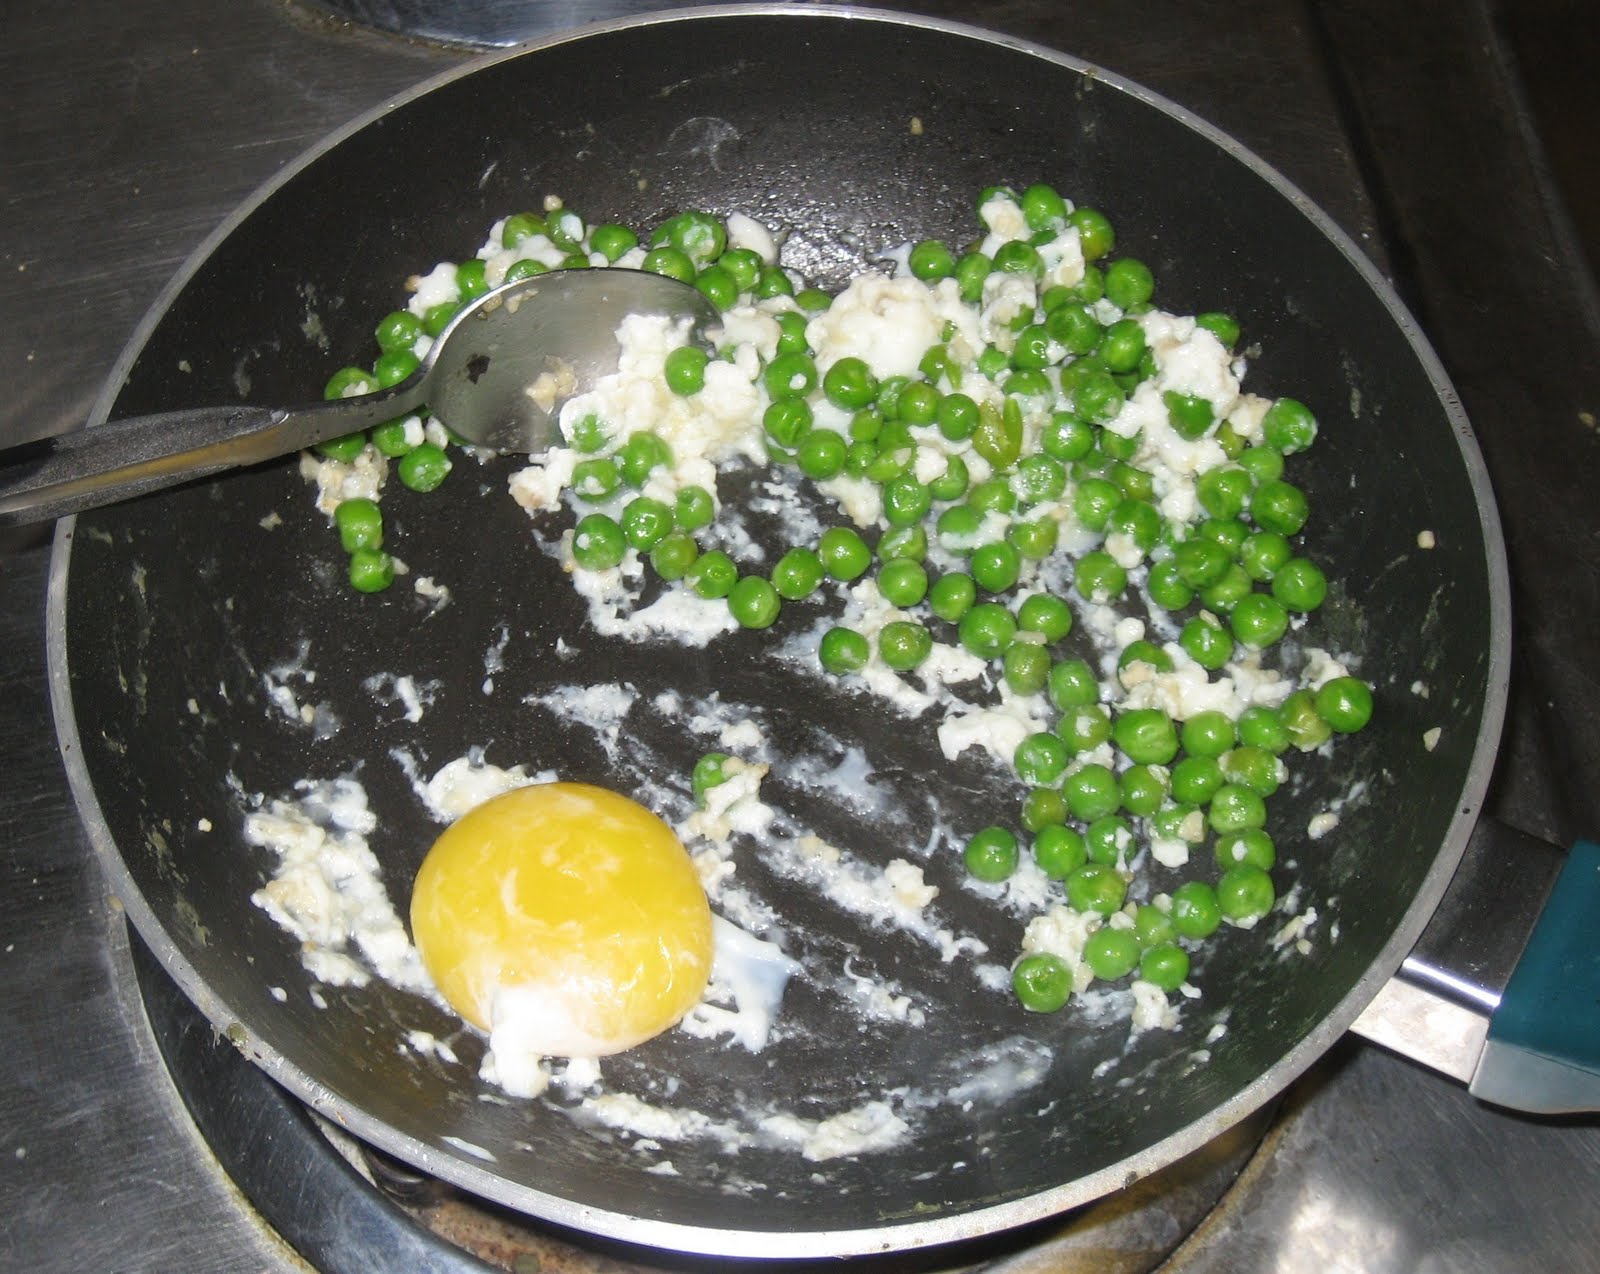
In order to use up some random leftovers (namely, petite peas), and also because I loved cooked eggs where the yolk stay whole and is kind of runny, I made what I call a "fake scramble." This is a technique I've perfected over time, and what it involves is cracking an egg into a hot pan as if you would make it sunny-side up, but then tilting the pan and carefully using a spoon to separate the whites from the yolk. You definitely need a good non-stick skillet for this, to prevent the yolk from getting stuck to the pan and breaking when you're nudging the yolk around and getting it away from the whites.

The reason why I like this is because I love my yolk runny, but I'm not a huge fan of undercooked whites. This techniques allows me to scrambled my whites while cooking my yolk just enough so that it is definitely properly cooked, but still deliciously soupy on the inside (although upon re-reading, "deliciously soupy" doesn't sound as delicious as what I was trying to express). Then I can break my yolk over my scrambled whites and have a delicious meal that is mine all mine.

So for the second scramble, I gently sautéed some petite peas in butter with minced garlic, and then added in one egg. Once my fake scramble was done, I combined a little bit of the scrambled egg #1 mix with the scrambled egg #2 mix, and then I pierced my lovely yolk, and tada! A lovely lunch. Really, you should try it some time. The blanket of creamy yolk over the peas, cauliflowers, and scrambled eggs with olive paste was delicious.


NOTE: For those of you who are so inclined to try this Olive Paste and don't have random friends who bring things back for you from Europe, I can tell you that this would be really easy to make, if you can just get your hands on some good quality black olives. The olive paste is really just olives, specifically Olive di Gaeta (varietà itrana), extra virgin olive oil, and a bit of salt. Get all your ingredients, throw the olives (pitted!) into a food processor, give it a whir, and slowly add in the olive oil till it is the consistency you like. Then salt according to your taste. Easy!

Sunday, October 3, 2010

Not an Olive Girl

I am not an olive girl. I've never really enjoyed the taste of olives. Briney, mildly bitter, slightly sour... they have a combination of flavors that I think you either love or hate, and I'm afraid to say I've never loved them.

At the same time, I'm not the type of person who refuses to try new foods. I think it's very important for people to be open-minded and expand their horizons, especially when it comes to what they eat.

Thus, when a friend brought this Paté di Olive di Gaeta back for me from Italy, I knew I would have to try it. First, it was a gift, and secondly, he raved about its taste, and it sounded good.

Because I know that I am not a huge fan of the taste of olives, I decided to test it out in an unintimidating form so that I could learn to like it before my brain automatically recognized the taste of olive and rejected it. I figured that some cinnamon raisin bread would be the perfect vehicle of transmission (oh yes, now you see my biology background rearing its head). I felt the sweetness of the raisins and the scent of the cinnamon would work well to compliment the darker flavor of the olives.

Also, because olives can be acidic, I thought I would mellow out the flavor a bit with some peanut butter, especially since peanut butter and cinnamon raisin bread get along so well.

So, for my first exposure, I toasted myself a slice of cinnamon raisin bread, spread a very thin layer of peanut butter on top, and then spread a layer of the olive paté on top of that.


The result was a complex meld of flavors that worked to highlight and complement each other very well. As I had predicted, the fat of the peanut butter helped to smooth out some of the bitterness in the olive paste, and the slightly sweet raisins provided a nice balance to the acidity.

While it may not have been the traditional way in which olive paste is eaten, I liked my slow introduction to the flavors. It was like a first date; the olive paste did not reveal all of its complexities and I, allured by what I had seen the first time around, had to come back for date #2.

This "second date" had to be more traditional. I wanted to see the olive paste shine by itself and see if we could get along together without any distractions. So I tried the paste the second time around on thick toasted breadand not that processed, bleached, pre-sliced stuff, but real breadand I enjoyed it.

Apparently me and olive paste get along rather well. I'm not saying I would eat it by the spoonful all by its lonesome, but I'm not giving this away to anyone else and I'm not exactly sharing. Who knew I would ever become the girl who hogged olive paste to herself? I certainly didn't see this one coming.

Since then, I've been enjoying the olive paste, hoarding it to myself, eating it sometimes on cinnamin raisin bread, sometimes with peanut butter, and occasionally with chocolate spread (oh yes). Soon I think I might introduce it into an omelet or scrambled eggs, perhaps with some caramelized onions and tomatoes.

So while this probably isn't the start of a life-long love affair, I believe it may develop into a beautiful friendship.